The Maestro3 Command Line Interface (CLI) is a unified tool to manage your Maestro services and resources

Project description

The Maestro3 Command Line Interface (CLI) is a unified tool to manage your Maestro services and resources. With just one tool to download and configure, you can control multiple resources Maestro provides from the command line and automate them through scripts.
Synopsis
m3 <command> [parameters]
Use m3 command help for information on a specific command. The synopsis for each command shows its parameters and their usage. Required parameters are marked with the star (*) character.
Installation
Pre-requisites
The installation of m3 cli assumed that you have Python3.10 and pip installed. Use the following commands to install the tools in case they are not installed.
Windows
Guide for python3 installation
Linux
Guide for python3 installation
Mac
Guide for python3 installation
Installation
 NOTE: Due to the best Python practices, it is recommended to use virtual environment to protect against dependency breakage. You can perfrom m3cli tool installation without this step. Need to mention that in case you want to install the to the created virtual environment you will need to activate the virtual environment with installed M3CLI before using it.
The guide how to install and activate virtualenv you can find below for the supported platforms:
Windows
Guide for virtualenv installation
Create: virtualenv -p python3 venv
Activate: venv\Scripts\activate.bat
Linux/Mac
Guide for virtualenv installation
Create: virtualenv -p python3 .venv
Activate: source .venv/bin/activate
To install m3-cli tool use the command listed below installation command.
NOTE: Replace tool version with the version number you need (see CHANGELOG.md or setup.py).
pip install m3-cli
Configuration
Before using m3 cli execute commnad m3 access to set up all needed settings.
In case you want to configure all needed settings manually, please set up the following environmnet variables:
M3SDK_ACCESS_KEY: Specifies an M3 access key associated with Maestro3 user;M3SDK_SECRET_KEY: Specifies the secret key associated with the access key. This is essentially the "password" for the access key.M3SDK_ADDRESS: Specifies the address of the Maestro3 environment.
Or you can set credentials non-interactively using m3 access command with
specified parameters:
m3 access --access_key <access_key> --secret_key <_secret_key> --api_address <api_address>
After this a default.cr file with the access parameters you provided will be
created in a .m3cli folder inside your home directory.
Obtaining credentials
To get your credentials please login to the Maestro3 and follow the guide below:
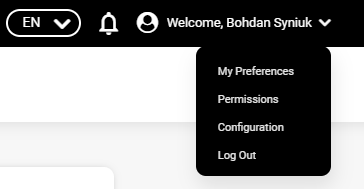
- Switch to My Account page:
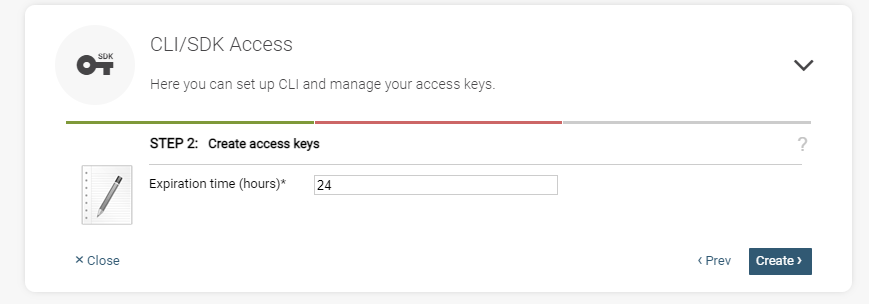
2. Start the 'CLI/SDK Access' wizard:
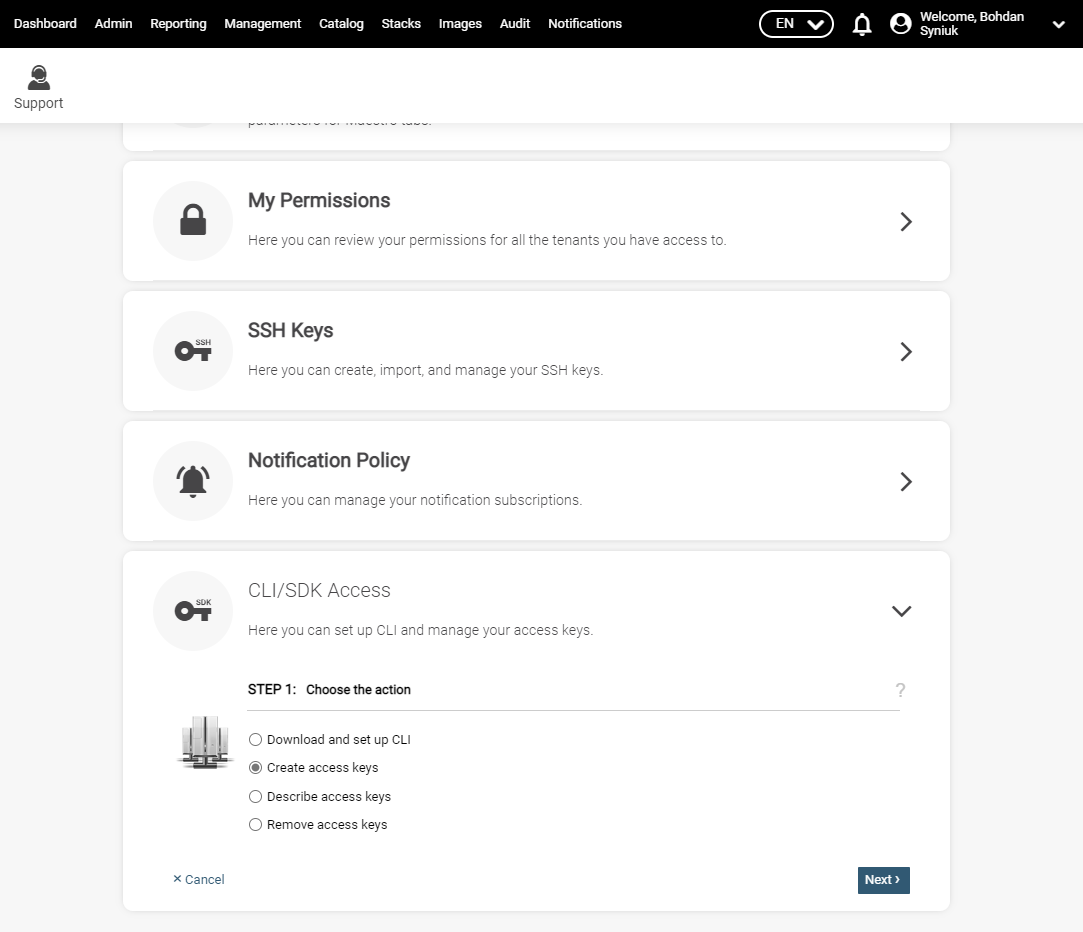
3. Specify the expiration time for the credentials:
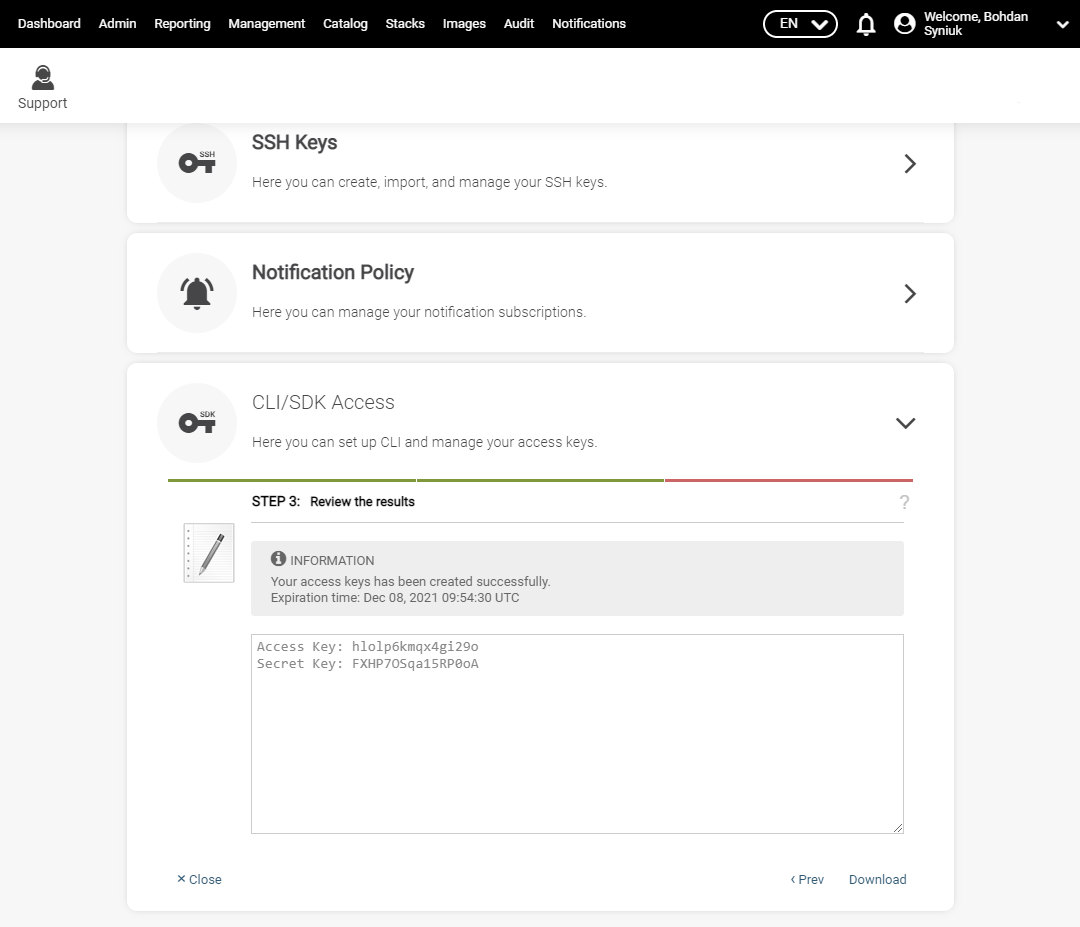
4. Obtain your credentials and export access key to environment variable M3SDK_ACCESS_KEY, and secret key to M3SDK_SECRET_KEY
Optional configuration
The following environment variables could be used to override default values m3 cli uses:
M3CLI_CONFIGURATION_FOLDER_PATH: Specifies the path to the directory containing files with the actual commands and parameters definitions (commands_def.json, commands_help.py). The default value: internal application path.M3SDK_VERSION: In case you need to specify SDK version. The default version is "3.2.80".M3CLI_DEBUG: in case you need debug mode set to this env variable value True. The default value is "False".LOG_PATH: in case you need to store the m3cli log file by the custom path.
Usage examples
After you have installed the tool and set the credentials as environment variables, the m3 cli is ready to be used.
NOTE: The development of the Maestro3 CLI is still in progress. Examples below contain demo data. Will be updated.
To get information about the available commands/parameters just run the m3 as
it is displayed below:
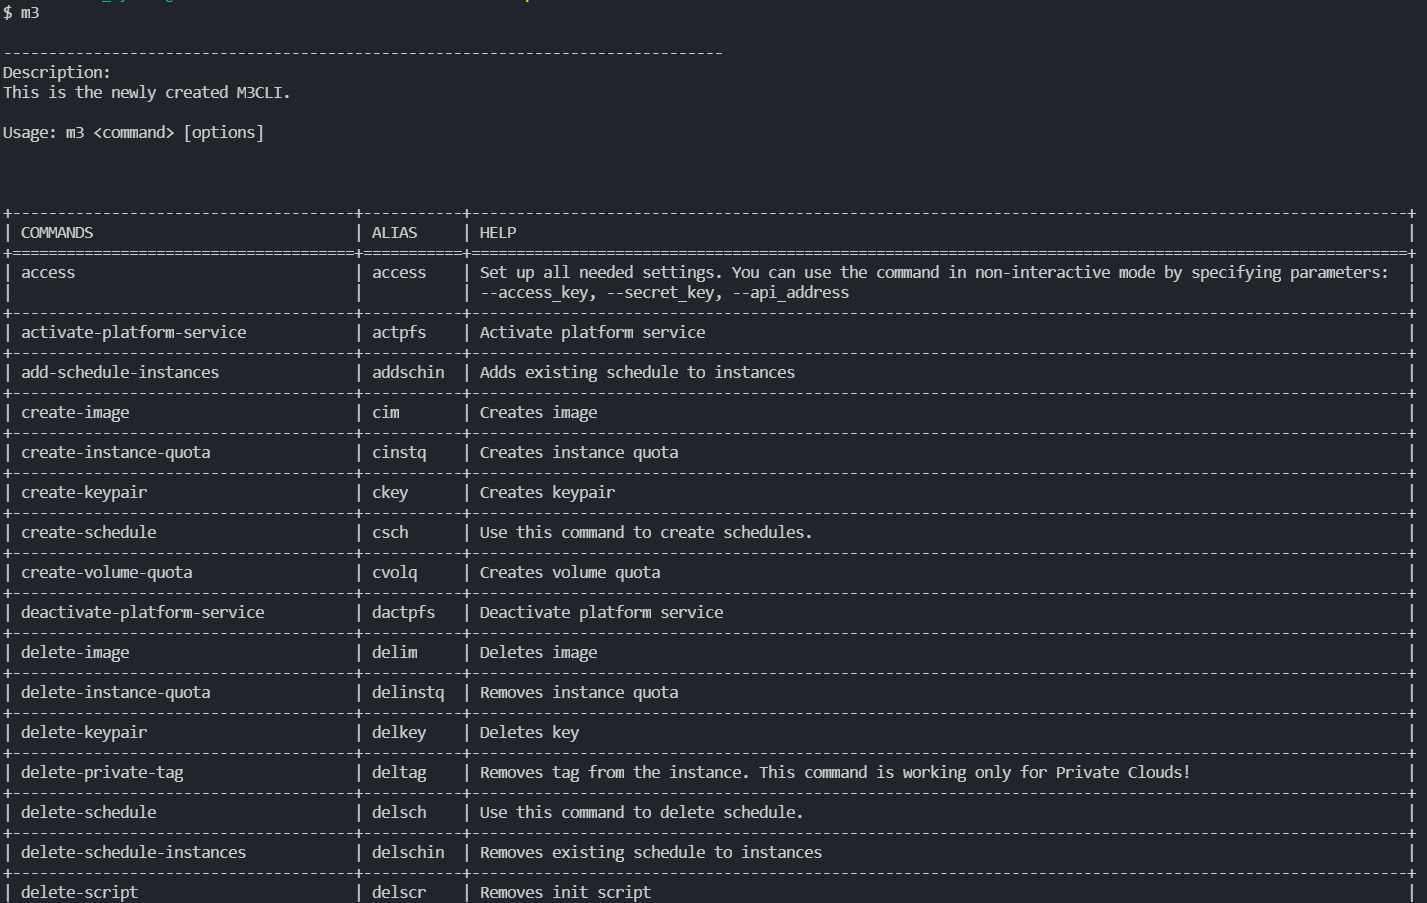
Root help contains data about all available commands:
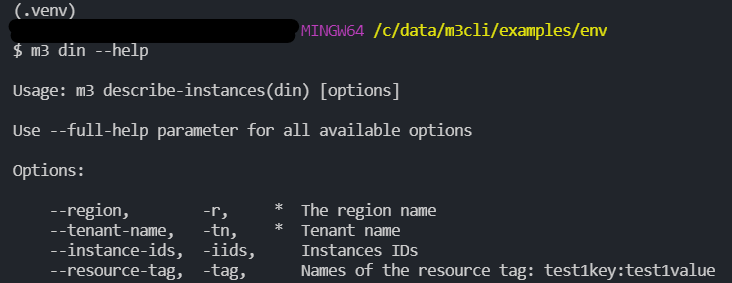
Command --help contains abbreviated data about parameters:
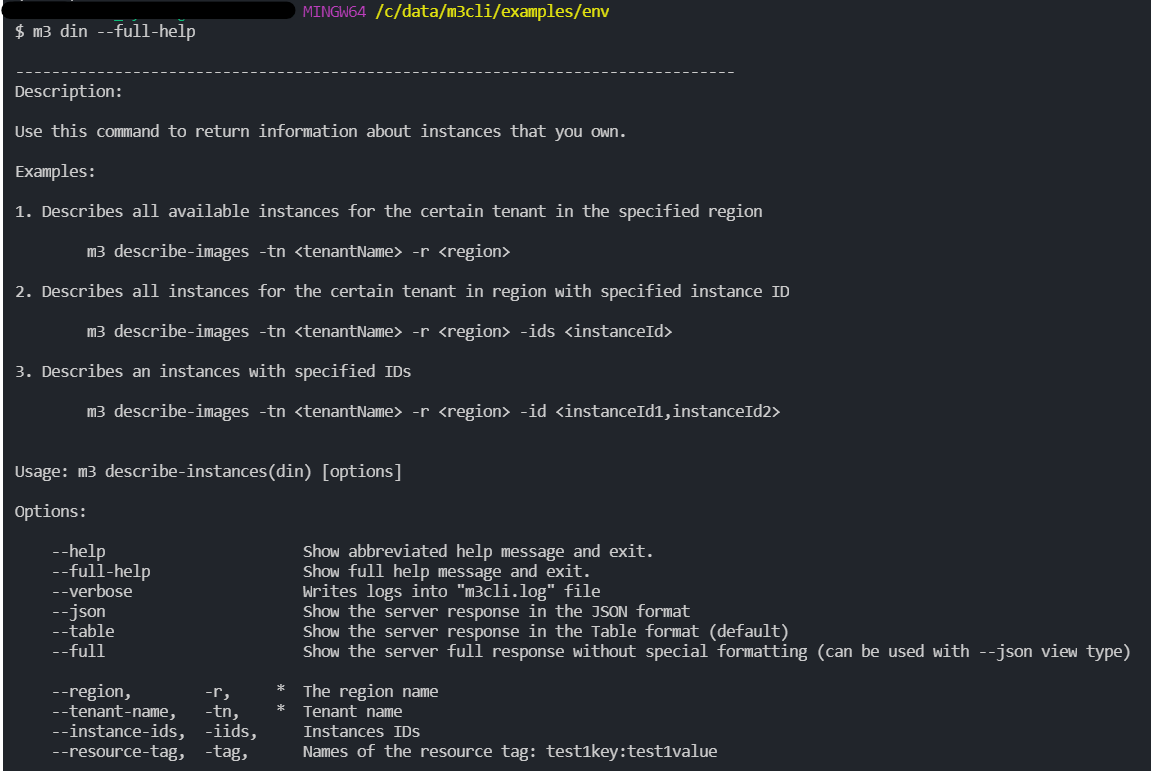
Use --full-help command for all available options:
Command result in --table output mode (default output mode) :

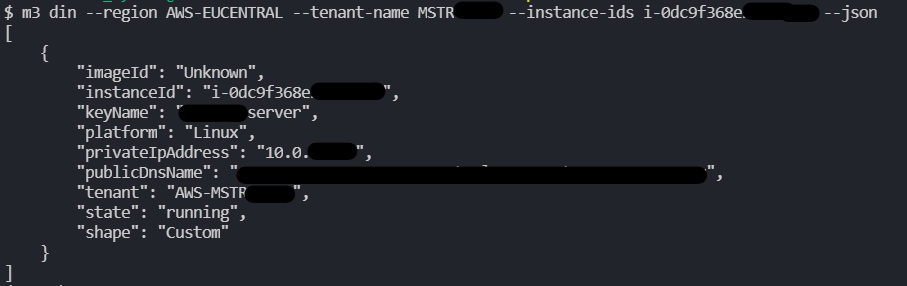
Command result in --json output mode (default output mode) :
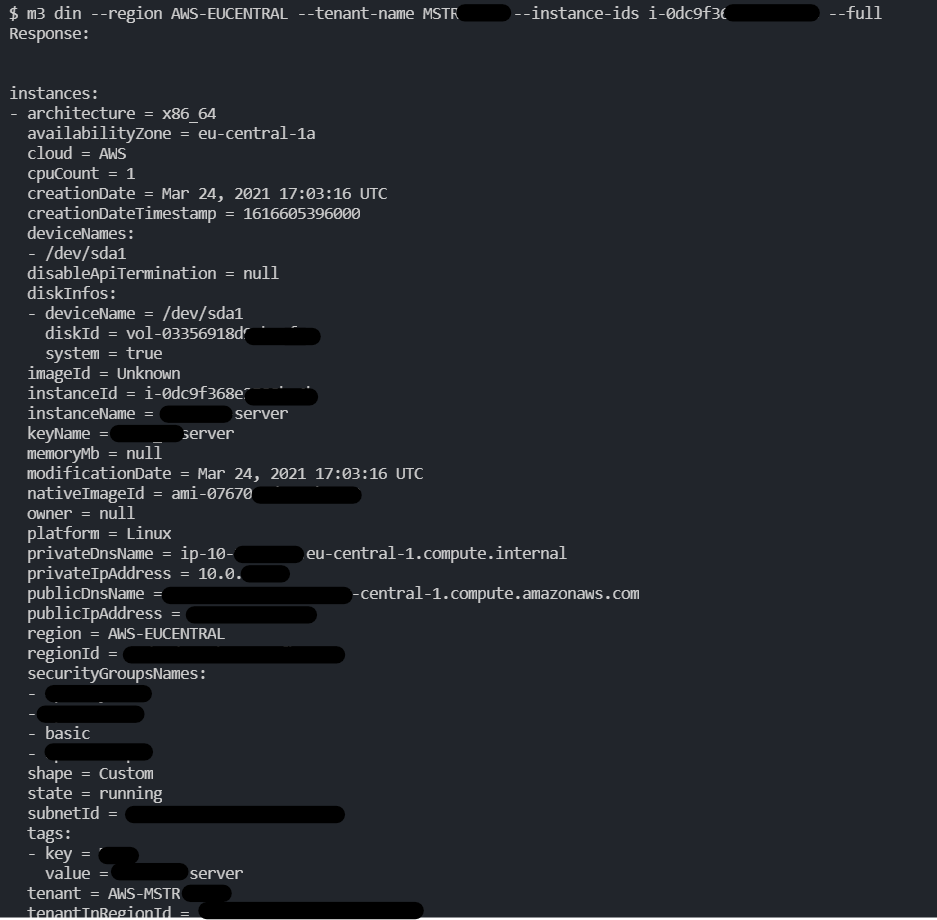
Command result in --full output mode (default output mode) :
--verbose parameter writes command result to the terminal.
Developers Guide
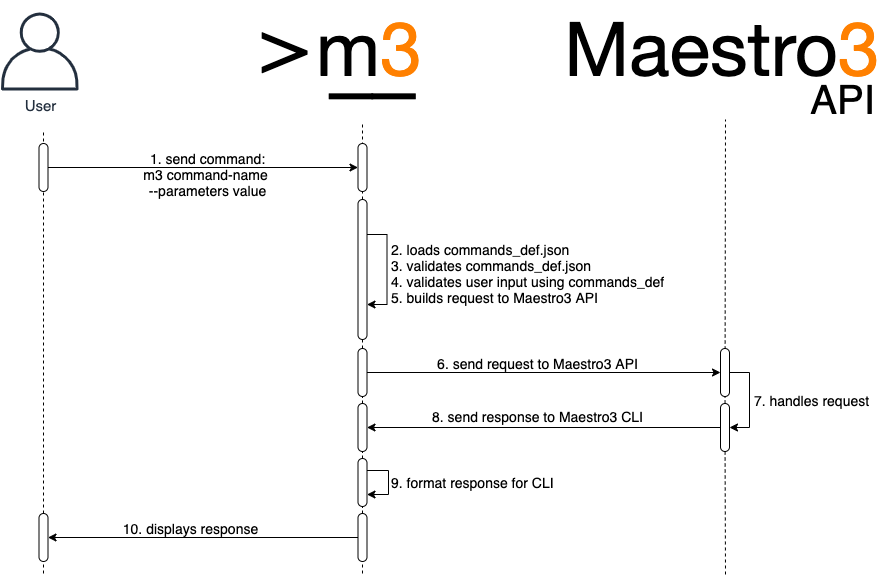
The Maestro3 CLI tool is designed to provide dynamic command line interface
based on commands configuration declared in commands_def.json file.
The tool DOES NOT perform any business logic related to management of resources Maestro3 provides. For now :)
The sequence diagram is displayed below.
Commands definition file:
The commands definition file (commands_def.json) is a file that defines a set
of commands, their groupings, and parameters of commands that can be executed via CLI.
Here is a full example of attributes found in the definition file:
{
    "groups": [
        "A name of a group of related commands"
    ],
    "domain_parameters": {
        "domain-parameter-name-1": {
            "alias": "param_alias",
            "api_param_name": "The name of the parameter that the server accepts to form the response",
            "help": "Parameter description",
            "required": true,
            "validation": {
                "type": "string"
            }
        }
    },
    "commands": {
        "command-name-1": {
            "api-action": "REQUIRED. Mapping for M3API command",
            "help_file": true,                      // A Flag. If commands help stored into the file
            "help": "Explanation of what command does",
            "alias": "Alias for the command name. Could be used instead of command-name-1",
            "integration_request": true,            // A Flag. Specify if the request will be processed
            "integration_response": true,           // A Flag. Specify if the response will be processed
            "integration_suffix": "",               // if specified, m3cli should build the plugin name according to the ${command_name}_${integration_suffix}.py pattern
            "groups": [
                "group1",                           // A name of the group of commands to which this command relates
                "cli-<command-name>-help",          // Defines a unidirectional relation to the <command-name> command
                "email-<notification_type>-group",  // Defines a relation to the Maestro notifications of the type <notification_type>
            ],
            "parameters": {                         // Optional
                "inherited-param-from-domain": {
                    "parent": "Name of the domain parameter to inherit properties."
                },
                "param-name-1": {
                    "parent": "name",               // The name of the parent
                    "alias": "Alias for the parameter name. Could be used instead of param-name-1",
                    "api_param_name": "The name of the parameter that the server accepts to form the response",
                    "help": "REQUIRED. Explanation of what the parameter means",
                    "required": true,               // Set the parameter as a REQUIRED
                    "secure": true,                 // Hide the value of the parameter in logs. Allowed values: [true, false]
                    "validation": {                 // REQUIRED. Set of validation rules.
                        "type": "string/object",           // REQUIRED. The type of parameter. Allowed values: ['string', 'number', 'list', 'object', 'date', 'bool', 'file']
                        "allowed_values": [],       // A list of allowed values. Applicable to param of types 'string' and 'list'
                        "regex": "Regular Expression. Applicable to params of types: 'string', 'file'",
                        "regex_error": "A meesage to show if the regex check failed. Applicable to params of types: 'string', 'file'",
                        "properties": {},           // jsonschema validation rules. Applicable to param of type: 'object';
                        "min_value": 0,             // number validation rule. Applicable only to type: 'number',
                        "max_value": 7,             // number validation rule. Applicable only to type: 'number',
                        "max_size_bytes": 1024,     // file validation rule. Applicable only to type: 'file',
                        "file_extensions": ['.txt'] // file validation rule. Applicable only to type: 'file'
                    },
                    "case": "upper/lower"           // convert a value to upper case automatically
                }
            },
            "output_configuration": {               // REQUIRED. Contains configuration for the output.
                "response_table_headers": ["header-1", "header-2"], // Required. Contains list of attributes to display in output.
                "none": true,                       // Replace the response from server to "The command has been executed successfully"
                "nullable": true,                   // Set the flag 'nullable' in order to prevent hiding zeros and False values of number and boolean attributes.
                "multiple_table": true,             // A flag. If the response consists of several tables
                // The structure of the "response_table_headers" if the "multiple_table" was specified
                "response_table_headers": [
                  {
                    "display_name": "Instance price model:",  // The display name of a table
                    "name": "instancePriceModel",             // The name of the table that the server sends in the response
                    "headers": []                             // Contains list of attributes to display in output.
                  }
                ],
                "headers_customization": {                      // Optional. Used to alter appearance of data in columns.
                  "the_name_of_header": {                       // The header name
                    "header_display_name": "Custom name of the header", // Custom name of the header
                    "disable_numparse": true,                   // A flag. Disables automatic conversion of string-values to numbers.
                    "prevent_list_formatting": true             // A flag. Disables automatic alignment of list values to a column.
                  }
                },
              "unmap_key": "Contains 'key' to extract response if needed."
            }
        }
    },
    "version": "major.minor"                            // see the versioning rules below
}
NOTE: Commands help values can be stored into the file named commands_help.py. The format of the such storing type is Python native. Example:
run-instance = """
Use this command to run instance.

Examples:
1. Describes all available instances for the certain tenant in the specified region
    m3 run-instance -tn <tenant-name> -r <region> -iname <instance-name> -shname <shape-name> -key <key-name> -count <number-of-instances>
"""
Related commands section in "full-help" contents
The related commands section is constructed automatically based on the groups attribute of each command.
The related commands look like this:
Related commands:

1. Deletes a schedule from your tenants schedule library:
        m3 delete-schedule -r <region> -tn <tenant> -n <name>
There are two ways a command can be added to a list of related commands of the other command.
The first approach requires to declare a group of commands in the group attribute in the root of the commands_def file,
and then assign it to all commands that are in this group. All commands within the group share a bidirectional relation with each other.
Consider the next example:
{
  "groups": ["group_A"],
  "commands": {
    "first_command": {
      "groups": ["group_A"],
      // ...
    },
    "second_command": {
      "groups": ["group_A"],
      // ...
    }
  }
}
With this configuration the first_command will be in the list of related commands of the second_command and vice versa.
The second approach allows us to define a unidirectional relation between commands (auxiliary commands). We make one command related to another
by adding the name of the other command to the list of groups of this command with a special prefix and suffix (cli- and -help).
Consider the next example:
{
  "commands": {
    "first_command": {
      "groups": ["cli-second-command-help"],
      // ...
    },
    "second_command": {
      // ...
    }
  }
}
With this configuration we will see the first_command in the list of related commands of the second_command.
At the same time the second_command will not be in the list of related commands of the first_command.
Default command parameter values
The default values for the command parameters can be stored
in the m3.properties file.
...
tenant-name = SFTL-SLCTL
region = SFTL-OPENSTACK-SLCTL
...
You can create several m3.properties files in different directories with
different default values. To select the required parameters change the
current working directory to the directory with the appropriate
m3.properties file.
Other option is to store the default values for the command
parameters in the default.cr file.
{
    ...
    "tenant-name": "SFTL-SLCTL",
    "region": "SFTL-OPENSTACK-SLCTL",
    ...
}
The default parameter values from the m3.properties file take precedence
over the values from the default.cr file.
Integration request/response
From version 2.1.0 there is possibility to process CLI input and Server output manually using custom Python code. To use this feature you need to create plugin with an appropriate properties:
- Create the directory named
pluginsby the path that were specified as a value for the env variableM3CLI_CONFIGURATION_FOLDER_PATH; - Create simple python module (
filename.py) and put it into the directory namedpluginsmentioned above; - To change the CLI input create a method inside your script with
name
create_custom_requestthat will receive one parameterrequest. For example:
def create_custom_request(request):
    return request
- To change the CLI output create a method inside your script with
name
create_custom_responsethat will receiverequestandresponseparameters. For example:
def create_custom_response(request, response):
    return response
From the version 3.41.7 there is possibility not to hide the boolean fields if the value is 'False'. To use this feature you should follow the next step:
Add nullable field with the value true to the output_configuration
section of the commands_def.json file. For example:
"output_configuration": {
        "nullable": true,
        "response_table_headers": [
          "region",
          "nativeName",
          "cloud",
          "active",
          "hidden"
        ]
      }
In example above, if the value of field active will be false, the value in
the table column will not be hidden.
Command output formatting
In case CLI receives a response with items which have an empty attribute, this attribute will be dropped from the response (in table view only).
To add custom formatting to a response attribute, add the headers_customization parameter to output_configuration.
"output_configuration": {
    "response_table_headers": ["header-1", "header-2"],
    "headers_customization": {
      "header-1": {
        "disable_numparse": true,
        "prevent_list_formatting": true
      }
    }
}
The disable_numparse setting disables automatic conversion of string-values to numbers.
The prevent_list_formatting setting disables automatic alignment of list values to a column.
Interactive options
Interactive options is a feature that enables a command to fetch additional
parameters from the server and either prompt a user to interactively provide values for
these parameters or create a file with additional parameters (a varfile) for future use.
To enable a command to fetch additional parameters, add the following attribute to the command's definition:
"interactive_options": {
    "option_name": "params", - The name of parameters group
    "parameters_handler": "GET_SERVICE_VARIABLES_INFO", - The name of server handler the returns the list of additional parameters
    "validation_handler": "VALIDATE_SERVICE_VARIABLES", - The name of server handler the validates the list of additional parameters
}
If this feature is enabled, the command will get additional parameters via the parameters_handler,
ask the user to fill the values for these parameters or to provide a varfile, validate the additional parameters
and send them back to the server as a part of the original request.
To enable a command to create a varfile, add the following attribute to the command's definition:
"interactive_options": {
    "parameters_handler": "GET_SERVICE_VARIABLES_INFO", - The name of server handler the returns the list of additional parameters
    "generate_varfile": true, - Marks the command as a generator of a file with additional parameters fetched with the "parameters_handler"
}
The varfile is a JSON file, and it contains all the additional parameters that the parameter_handler provides.
The parameters are either filled with default values or have empty values.
m3cli autocomplete
By default in m3-cli tool will be enabled autocomplete that supports only Unix-based platforms (bash&zsh interpreters).
To activate it do a few steps:
- Create virtual environment
- Install m3-cli
- Create SYMLINK to virtual environment
sudo ln -s your_path_to_venv/bin/m3 /usr/local/bin/m3 - Start new terminal session
- Execute command
sudo m3 enable-autocomplete - Restart terminal session
To deactivate
- Execute command
sudo m3 disable-autocomplete - Restart terminal session
NOTE: The type of the return value in the functions described above should be the same as the received parameter (request/response)
- After successful plugins creation add an appropriate attributes to the
command description in the file
commands_def.json:"integration_request": trueor"integration_response": true
CLI update detection flow
Once a day when any of the CLI commands is invoked, CLI performs a check for an available update.
It includes making a health-check call to the server and using its response to refresh
the data stored in the default.cr file about the latest CLI version and distribution links.
This data is used between the daily update checks to notify a user of a pending update while avoiding the need to communicate with the server on each request.
An update notification is printed to the user first before the actual response, and contains instructions of how to update the CLI client on a Linux, Windows or macOS machine.
If the health-check call fails due to a server-side error while CLI performs a daily update check,
a warning is printed informing the user of the error and that CLI is unable to automatically check for updates.
To force CLI to check for an update, invoke the health-check command manually.
CLI development flow
- Update the
commands_def.jsonfile with new commands/parameters that correspond to the current release and update the version of the file. - Update the commands' plugins to modify the models of requests or responses if required.
- Update the version attribute in
setup.py. - Update CHANGELOG.md with the changes being made to configuration of commands.
Delivery flow
- Change directory to the project root folder. File
setup.pyshould be in the same folder as you are - Prepare the dist with the command:
python setup.py sdist --formats=zip - Login to epmc-eoos AWS account; (may be changed)
- Update the file
m3-<version>.zipin S3 bucket namedm3-cli-distribution
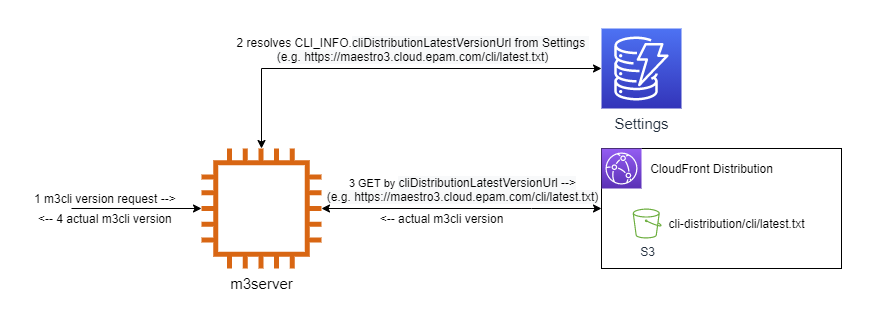
Resolving m3cli version for CLISDK Access wizard
Tests execution
Without Coverage:
To run tests just make sure you have m3cli installed in your virtual
environment. No other dependencies are required. Execute the following
(add flag -v to see a more detailed output):
python -m unittest
You should see the output with successful result - something like this:
..............................................................................................................................
----------------------------------------------------------------------
Ran 137 tests in 0.259

OK
Using Coverage:
To run tests using Coverage first you have to install the library to the same virtual environment where m3cli is:
pip install coverage
Then execute the command below:
coverage run -m unittest -v
If no tests are failed you can generate a console report:
coverage report --omit "tests*"
To generate the report for web-interface use the command:
coverage html --omit "tests*"
You should see htmlcov folder in the project's root. Find index.html in
there and open via browser. May your tests always pass successfully!
Gitlab CI/CD integration
Use the .gitlab-ci.yml for configuring Gitlab CI/CD.
Use the tox.ini file for automating and standardizing testing with a tox.


Download files
Download the file for your platform. If you're not sure which to choose, learn more about installing packages.


