A python library for AI personality definition

Project description
Lord of Large Language Models (LoLLMs)


Lord of Large Language Models (LoLLMs) Server is a text generation server based on large language models. It provides a Flask-based API for generating text using various pre-trained language models. This server is designed to be easy to install and use, allowing developers to integrate powerful text generation capabilities into their applications.
Features
- Fully integrated library with access to bindings, personalities and helper tools.
- Generate text using large language models.
- Supports multiple personalities for generating text with different styles and tones.
- Real-time text generation with WebSocket-based communication.
- RESTful API for listing personalities and adding new personalities.
- Easy integration with various applications and frameworks.
- Possibility to send files to personalities
- Possibility to run on multiple nodes and provide a generation service to many outputs at once.
- Data stays local even in the remote version. Only generations are sent to the host node. The logs, data and discussion history are kept in your local disucssion folder.
Installation
You can install LoLLMs using pip, the Python package manager. Open your terminal or command prompt and run the following command:
pip install --upgrade lollms
Or if you want to get the latest version from the git:
pip install --upgrade git+https://github.com/ParisNeo/lollms.git
GPU support
If you want to use cuda. Either install it directly or use conda to install everything:
conda create --name lollms python=3.10
Activate the environment
conda activate lollms
Install cudatoolkit
conda install -c anaconda cudatoolkit
Install lollms
pip install --upgrade lollms
Now you are ready.
To simply configure your environment run the settings app:
lollms-settings
The tool is intuitive and will guide you through configuration process.
The first time you will be prompted to select a binding.
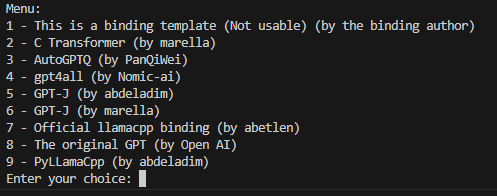
Once the binding is selected, you have to install at least a model. You have two options:
1- install from internet. Just give the link to a model on hugging face. For example. if you select the default llamacpp python bindings (7), you can install this model:
https://huggingface.co/TheBloke/airoboros-7b-gpt4-GGML/resolve/main/airoboros-7b-gpt4.ggmlv3.q4_1.bin
2- install from local drive. Just give the path to a model on your pc. The model will not be copied. We only create a reference to the model. This is useful if you use multiple clients so that you can mutualize your models with other tools.
Now you are ready to use the server.
Library example
Here is the smallest possible example that allows you to use the full potential of the tool with nearly no code
from lollms.console import Conversation

cv = Conversation(None)
cv.start_conversation()
Now you can reimplement the start_conversation method to do the things you want:
from lollms.console import Conversation

class MyConversation(Conversation):
  def __init__(self, cfg=None):
    super().__init__(cfg, show_welcome_message=False)

  def start_conversation(self):
    prompt = "Once apon a time"
    def callback(text, type=None):
        print(text, end="", flush=True)
        return True
    print(prompt, end="", flush=True)
    output = self.safe_generate(prompt, callback=callback)

if __name__ == '__main__':
  cv = MyConversation()
  cv.start_conversation()
Or if you want here is a conversation tool written in few lines
from lollms.console import Conversation

class MyConversation(Conversation):
  def __init__(self, cfg=None):
    super().__init__(cfg, show_welcome_message=False)

  def start_conversation(self):
    full_discussion=""
    while True:
      prompt = input("You: ")
      if prompt=="exit":
        return
      if prompt=="menu":
        self.menu.main_menu()
      full_discussion += self.personality.user_message_prefix+prompt+self.personality.link_text
      full_discussion += self.personality.ai_message_prefix
      def callback(text, type=None):
          print(text, end="", flush=True)
          return True
      print(self.personality.name+": ",end="",flush=True)
      output = self.safe_generate(full_discussion, callback=callback)
      full_discussion += output.strip()+self.personality.link_text
      print()

if __name__ == '__main__':
  cv = MyConversation()
  cv.start_conversation()
Here we use the safe_generate method that does all the cropping for you ,so you can chat forever and will never run out of context.
Socket IO Server Usage
Once installed, you can start the LoLLMs Server using the lollms-server command followed by the desired parameters.
lollms-server --host <host> --port <port> --config <config_file> --bindings_path <bindings_path> --personalities_path <personalities_path> --models_path <models_path> --binding_name <binding_name> --model_name <model_name> --personality_full_name <personality_full_name>
Parameters
--host: The hostname or IP address to bind the server (default: localhost).--port: The port number to run the server (default: 9600).--config: Path to the configuration file (default: None).--bindings_path: The path to the Bindings folder (default: "./bindings_zoo").--personalities_path: The path to the personalities folder (default: "./personalities_zoo").--models_path: The path to the models folder (default: "./models").--binding_name: The default binding to be used (default: "llama_cpp_official").--model_name: The default model name (default: "Manticore-13B.ggmlv3.q4_0.bin").--personality_full_name: The full name of the default personality (default: "personality").
Examples
Start the server with default settings:
lollms-server
Start the server on a specific host and port:
lollms-server --host 0.0.0.0 --port 5000
API Endpoints
WebSocket Events
connect: Triggered when a client connects to the server.disconnect: Triggered when a client disconnects from the server.list_personalities: List all available personalities.add_personality: Add a new personality to the server.generate_text: Generate text based on the provided prompt and selected personality.
RESTful API
GET /personalities: List all available personalities.POST /personalities: Add a new personality to the server.
Sure! Here are examples of how to communicate with the LoLLMs Server using JavaScript and Python.
JavaScript Example
// Establish a WebSocket connection with the server
const socket = io.connect('http://localhost:9600');

// Event: When connected to the server
socket.on('connect', () => {
  console.log('Connected to the server');

  // Request the list of available personalities
  socket.emit('list_personalities');
});

// Event: Receive the list of personalities from the server
socket.on('personalities_list', (data) => {
  const personalities = data.personalities;
  console.log('Available Personalities:', personalities);

  // Select a personality and send a text generation request
  const selectedPersonality = personalities[0];
  const prompt = 'Once upon a time...';
  socket.emit('generate_text', { personality: selectedPersonality, prompt: prompt });
});

// Event: Receive the generated text from the server
socket.on('text_generated', (data) => {
  const generatedText = data.text;
  console.log('Generated Text:', generatedText);

  // Do something with the generated text
});

// Event: When disconnected from the server
socket.on('disconnect', () => {
  console.log('Disconnected from the server');
});
Python Example
import socketio

# Create a SocketIO client
sio = socketio.Client()

# Event: When connected to the server
@sio.on('connect')
def on_connect():
    print('Connected to the server')

    # Request the list of available personalities
    sio.emit('list_personalities')

# Event: Receive the list of personalities from the server
@sio.on('personalities_list')
def on_personalities_list(data):
    personalities = data['personalities']
    print('Available Personalities:', personalities)

    # Select a personality and send a text generation request
    selected_personality = personalities[0]
    prompt = 'Once upon a time...'
    sio.emit('generate_text', {'personality': selected_personality, 'prompt': prompt})

# Event: Receive the generated text from the server
@sio.on('text_generated')
def on_text_generated(data):
    generated_text = data['text']
    print('Generated Text:', generated_text)

    # Do something with the generated text

# Event: When disconnected from the server
@sio.on('disconnect')
def on_disconnect():
    print('Disconnected from the server')

# Connect to the server
sio.connect('http://localhost:9600')

# Keep the client running
sio.wait()
Make sure to have the necessary dependencies installed for the JavaScript and Python examples. For JavaScript, you need the socket.io-client package, and for Python, you need the python-socketio package.
Contributing
Contributions to the LoLLMs Server project are welcome and appreciated. If you would like to contribute, please follow the guidelines outlined in the CONTRIBUTING.md file.
License
LoLLMs Server is licensed under the Apache 2.0 License. See the LICENSE file for more information.
Repository
The source code for LoLLMs Server can be found on GitHub
Release history Release notifications | RSS feed


Download files
Download the file for your platform. If you're not sure which to choose, learn more about installing packages.


