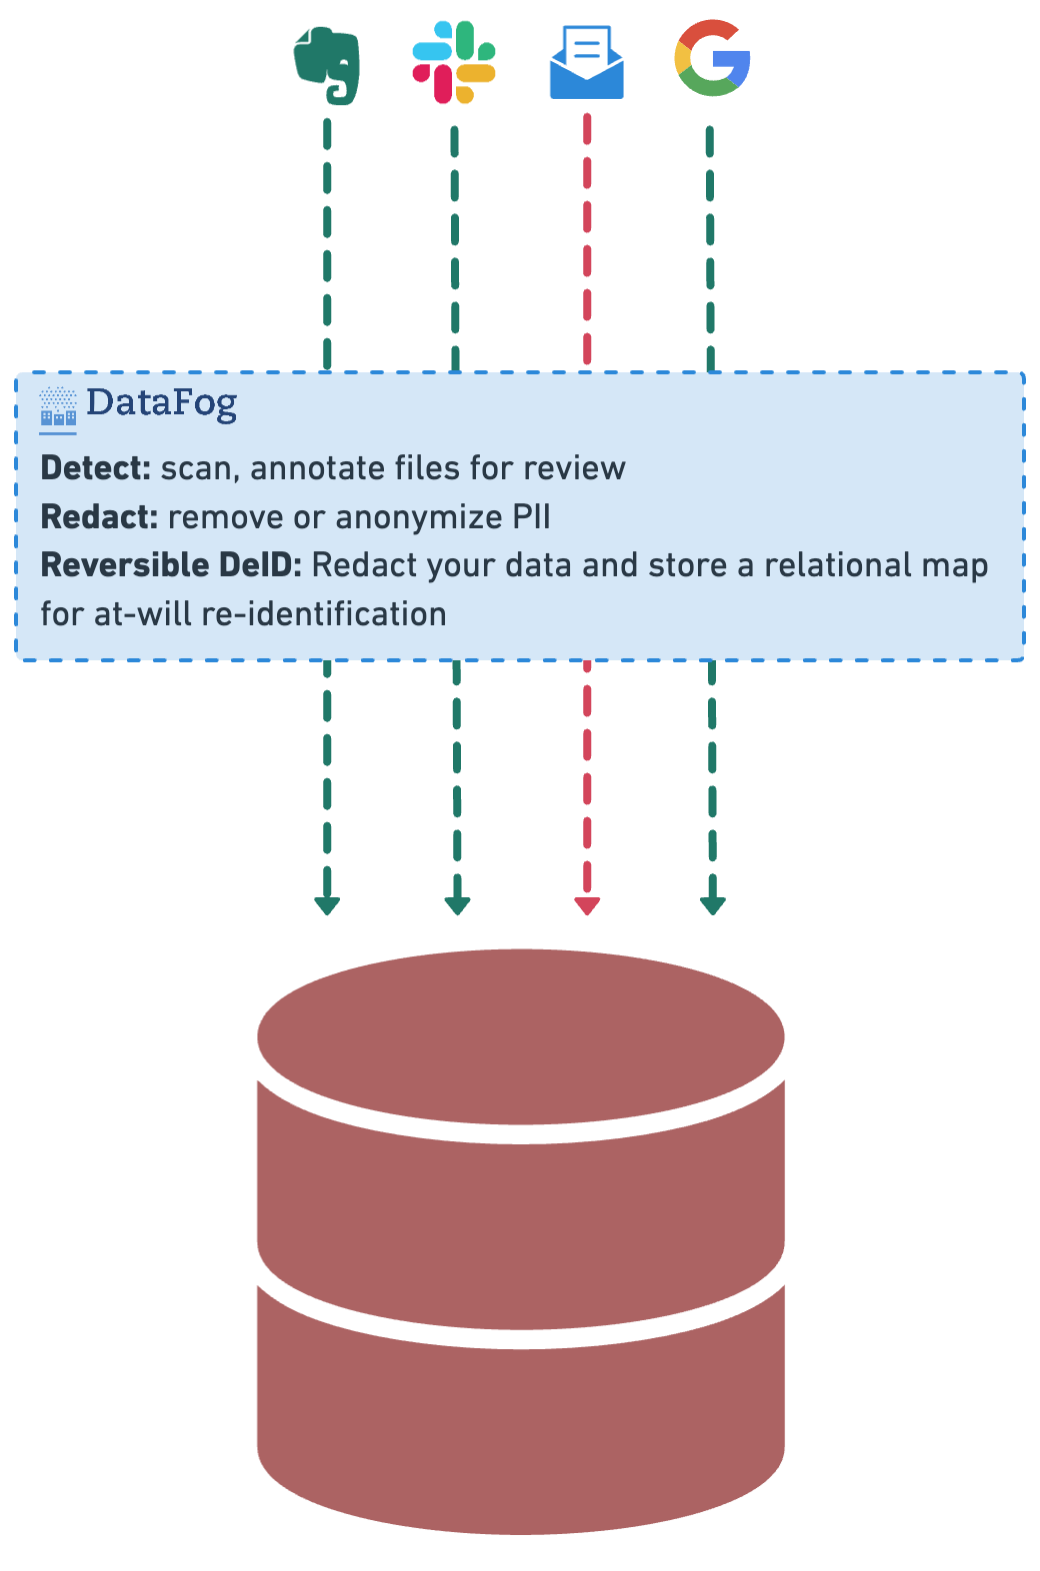
Scan, redact, and manage PII in your documents before they get uploaded to a Retrieval Augmented Generation (RAG) system.

Project description

Open-source DevSecOps for Generative AI Systems.


Overview
What is DataFog?
DataFog is an open-source DevSecOps platform that lets you scan and redact Personally Identifiable Information (PII) out of your Generative AI applications.
Core Problem
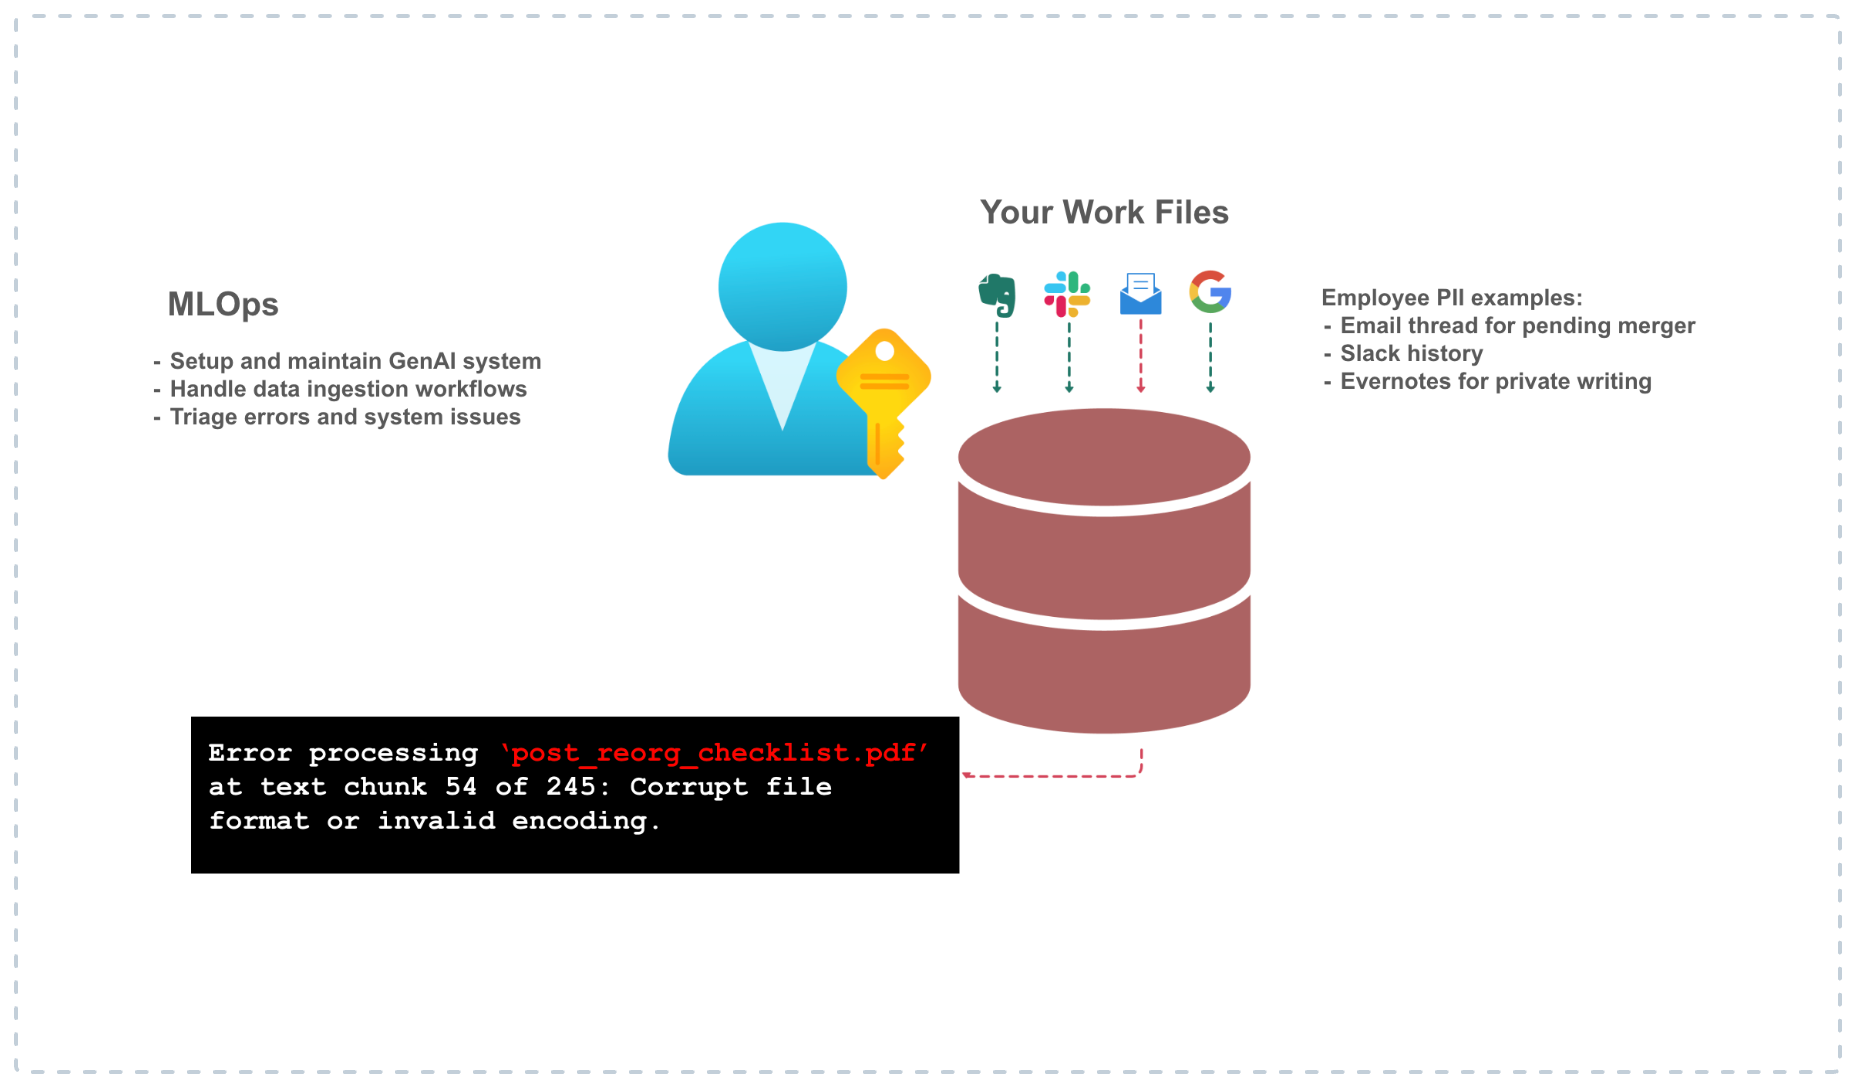
How it works
Installation
DataFog can be installed via pip:
pip install datafog
Examples -
v3.2.0 NEW
Based on the provided test cases, here's a suitable "Getting Started" section for the documentation:
Getting Started
The DataFog library provides functionality for text and image processing, including PII (Personally Identifiable Information) annotation and OCR (Optical Character Recognition) capabilities.
Installation
To install the DataFog library, use the following command:
pip install datafog
Usage
Here are some examples of how to use the DataFog library:
Text PII Annotation
To annotate PII in a given text, lets start with a set of clinical notes:
!git clone https://gist.github.com/b43b72693226422bac5f083c941ecfdb.git
from datafog import TextPIIAnnotator

text = "John Doe lives at 1234 Elm St, Springfield."
text_annotator = TextPIIAnnotator()
annotated_text = text_annotator.run(text)
print(annotated_text)
This will output the annotated text with PII labeled, such as {"LOC": ["Springfield"]}.
Image Text Extraction and Annotation
To extract text from an image and perform PII annotation, you can use the DataFog class:
from datafog import DataFog

image_url = "https://example.com/image.png"
datafog = DataFog()
annotated_text = await datafog.run_ocr_pipeline([image_url])
print(annotated_text)
This will download the image, extract the text using OCR, and annotate any PII found in the extracted text.
Text Processing
To process and annotate text using the DataFog pipeline, you can use the DataFog class:
from datafog import DataFog

text = ["Tokyo is the capital of Japan"]
datafog = DataFog()
annotated_text = await datafog.run_text_pipeline(text)
print(annotated_text)
This will process the given text and annotate entities such as person names and locations.
For more detailed usage and examples, please refer to the API documentation.
Note: The DataFog library uses asynchronous programming, so make sure to use the async/await syntax when calling the appropriate methods.
v3.1.0
Base case: PII annotation of text-files
from datafog import OCRPIIAnnotator, TextPIIAnnotator
import json
import requests

response = requests.get('https://gist.githubusercontent.com/sidmohan0/1aa3ec38b4e6594d3c34b113f2e0962d/raw/42e57146197be0f85a5901cd1dcdd9ad15b31bab/sotu_2023.txt')
response.raise_for_status()  # Ensure the request was successful
text = response.text
# print(text)
text_annotator = TextPIIAnnotator()
annotated_text = text_annotator.run(text, output_path=f"sotu_2023_output.json")
print("Annotated Text:", annotated_text)
OCR Reference Set (Images)
image_set = {
    "medical_invoice": "https://s3.amazonaws.com/thumbnails.venngage.com/template/dc377004-1c2d-49f2-8ddf-d63f11c8d9c2.png",
    "sales_receipt": "https://templates.invoicehome.com/sales-receipt-template-us-classic-white-750px.png",
    "press_release": "https://newsroom.cisco.com/c/dam/r/newsroom/en/us/assets/a/y2023/m09/cisco_splunk_1200x675_v3.png",
    "insurance_claim_scanned_form": "https://www.pdffiller.com/preview/101/35/101035394.png",
    "scanned_internal_record": "https://www.pdffiller.com/preview/435/972/435972694.png",
    "executive_email": "https://pbs.twimg.com/media/GM3-wpeWkAAP-cX.jpg"
}
OCR text extraction from images + PII annotation
with this, you can then run the following steps:
from datafog import OCRPIIAnnotator, TextPIIAnnotator
import json

image_url = image_set["executive_email"]

annotator = OCRPIIAnnotator()
annotated_text = annotator.run(image_url, output_path=f"executive_email_output.json")
print("Annotated Text:", annotated_text)
and the output should look like this:
Annotated Text: {'DATE_TIME': ['Wednesday', 'June 12, 2019'], 'LOC': [], 'NRP': [], 'ORG': [], 'PER': ['Kevin Scott Sent', 'Satya Nadella', 'Bill Gates Subject', 'Thoughts']}
With PySpark
Note: as of 3.1.0, you'll need to start the Spark session by instancing the DataFog class as shown below
from datafog import DataFog
from datafog.pii_annotation import ImageProcessor
datafog = DataFog()

# let's process the images that we shared above
processed_images = [(name, ImageProcessor().download_image(url=image_url)) for name, image_url in image_set.items()]

from datafog.pii_annotation import SparkService
parsed_images = [(name, ImageProcessor().parse_image(img)) for name, img in processed_images]

df = SparkService().spark.createDataFrame(parsed_images, ["image_name", "parsed_data"])

# Display DataFrame
df.show(truncate=False)
Contributing
DataFog is a community-driven open-source platform and we've been fortunate to have a small and growing contributor base. We'd love to hear ideas, feedback, suggestions for improvement - anything on your mind about what you think can be done to make DataFog better! Join our Discord and join our growing community.
Dev Notes
- Justfile commands:
just formatto apply formatting.just lintto check formatting and style.
Testing
To run the datafog unit tests, check out this repository and do
tox
License
This software is published under the MIT license.
Release history Release notifications | RSS feed


Download files
Download the file for your platform. If you're not sure which to choose, learn more about installing packages.


