bimpy - bundled imgui for python

Project description
bimpy - bundled imgui for python

bimpy is a a native extension for Python built with C++ and that provides bindings to dear imgui and distributed as a self-contained package bundled with glfw and gl3w


Features:
-
Immediate mode UI with python. The API is kept as close to the original dear imgui as possible.
-
bimpy already has all necessary functionality for window/OpenGL context creation and hides those details from the user.
-
bimpy can display images from ndarrays, PIL Images, numpy arrays, etc.,
-
bimpy works on Windows, GNU Linux, and macOS.
-
bimpy does not have dependencies and can be easily built from sources. Building relies only on distutils.
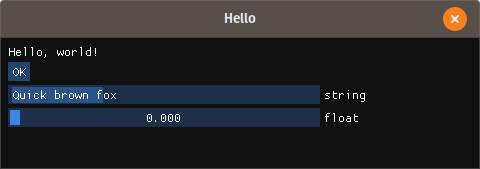
Hello world with bimpy
Core API tries to map to the Dear ImGui as close as possible. There is additional API, such as bimpy.App class that simplifies bimpy usage
|
Core API |
Using |
import bimpy as bp

ctx = bp.Context()

ctx.init(600, 600, "Hello")

s = bp.String()
f = bp.Float()

while not ctx.should_close():
    with ctx:
        bp.text("Hello, world!")

        if bp.button("OK"):
            print(s.value)

        bp.input_text('string', str, 256)

        bp.slider_float("float", f, 0, 1)
|
import bimpy as bp


class App(bp.App):
    def __init__(self):
        super(App, self).__init__(title='Test')
        self.s = bp.String()
        self.f = bp.Float()

    def on_update(self):
        bp.text("Hello, world!")

        if bp.button("OK"):
            print(self.s.value)

        bp.input_text('string', self.s, 256)

        bp.slider_float("float", self.f, 0, 1)


app = App()
app.run()
|
Display images
Display PIL image:
import bimpy
from PIL import Image

ctx = bimpy.Context()
ctx.init(800, 800, "Image")

image = Image.open("test.png")
im = bimpy.Image(image)

while not ctx.should_close():
    with ctx:
        bimpy.text("Display PIL Image")
        bimpy.image(im)
|
|

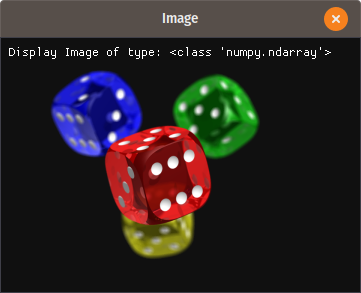
Similarly, numpy arrays with 2 dimensions, 3 dimensions (2, 3 or 4 channels) of type np.uint8 can be displayed.
Display numpy, ndarray image:
import bimpy
from PIL import Image
import numpy as np

ctx = bimpy.Context()
ctx.init(800, 800, "Image")

image = np.asarray(Image.open("3.png"), dtype=np.uint8)
im = bimpy.Image(image)

while not ctx.should_close():
    with ctx:
        bimpy.text("Display Image of type:")
        bimpy.same_line()
        bimpy.text(str(type(image)))
        bimpy.image(im)
|
|
More examples here: https://github.com/podgorskiy/bimpy/blob/master/examples/image.py
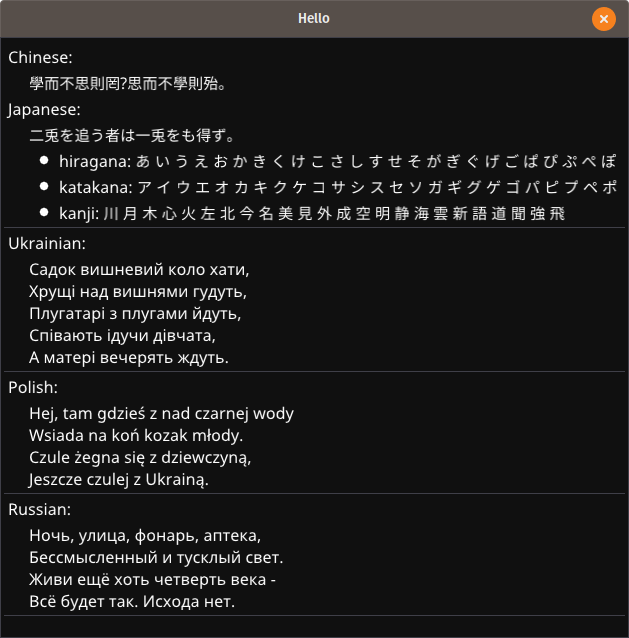
Non-english text
Use builtin bp.load_fonts to load fonts with CJK, cyrillic, greek characters
import bimpy as bp


ctx = bp.Context()

ctx.init(600, 600, "Hello")

bp.load_fonts(
    chinese=True,
    latin_ext=True,
    japanese=True,
    cyrillic=True
)


while not ctx.should_close():
    with ctx:
        chinese = u"學而不思則罔,思而不學則殆。"
        japanese = u"二兎を追う者は一兎をも得ず。 "

        hiragana = u"あ い う え お か ..."
        katakana = u"ア イ ウ エ オ カ ..."
        kanji = "川 月 木 心 火 左 北 今..."

        ukrainian = "Садок вишневий коло..."
        polish = "Hej, tam gdzieś z nad..."
        russian = "Ночь, улица, фонарь, ..."

        bp.text('Chinese:')
        bp.indent()
        bp.text(chinese)
        bp.unindent()
        bp.text('Japanese:')
        bp.indent()
        bp.text(japanese)
        bp.bullet_text("hiragana: " + hiragana)
        bp.bullet_text("katakana: " + katakana)
        bp.bullet_text("kanji: " + kanji)
        bp.unindent()
        bp.separator()
        bp.text('Ukrainian:')
        bp.indent()
        bp.text(ukrainian)
        bp.unindent()
        bp.separator()
        bp.text('Polish:')
        bp.indent()
        bp.text(polish)
        bp.unindent()
        bp.separator()
        bp.text('Russian:')
        bp.indent()
        bp.text(russian)
        bp.unindent()
        bp.separator()
|
|
Install
Installation is easy since the package does not have dependencies:
pip install bimpy
Or you can build and install from sources:
python setup.py install
All c/c++ sources are built with distutils. All you need is a compiler with C++11 support.
Windows users, who use python 2.7 may encounter problems, because on Windows, python 2.7 uses MSVC 9.0, which doesn't have support for c++11. However, you still can build it with more recent MSVC (for example MSVC 14.0, which is Visual C++ 2015) using the commands below:
call "%VS140COMNTOOLS%\VsDevCmd.bat"
set VS90COMNTOOLS=%VS140COMNTOOLS%
python setup.py install
If building on Linux, the following dependencies will be needed:
sudo apt-get install mesa-common-dev libxi-dev libxinerama-dev libxrandr-dev libxcursor-dev
To build all wheels for linux package distribution (manylinux) run build_manylinux_wheels.sh.
For testing/debugging there is a CMakeList.txt included. It is not used by setup.py, but can be handy in order to build/debug package from certain IDEs.
How to use it?
Intro
bimpy is python binding for dear imgui <https://github.com/ocornut/imgui>__ and tries to match the C++ API. Also, it has some additional functions to create a window and some other differences.
It has binding for the most functions from dear imgui. All functions are renamed from CamelCase to snake_case, which is more common for python. For example ImGui::InputText is mapped to bimpy.input_text.
Context and window
First of all, you need to import bimpy
import bimpy
Distinctively from dear imgui, bimpy does not have global state (dear imgui has it by default, but it has an option not to have one). So, you will need to create a context.
ctx = bimpy.Context(width, height, name)
Where integers width and height specify the size of the window, and string name is a caption of the window.
All calls to bimpy's API must be within with statement applied to the context object:
with ctx:
    bimpy.text("Hello, world!")
And there must be only one with statement applied to the context object per frame.
Or, a second option is to manualy call ctx.new_frame() before all API calls, and then ctx.render() after.
ctx.new_frame()
bimpy.text("Hello, world!")
ctx.render()
You can have multiple Context objects for multiple windows, however, API is not thread-safe.
Variables
All imgui API that provides user input (such as InputText, SliderFloat, etc.) modifies the variable through the reference to it. However, in python, such objects as integers, floats and strings are passed always by value. Because of this, bimpy provides special wrappers, that allow passing those variables by reference.
For example, to use slider_float, you will need first to create a variable that will hold the state:
f = bimpy.Float();
You can access the value in the following way: f.value
To use it with slider_float simply pass it to that function:
bimpy.slider_float("float slider", f, 0.0, 1.0)
All imgui input functions that provide multiple inputs, like SliderFloat2, SliderInt4, InputInt3, etc. are mapped to equivalent functions, but instead of passing an array of variables, you need to list all variables in the argument list:
f1 = bimpy.Float();
f2 = bimpy.Float();
f3 = bimpy.Float();

while(not ctx.should_close()):
	with ctx:
		bimpy.slider_float3("float", f1, f2, f3, 0.0, 1.0)
Draw commands
Some draw commands are exposed. In contrast to C++ API, the exposed functions are not methods of ImDrawList, but global functions. All drawing functions should be called inside the begin/end calls of a window.
List of exposed drawing functions:
    add_circle(centre: _bimpy.Vec2, radius: float, col: int, num_segments: int=12, thickness: float=1.0) -> None
    add_circle_filled(centre: _bimpy.Vec2, radius: float, col: int, num_segments: int=12) -> None
    add_line(a: _bimpy.Vec2, b: _bimpy.Vec2, col: int, thickness: float=1.0) -> None
    add_quad(a: _bimpy.Vec2, b: _bimpy.Vec2, c: _bimpy.Vec2, d: _bimpy.Vec2, col: int, thickness: float=1.0) -> None
    add_quad_filled(a: _bimpy.Vec2, b: _bimpy.Vec2, c: _bimpy.Vec2, d: _bimpy.Vec2, col: int) -> None
    add_rect(a: _bimpy.Vec2, b: _bimpy.Vec2, col: int, rounding: float=0.0, rounding_corners_flags: int=Corner.All, thickness: float=1.0) -> None
    add_rect_filled(a: _bimpy.Vec2, b: _bimpy.Vec2, col: int, rounding: float=0.0, rounding_corners_flags: int=Corner.All) -> None
    add_rect_filled_multicolor(a: _bimpy.Vec2, b: _bimpy.Vec2, col_upr_left: int, col_upr_right: int, col_bot_right: int, col_bot_lefs: int) -> None
    add_triangle(a: _bimpy.Vec2, b: _bimpy.Vec2, c: _bimpy.Vec2, col: int, thickness: float=1.0) -> None
    add_triangle_filled(a: _bimpy.Vec2, b: _bimpy.Vec2, c: _bimpy.Vec2, col: int) -> None
Simple usage example below:
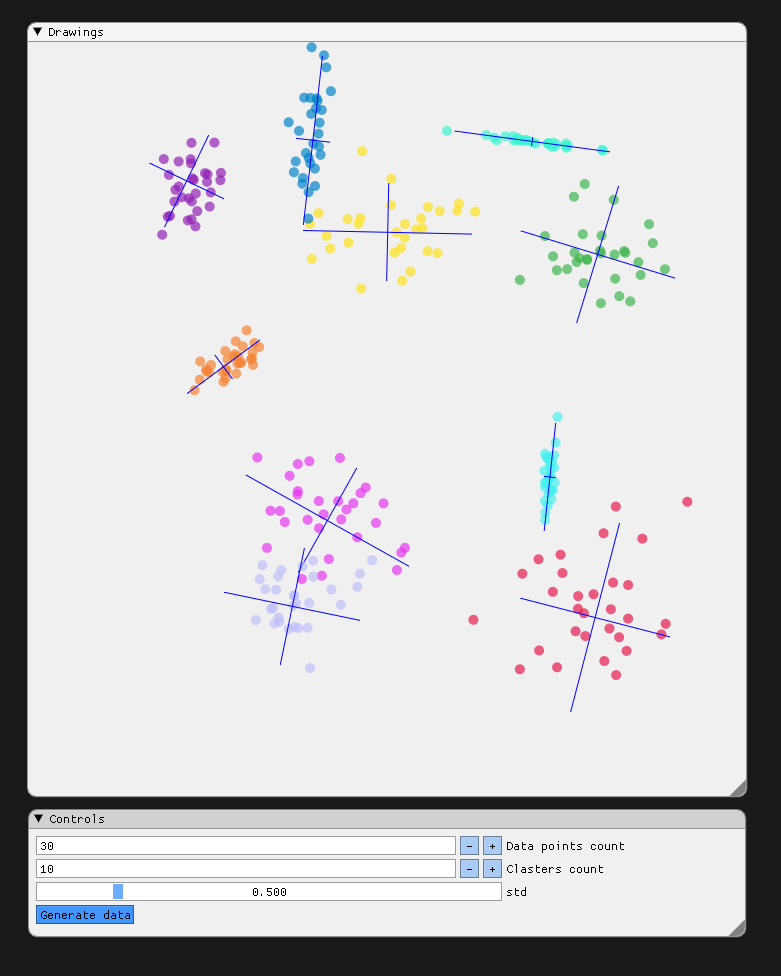
	import bimpy
	import numpy as np

	ctx = bimpy.Context()

	ctx.init(1200, 1200, "Draw Commands Test")

	with ctx:
		bimpy.themes.set_light_theme()

	DATA_POINTS = bimpy.Int(30)
	CLASTERS = bimpy.Int(4)

	std = bimpy.Float(0.5)

	colors = [0x4b19e6, 0x4bb43c, 0x19e1ff, 0xc88200, 0x3182f5, 0xb41e91, 0xf0f046, 0xf032e6, 0xd2f53c,
			  0xfabebe, 0x008080, 0xe6beff, 0xaa6e28, 0xfffac8, 0x800000, 0xaaffc3, 0x808000, 0xffd8b1,
			  0x000080, 0x808080, 0xFFFFFF, 0x000000]

	datapoints = []


	def generate_fake_data():
		datapoints.clear()
		for i in range(CLASTERS.value):
			x = np.random.normal(size=(DATA_POINTS.value, 2))
			alpha = np.random.rand()
			scale = std.value * np.random.rand(2) * np.eye(2, 2)
			position = np.random.rand(2) * 5
			rotation = np.array([[np.cos(alpha), np.sin(alpha)], [-np.sin(alpha), np.cos(alpha)]])
			x = np.matmul(x, scale)
			x = np.matmul(x, rotation)
			x += position
			datapoints.append((x, rotation, position, scale))

	axis = x = np.array([[-1, 0], [1, 0], [0, -1], [0, 1]])

	while not ctx.should_close():
		ctx.new_frame()

		bimpy.set_next_window_pos(bimpy.Vec2(20, 20), bimpy.Condition.Once)
		bimpy.set_next_window_size(bimpy.Vec2(800, 600), bimpy.Condition.Once)
		bimpy.begin("Drawings")

		window_pos = bimpy.get_window_pos()

		center = bimpy.Vec2(100, 100) + window_pos
		m = 100.0
		for i in range(len(datapoints)):
			(x, R, P, S) = datapoints[i]

			for j in range(x.shape[0]):
				point = bimpy.Vec2(x[j, 0], x[j, 1])
				bimpy.add_circle_filled(point * m + center, 5, 0xAF000000 + colors[i], 100)

			axis_ = np.matmul(axis, S * 2.0)
			axis_ = np.matmul(axis_, R) + P

			bimpy.add_line(
				center + bimpy.Vec2(axis_[0, 0], axis_[0, 1]) * m,
				center + bimpy.Vec2(axis_[1, 0], axis_[1, 1]) * m,
				0xFFFF0000, 1)

			bimpy.add_line(
				center + bimpy.Vec2(axis_[2, 0], axis_[2, 1]) * m,
				center + bimpy.Vec2(axis_[3, 0], axis_[3, 1]) * m,
				0xFFFF0000, 1)

		bimpy.end()

		bimpy.set_next_window_pos(bimpy.Vec2(20, 640), bimpy.Condition.Once)
		bimpy.set_next_window_size(bimpy.Vec2(800, 140), bimpy.Condition.Once)
		bimpy.begin("Controls")

		bimpy.input_int("Data points count", DATA_POINTS)
		bimpy.input_int("Clasters count", CLASTERS)

		bimpy.slider_float("std", std, 0.0, 3.0)

		if bimpy.button("Generate data"):
			generate_fake_data()

		bimpy.end()

		ctx.render()
Acknowledgements
- robobuggy https://github.com/gfannes
- njazz https://github.com/njazz
- Florian Rott https://github.com/sauberfred
- zakx https://github.com/zakx
- Joel Linn https://github.com/JoelLinn
Release history Release notifications | RSS feed


Download files
Download the file for your platform. If you're not sure which to choose, learn more about installing packages.
Source Distribution
Built Distributions
Hashes for bimpy-0.1.1-cp39-cp39-manylinux2010_x86_64.whl
| Algorithm | Hash digest | |
|---|---|---|
| SHA256 | 2695561113724b947b724f0bcd1e6f1dbe8f0f3f07a29939a668476f102c8761 |
|
| MD5 | 83fe7184c24c051c215936eac662c2e1 |
|
| BLAKE2b-256 | 2ae8954813be9e3d023902b7be245d8ada765554552d9512536fd78264ab92ab |
Hashes for bimpy-0.1.1-cp38-cp38-win_amd64.whl
| Algorithm | Hash digest | |
|---|---|---|
| SHA256 | 95b6642fc4f9c9b234cd3cd117fda0c0908ded044c87b98c5e3c1d239caffebd |
|
| MD5 | e46c5b93cad942988af2257ade24343e |
|
| BLAKE2b-256 | 23163b930238099f604822d62cd28383541ec53cb341fe0d94262abc1722b498 |
Hashes for bimpy-0.1.1-cp38-cp38-manylinux2010_x86_64.whl
| Algorithm | Hash digest | |
|---|---|---|
| SHA256 | b806de4a301f174ec5c30077e1da8ebe88c650fe38034447e0e9ebf9e7f599b1 |
|
| MD5 | 9912220394063092766ff0e142414d68 |
|
| BLAKE2b-256 | d6a2f0c3df59d830df71c7b73ecb2298d26dfb7d13c976fb41b6dffa15768223 |
Hashes for bimpy-0.1.1-cp37-cp37m-win_amd64.whl
| Algorithm | Hash digest | |
|---|---|---|
| SHA256 | 168f023dfa91706d3640ede80518437f6ee3ffa65d08a34f7efd23928b25c830 |
|
| MD5 | 9f2c4c7055df139cc1929a016c0ed5d0 |
|
| BLAKE2b-256 | dd59bfb489a77cc80f6b4e8dcfdafc39e8931cddefa505d84a5ab00fa230fce5 |
Hashes for bimpy-0.1.1-cp37-cp37m-win32.whl
| Algorithm | Hash digest | |
|---|---|---|
| SHA256 | ffc9b25782b9544620ae8628ee06f6f92b9bd3fef9c12f71b907d9afbba267c4 |
|
| MD5 | cc110efec8171b4a336173925f401324 |
|
| BLAKE2b-256 | 812ee5b9e8a171fc229080d9b4062b12333096c87c9980fc986b35338d3e49b8 |
Hashes for bimpy-0.1.1-cp37-cp37m-manylinux2010_x86_64.whl
| Algorithm | Hash digest | |
|---|---|---|
| SHA256 | fa716591b218567520bf752ff0a45ce11178f937a298767da0b4f9ec8edceda4 |
|
| MD5 | 8bb3b8358d6680fe768ed8826d00bba3 |
|
| BLAKE2b-256 | 6efd819c2c84c724f58e2859d01c0bf4d4328403de83666c5b90e5b91c165e1e |
Hashes for bimpy-0.1.1-cp36-cp36m-win_amd64.whl
| Algorithm | Hash digest | |
|---|---|---|
| SHA256 | 286a0d1e9c99f3c53d91611c9043a955b9e176c441c5de860af98c4a92f76bed |
|
| MD5 | fb745e5f1f80f4c4f189705a56737440 |
|
| BLAKE2b-256 | b354db88d629afef15daa51f9bcafb411c66dee85a4a28a30a9f14bdf6c597dd |
Hashes for bimpy-0.1.1-cp36-cp36m-win32.whl
| Algorithm | Hash digest | |
|---|---|---|
| SHA256 | eb203c33f75f22edf30465d7b6faca88096857c7f61e8bc7f0626e6f2bea7008 |
|
| MD5 | 17deccfd0e36f8fc0a0853af8ebfc65a |
|
| BLAKE2b-256 | 490930b899521b535b7c7eb7b7a963f7abb64a4ebfa7fe84f21388c5225e7c8c |
Hashes for bimpy-0.1.1-cp36-cp36m-manylinux2010_x86_64.whl
| Algorithm | Hash digest | |
|---|---|---|
| SHA256 | 98c6fdb653481e91a7aea72eae523d542ddd6ac494e602bcc3a8ba1ac483e8d0 |
|
| MD5 | ba74b68f78f022ec3496fa470216de23 |
|
| BLAKE2b-256 | 86891ad41fb0d88b7ef1b007f030acf26f401367f5608c51ee041a481e50dcb7 |
Hashes for bimpy-0.1.1-cp35-cp35m-manylinux2010_x86_64.whl
| Algorithm | Hash digest | |
|---|---|---|
| SHA256 | 890c36cc132804e9da596fe8211eecf46fab3d5605ba771629a9938b9ddbaa68 |
|
| MD5 | b72e99285e5afe72cb182ba58179ee1a |
|
| BLAKE2b-256 | 77540cfc0ef3687055410342f1aaa517496f732b5ec74d417e34bc1d8ae72a5a |
Hashes for bimpy-0.1.1-cp27-cp27mu-manylinux2010_x86_64.whl
| Algorithm | Hash digest | |
|---|---|---|
| SHA256 | 36d0501c74a62c23f6f86b34a8764dbc508b23b20e49424e53f177dfca8e7f54 |
|
| MD5 | af0379c2dfc6d6aa172f120b79f84ecb |
|
| BLAKE2b-256 | a1c7240e868de8ee0b7ae612003eb8167bc156d0975e26f8ec1fee169b28da11 |
Hashes for bimpy-0.1.1-cp27-cp27m-win_amd64.whl
| Algorithm | Hash digest | |
|---|---|---|
| SHA256 | f67ab369f1f941d9b704f0b7063117e3192a3ce2f272e340274bd05cf04d2ee5 |
|
| MD5 | 3b34871ec5f7e53faad1b227ec83299d |
|
| BLAKE2b-256 | 230beed2f97028dc02a1c7e5507eb928e2af6403e6381c293bad22b36bc679e6 |
Hashes for bimpy-0.1.1-cp27-cp27m-win32.whl
| Algorithm | Hash digest | |
|---|---|---|
| SHA256 | 7313b9e798f29255ba98298b0b8e430fa672d5ca62cb5c8cb8108c92059dd09a |
|
| MD5 | 657ad1b9554f5f63f69dbed5db7dd95f |
|
| BLAKE2b-256 | 8ae930fd84ee59d4cce98714d85e53748cd3f5b5510a00a4b06122fad3ec793d |
Hashes for bimpy-0.1.1-cp27-cp27m-manylinux2010_x86_64.whl
| Algorithm | Hash digest | |
|---|---|---|
| SHA256 | 6fb58a9505bb47797f420949519963d971880669fcb183cb9275db63e3c1fd91 |
|
| MD5 | 387b8515cc316f9937ad7ee88221c6a4 |
|
| BLAKE2b-256 | c7f0976909aea2b4e2cc2f073af2ac1d1fe7c4500d7f35ca4b388a4e37c68d7c |


