A CDK Python app for deploying ETL jobs that operate data pipelines for InsuranceLake in AWS

Project description
InsuranceLake ETL
The InsuranceLake solution is comprised of two codebases: Infrastructure and ETL. This codebase is specific to the ETL features (both infrastructure and application code), but the documentation that follows applies to the solution as a whole. For documentation with specific details on the Infrastructure, refer to the InsuranceLake Infrastructure with CDK Pipeline README.
This solution helps you deploy ETL processes and data storage resources to create InsuranceLake. It uses Amazon S3 buckets for storage, AWS Glue for data transformation, and AWS CDK Pipelines. The solution is originally based on the AWS blog Deploy data lake ETL jobs using CDK Pipelines.
CDK Pipelines is a construct library module for painless continuous delivery of CDK applications. CDK stands for Cloud Development Kit. It is an open source software development framework to define your cloud application resources using familiar programming languages.
Specifically, this solution helps you to:
- Deploy a "3 Cs" (Collect, Cleanse, Consume) architecture InsuranceLake
- Deploy ETL jobs needed make common insurance industry data souces available in a data lake
- Use pySpark Glue jobs and supporting resoures to perform data transforms in a modular approach
- Build and replicate the application in multiple environments quickly
- Deploy ETL jobs from a central deployment account to multiple AWS environments such as Dev, Test, and Prod
- Leverage the benefit of self-mutating feature of CDK Pipelines; specifically, the pipeline itself is infrastructure as code and can be changed as part of the deployment
- Increase the speed of prototyping, testing, and deployment of new ETL jobs
Contents
- Quickstart
- Quickstart with CI/CD
- Architecture
- Pipeline Usage
- Codebase
- User Documentation
- Developer Documentation
- Additional resources
- Authors
- License Summary
Quickstart
If you'd like to get started quickly transforming some sample raw insurance data and running SQL on the resulting dataset, and without worrying about CI/CD, follow this guide:
Python/CDK Basics
Skip steps in this section as needed if you've worked with CDK and Python before.
- Open the AWS Console and navigate to AWS Cloud9
- Select the region to create the Cloud9 environment (should be the same region as the stack; us-east-2 by default)
- Select Create environment
- Enter an environment name, for example, InsuranceLakeDemo
- Select the t3.small instance size (CDK deployment requires more than 1 GB RAM)
- Leave the Platform selected as Amazon Linux 2023
- Adjust the timeout to your preference
- Click Create
- Open the environment you created and wait until it is available for use
- Clone the repositories
git clone https://github.com/aws-samples/aws-insurancelake-infrastructure.git
git clone https://github.com/aws-samples/aws-insurancelake-etl.git
- Use a terminal or command prompt and change the working directory to the location of the infrastructure code
cd aws-insurancelake-infrastructure
- Create a Python virtual environment
python3 -m venv .venv
- Activate the virtual environment
source .venv/bin/activate
- Install required Python libraries
- NOTE: You may see a warning stating that a newer version is available; it is safe to ignore this for the Quickstart
pip install -r requirements.txt
- Bootstrap CDK in your AWS account
- By default the solution will deploy resources to the
us-east-2region
cdk bootstrap - By default the solution will deploy resources to the
Deploy the Application
- Ensure you are still in the
aws-insurancelake-infrastructuredirectory - Deploy infrastructure resources in the development environment (1 stack)
cdk deploy Dev-InsuranceLakeInfrastructurePipeline/Dev/InsuranceLakeInfrastructureS3BucketZones
- Review and accept IAM credential creation for the S3 bucket stack
- Wait for deployment to finish (approx. 5 mins)
- Copy the S3 bucket name for the Collect bucket to use later
- Bucket name will be in the form:
dev-insurancelake-<AWS Account ID>-<Region>-collect
- Bucket name will be in the form:
- Switch the working directory to the location of the etl code
cd ../aws-insurancelake-etl
- Deploy the ETL resources in the development environment (4 stacks)
cdk deploy Dev-InsuranceLakeEtlPipeline/Dev/InsuranceLakeEtlDynamoDb Dev-InsuranceLakeEtlPipeline/Dev/InsuranceLakeEtlGlue Dev-InsuranceLakeEtlPipeline/Dev/InsuranceLakeEtlStepFunctions Dev-InsuranceLakeEtlPipeline/Dev/InsuranceLakeEtlAthenaHelper
- Wait for approximately 1 minute for DynamoDB deployment to finish
- Review and accept IAM credential creation for the Glue jobs stack
- Wait approximately 3 minutes for deployment to finish
- Review and accept IAM credential creation for the Step Functions stack
- Wait approximately 7 minutes for deployment of Step Functions and Athena Helper stacks to finish
Try out the ETL Process
- Populate the DynamoDB lookup table with sample lookup data
AWS_DEFAULT_REGION=us-east-2 resources/load_dynamodb_lookup_table.py SyntheticGeneralData dev-insurancelake-etl-value-lookup resources/syntheticgeneral_lookup_data.json
- Transfer the sample claim data to the Collect bucket
aws s3 cp resources/syntheticgeneral-claim-data.csv s3://<Collect S3 Bucket>/SyntheticGeneralData/ClaimData/
- Transfer the sample policy data to the Collect bucket
aws s3 cp resources/syntheticgeneral-policy-data.csv s3://<Collect S3 Bucket>/SyntheticGeneralData/PolicyData/
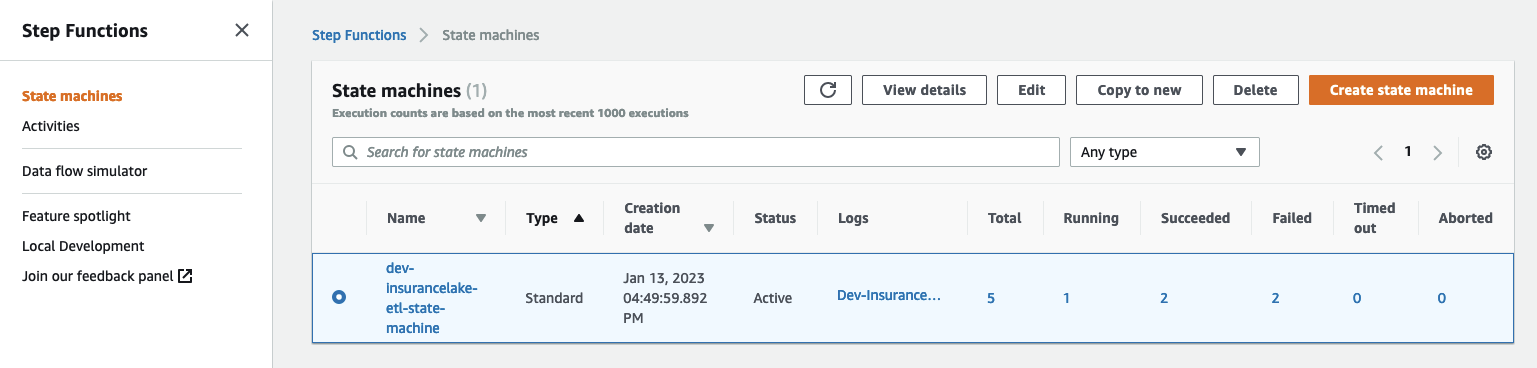
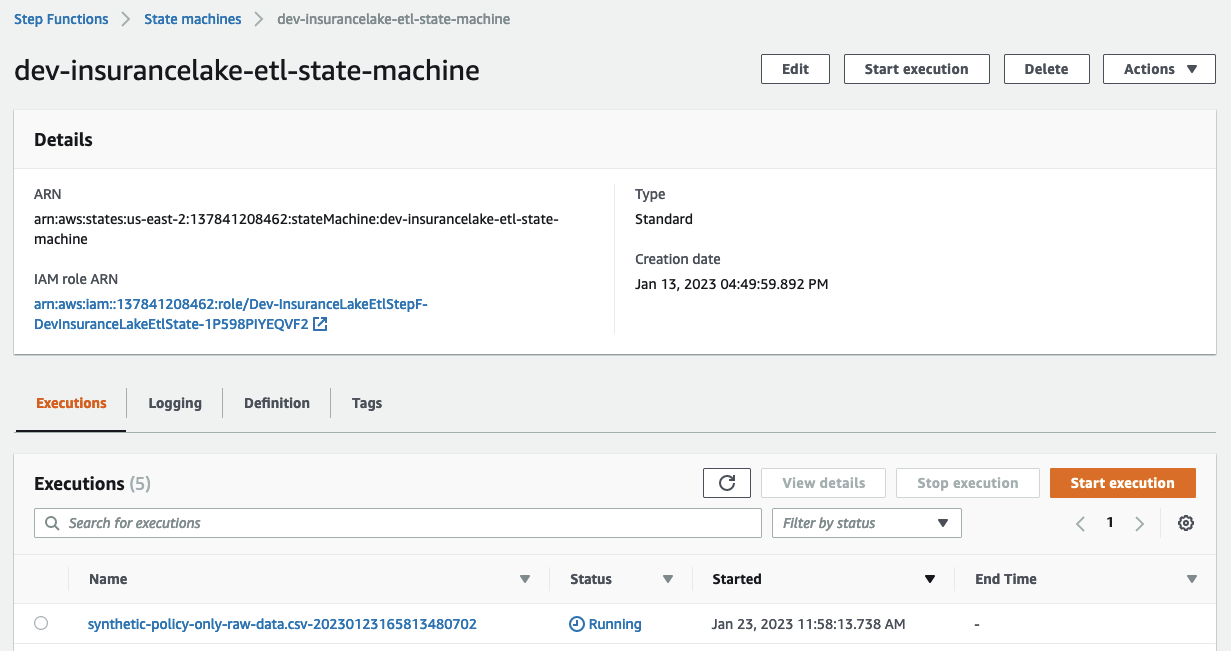
- Open Step Functions in the AWS Console and select
dev-insurancelake-etl-state-machine - Open the state machine execution in progress and monitor the status until completed
- Open Athena in the AWS Console
- Select Launch Query Editor, and change the Workgroup to
insurancelake - Run the following query to view a sample of prepared data in the consume bucket:
select * from syntheticgeneraldata_consume.policydata limit 100
Quickstart with CI/CD
If you've determined the AWS CDK InsuranceLake is a good starting point for your own InsuranceLake, and would like to rapidly iterate through development cycles with one or more teams, we recommend deploying with a CI/CD pipeline. Follow this guide to create your CodePipeline stack and to use it to deploy the InsuranceLake resources:
- If this is your first time using the application, follow the Python/CDK Basics steps
- Use a terminal or command prompt and change the working directory to the location of the infrastruture code
cd aws-insurancelake-infrastructure
- In
lib/configuration.py, review thelocal_mappingstructure in theget_local_configuration()function- Specifically, the regions and account IDs should make sense for your environments. These values, in the repository (not locally), will be used by CodeCommit and need to be maintained in the repository.
- The values for the Test and Production environments can be ommitted at this time, because we will only be deploying the Deployment and Development environments.
- We want to explicitly specify the account and region for each deployment environment so that the infrastructure VPCs get 3 Availability Zones (if the region has them available). Reference
- Deploy CodeCommit repository stack
cdk deploy Deploy-InsuranceLakeInfrastructureMirrorRepository
- If you plan to use CodeCommit as the main repository, install the Git CodeCommit Helper:
sudo pip install git-remote-codecommit
- Initialize git, create a develop branch, perform initial commit, and push to remote
- We are using the develop branch because the Dev environment deployment is triggered by commits to the develop branch.
- Edit the repository URL to correspond to your version control system if you are not using CodeCommit
git init
git branch -M develop
git add .
git commit -m 'Initial commit'
git remote add origin codecommit::us-east-2://aws-insurancelake-infrastructure
git push --set-upstream origin develop
- Deploy Infrastructure CodePipeline resource in the development environment (1 stack)
cdk deploy DevInsuranceLakeInfrastructurePipeline
- Review and accept IAM credential creation for the CodePipeline stack
- Wait for deployment to finish (approx. 5 mins)
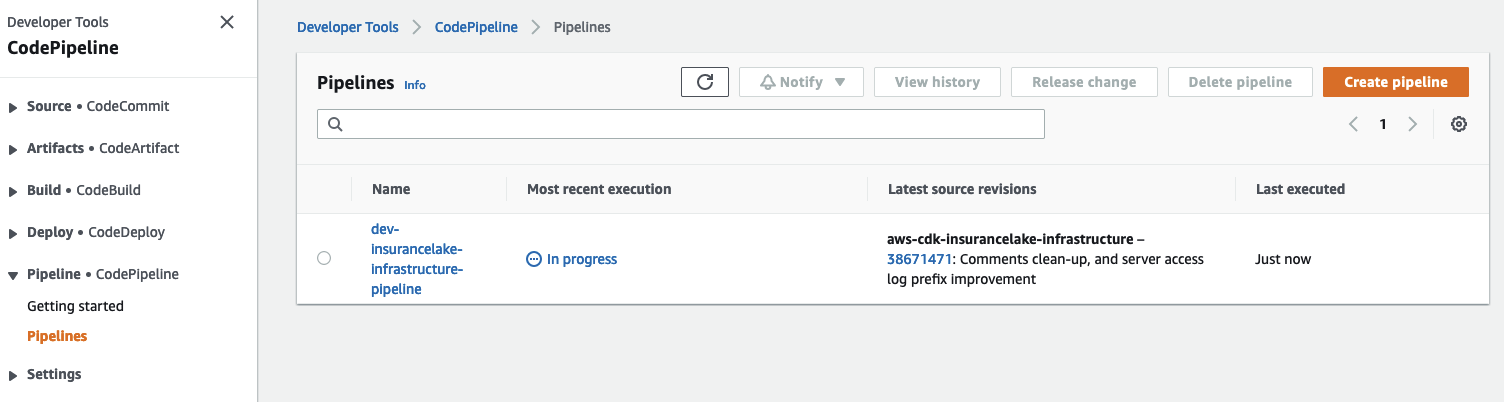
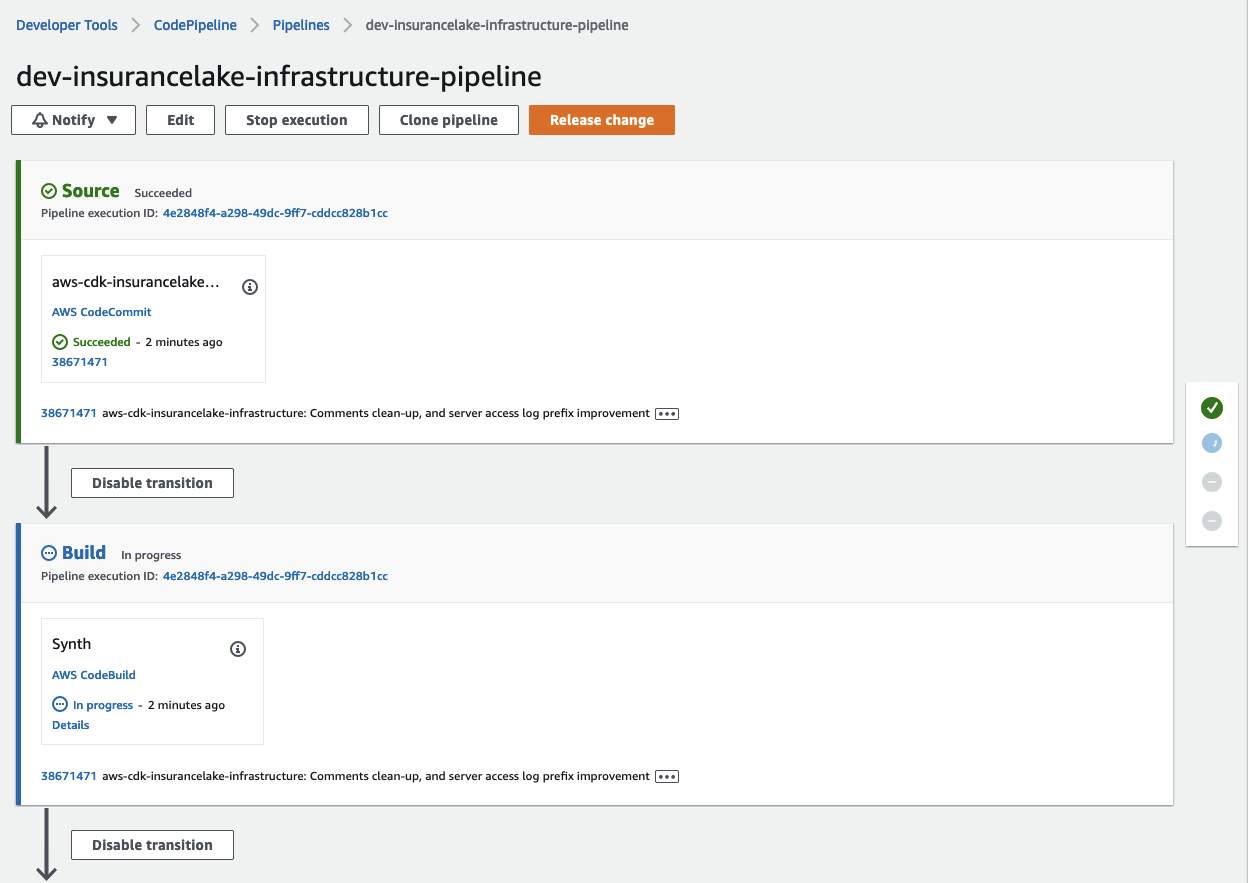
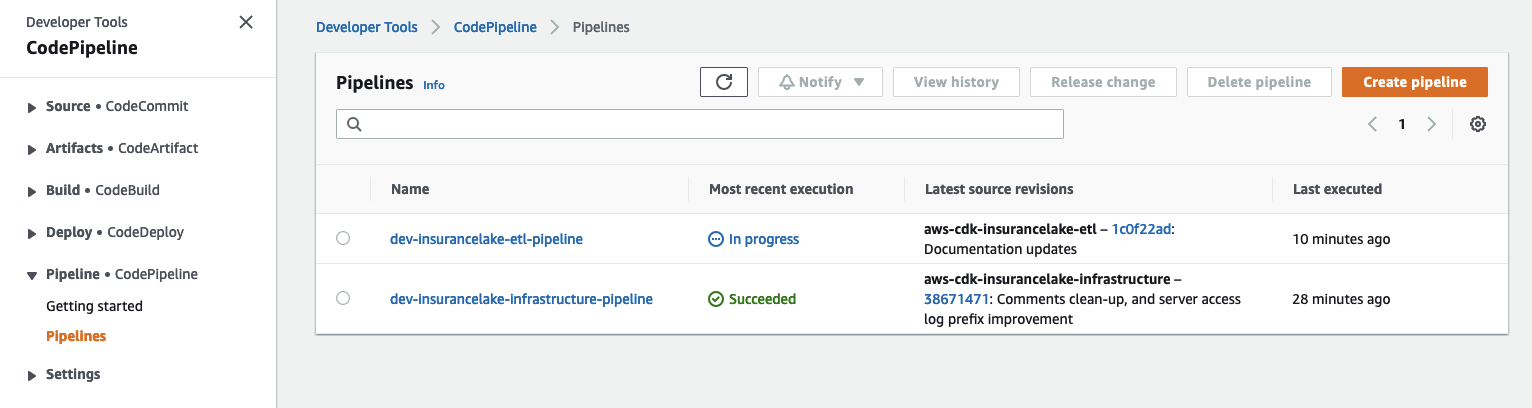
- Open CodePipeline in the AWS Console and select the
dev-insurancelake-infrastructure-pipelinePipeline- The first run of the pipeline starts automatically after the Pipeline stack is deployed.
- The first run of the pipeline starts automatically after the Pipeline stack is deployed.
- Monitor the status of the pipeline until completed
- Switch the working directory to the location of the etl code
cd ../aws-insurancelake-etl
- In
lib/configuration.py, review thelocal_mappingstructure in theget_local_configuration()function, ensure this matches the Infrastructure configuration, or differs if specifically needed. - Deploy CodeCommit repository stack
cdk deploy Deploy-InsuranceLakeEtlMirrorRepository
- Initialize git, create a develop branch, perform initial commit, and push to remote
- We are using the develop branch because the Dev environment deployment is triggered by commits to the develop branch.
- Edit the repository URL to correspond to your version control system if you are not using CodeCommit
git init
git branch -M develop
git add .
git commit -m 'Initial commit'
git remote add origin codecommit::us-east-2://aws-insurancelake-etl
git push --set-upstream origin develop
- Deploy ETL CodePipeline resource in the development environment (1 stack)
cdk deploy DevInsuranceLakeEtlPipeline
- Review and accept IAM credential creation for the CodePipeline stack
- Wait for deployment to finish (approx. 5 mins)
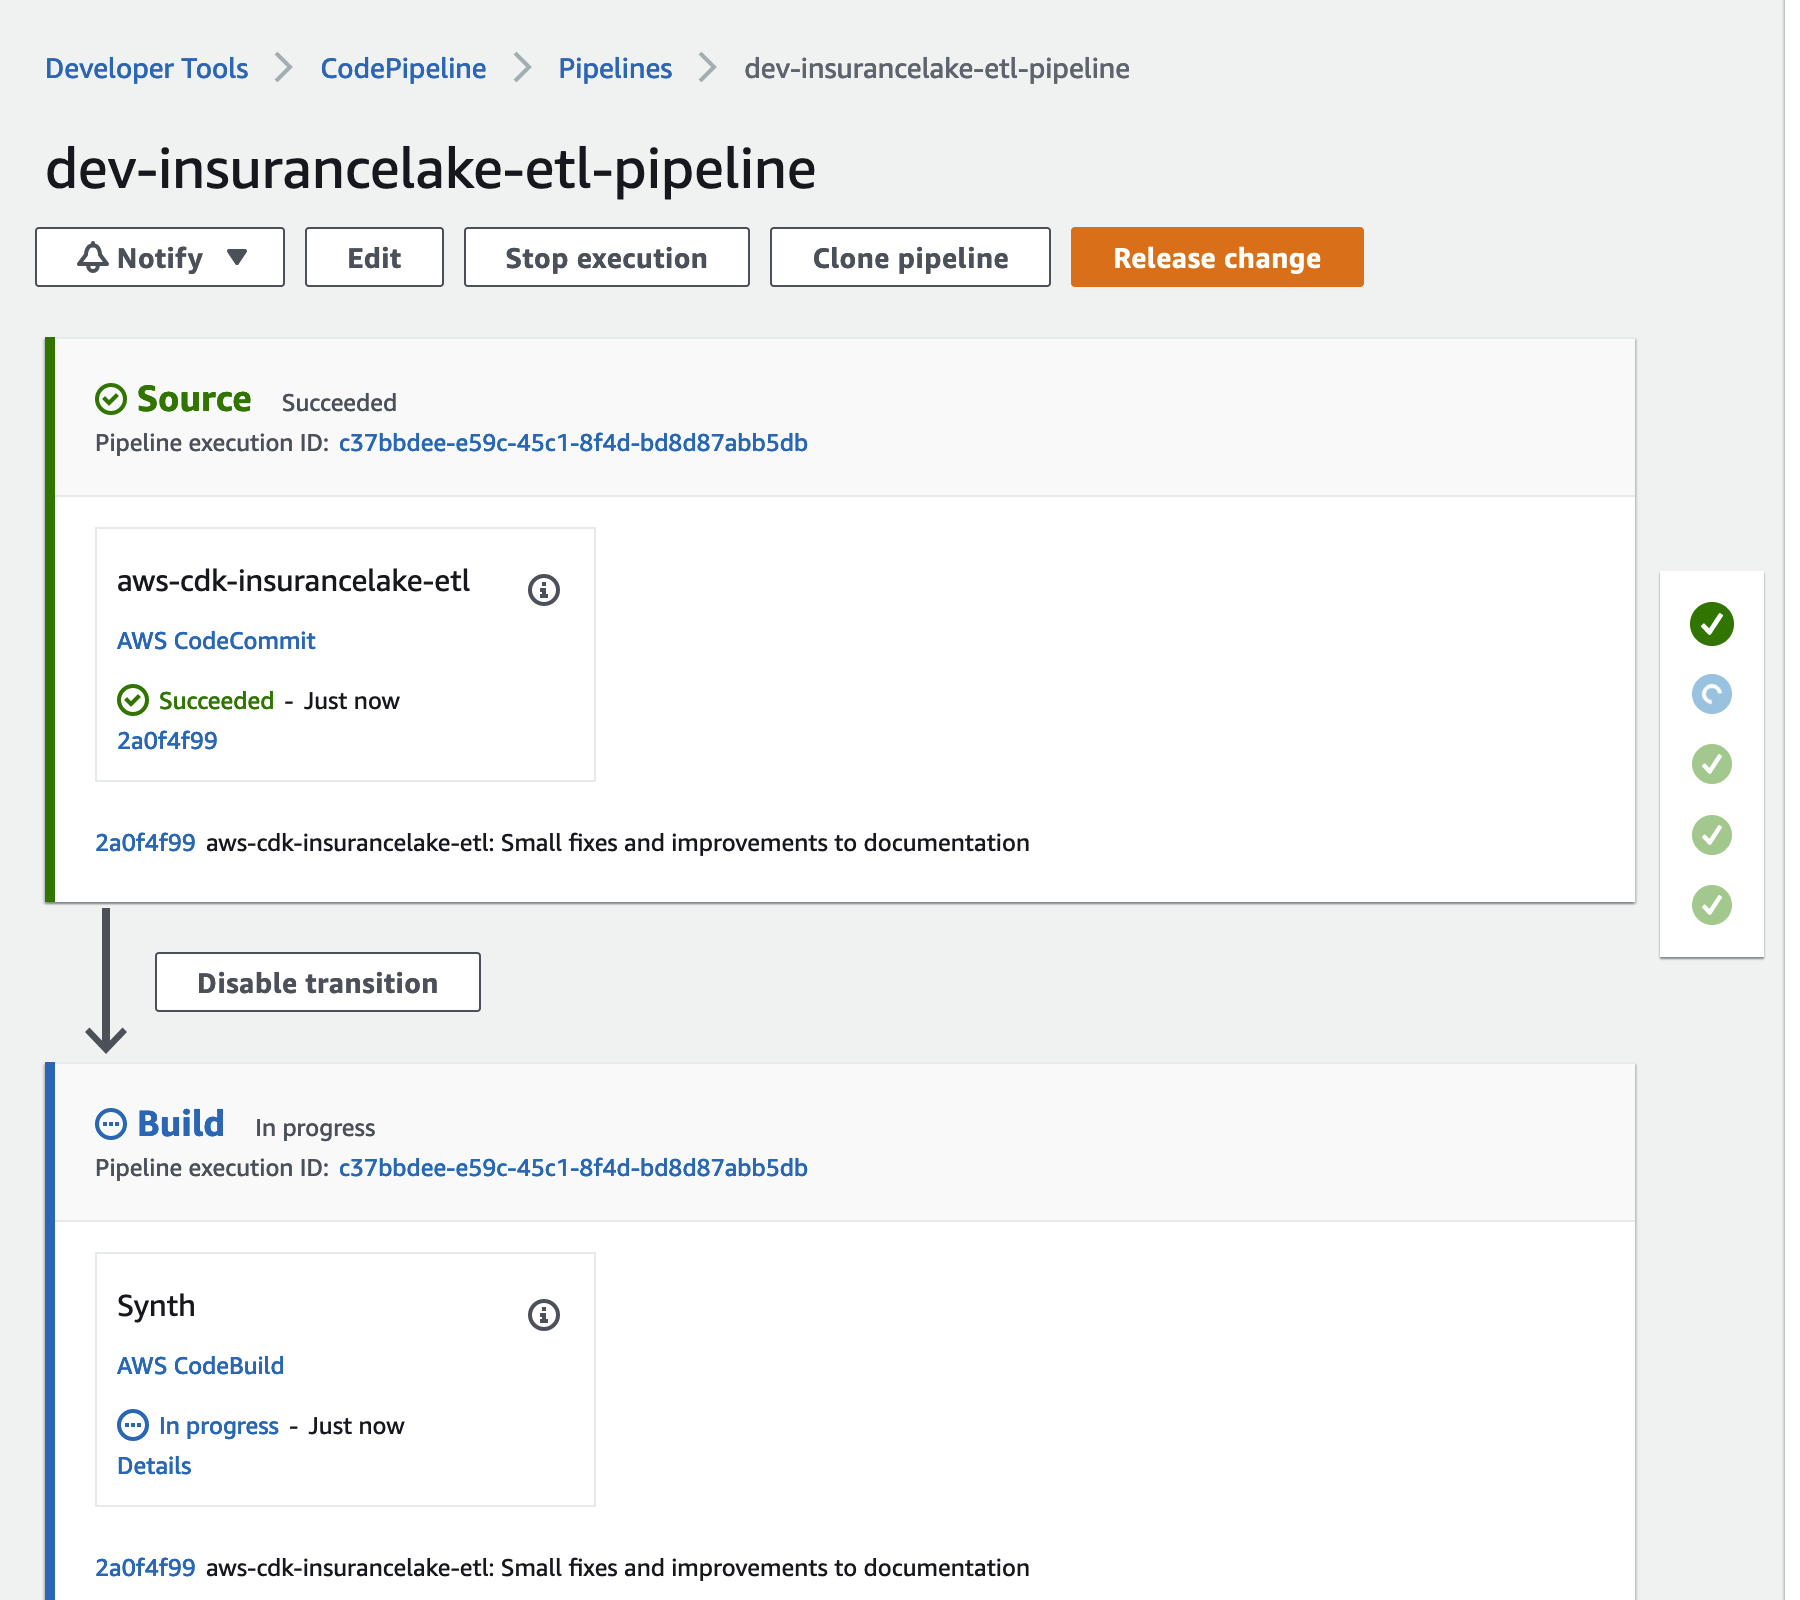
- Open CodePipeline in the AWS Console and select the
dev-insurancelake-etl-pipelinePipeline- The first run of the pipeline starts automatically after the Pipeline stack is deployed.
- The first run of the pipeline starts automatically after the Pipeline stack is deployed.
- Monitor the status of the pipeline until completed
Architecture
In this section we talk about the overall InsuranceLake architecture and the ETL component.
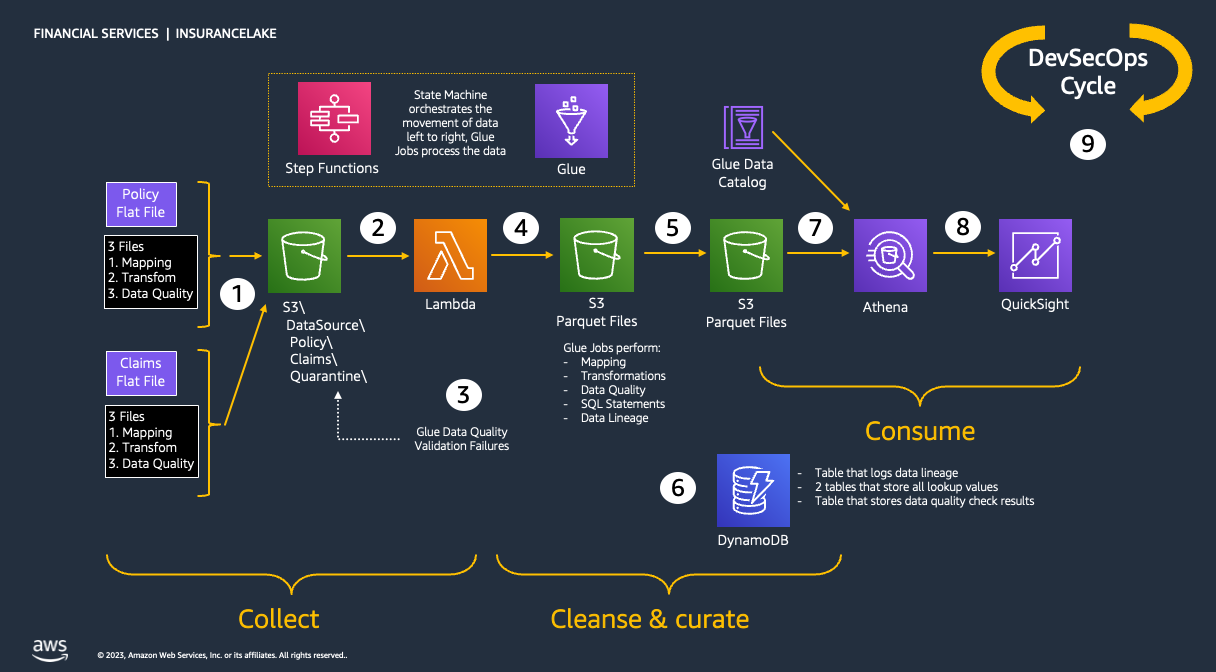
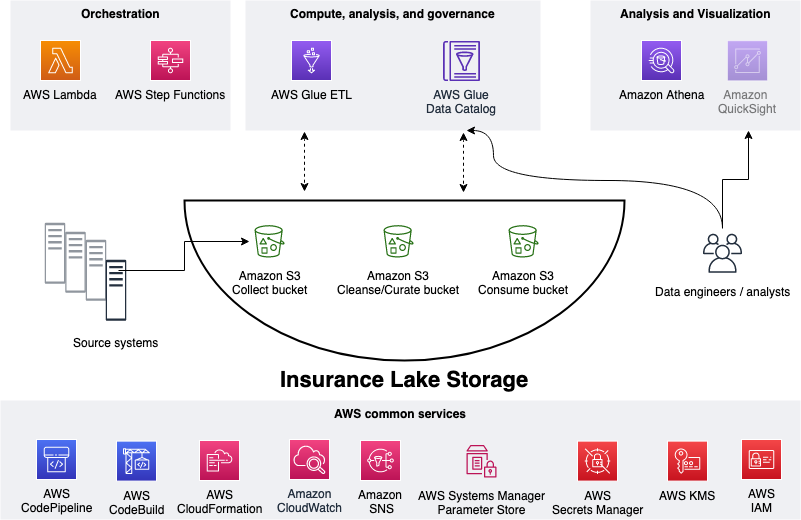
InsuranceLake 3 Cs
As shown in the figure below, we use Amazon S3 for storage. We use three S3 buckets: 1. Collect bucket to store raw data in its original format 1. Cleanse/Curate bucket to store the data that meets the quality and consistency requirements of the lake 1. Consume bucket for data that is used by analysts and data consumers of the lake (for example, Amazon Quicksight, Amazon Sagemaker)
InsuranceLake is designed to support a number of source systems with different file formats and data partitions. To demonstrate, we have provided a CSV parser and sample data files for a source system with two data tables, which are uploaded to the Collect bucket.
We use AWS Lambda and AWS Step Functions for orchestration and scheduling of ETL workloads. We then use AWS Glue with pySpark for ETL and data cataloging, Amazon DynamoDB for transformation persistence, Amazon Athena for interactive queries and analysis. We use various AWS services for logging, monitoring, security, authentication, authorization, notification, build, and deployment.
Note: AWS Lake Formation is a service that makes it easy to set up a secure data lake in days. Amazon QuickSight is a scalable, serverless, embeddable, machine learning-powered business intelligence (BI) service built for the cloud. These two services are not used in this solution but can be added.
ETL
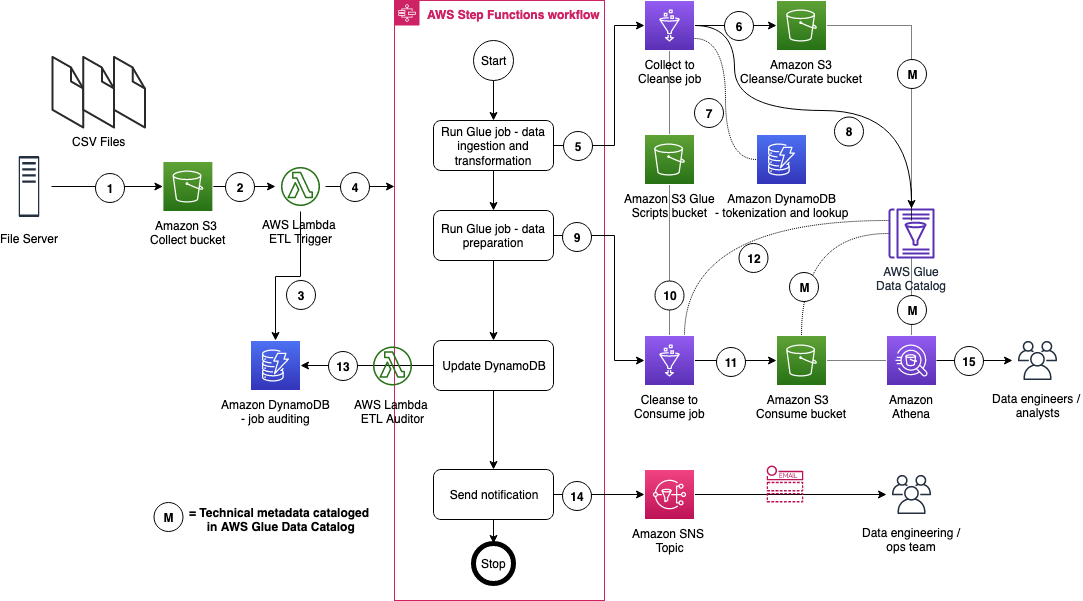
The figure below represents the ETL resources we provision for Data Lake.
- A file server uploads files to S3 collect bucket of InsuranceLake; file server is a data producer/source for the data lake
- Amazon S3 triggers an event notification to AWS Lambda Function
- AWS Lambda function inserts job information in DynamoDB table
- AWS Lambda function starts an execution of AWS Step Functions State machine
- Runs the first Glue job: initiates data processing from Collect to Cleanse
- Glue job: Spark Glue job will process the data from Collect to Cleanse; source data is assumed to be in CSV format and will be converted to Parquet format
- DynamoDB: Glue job tokenization will store original values, and lookup tables reside in database
- After creating Parquet data, update the Glue Data Catalog table
- Runs the second Glue job: initiates data processing from Cleanse to Consume
- Glue job: Cleanse to Consume fetches data transformation rules from Glue scripts bucket, and runs transformations
- Stores the result in Parquet format in Consume bucket
- Glue job updates the Data Catalog table
- Updates DynamoDB table with job status
- Sends SNS notification
- Data engineers or analysts analyze data using Amazon Athena
Pipeline Usage
Bucket Layout
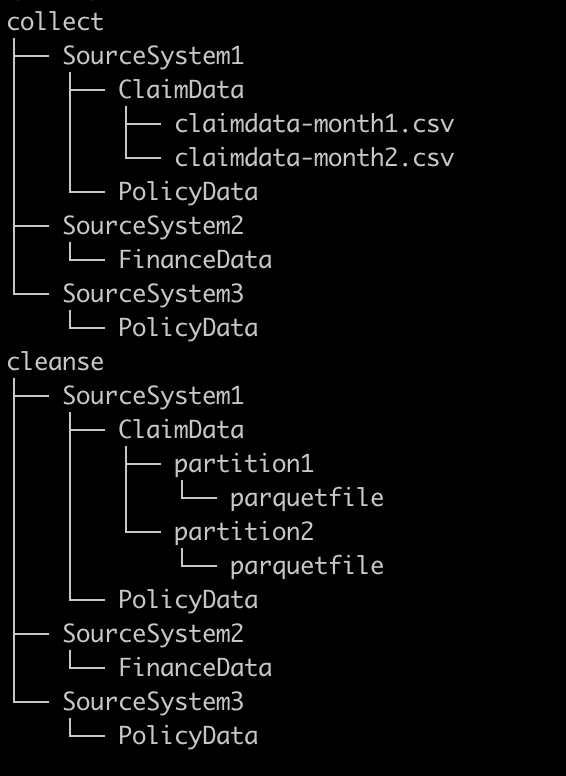
In order to allow transform specifications to be matched with source system data and organized in groups, each of the three ETL stage buckets (Collect, Cleanse, Consume) have similar directory layouts. The first level represents the source system name or the database that will group the underlying tables. The second layer represents the data set or table containing the uploaded data. In the Collect bucket, the source files are stored at the second layer. In the Cleanse bucket, data is converted to compressed parquet files and stored in partitions at the second layer. In the Consume bucket database and table names may change if data is merged.
Conversely, the files for the transformation/input configuration, schema mapping, data quality rules, Athena/Spark SQL, and entity matching configuration will follow a naming convention that matches the bucket layout. This matching is case sensitive.
| Purpose | ETL Scripts Bucket Location | Naming Convention |
|---|---|---|
| Schema Mapping | /etl/transformation-spec | <database name>-<table name>.csv |
| Transformation/Input Config | /etl/transformation-spec | <database name>-<table name>.json |
| Data Quality Rules | /etl/dq-rules | dq-<database name>-<table name>.json |
| Spark SQL | /etl/transformation-sql | spark-<database name>-<table name>.sql |
| Athena SQL | /etl/transformation-sql | athena-<database name>-<table name>.sql |
| Entity Match Config | /etl/transformation-spec | <database name>-entitymatch.json |
Transformation Modules
| File / Folder | Description |
|---|---|
| datatransform_dataprotection | pySpark logic to redact, hash, and tokenize sensitive data columns |
| datatransform_lookup | pySpark logic to perform column value lookup operations |
| datatransform_misc | pySpark logic for miscellaneous data transformation functions, such as filtering rows |
| datatransform_premium | pySpark logic to perform common insurance industry data transforms |
| datatransform_stringmanipulation | pySpark logic to perform regex transforms, and Python formatting string operations on data |
| datatransform_structureddata | pySpark logic to perform operations on nested data structures usually created from JSON files |
| datatransform_typeconversion | pySpark logic to convert date columns, and other data types to standard format |
| custom_mapping | pySpark logic to rename columns according to a map file |
| dataquality_check | Glue logic to run Data Quality rules according to a rules file |
| datalineage | Custom data lineage tracking class designed to work with InsuranceLake transforms |
Codebase
Source Code Structure
Table below explains how this source code is structured:
| File / Folder | Description |
|---|---|
| app.py | Application entry point |
| code_commit_stack | Optional stack to deploy an empty CodeCommit respository for mirroring |
| pipeline_stack | Pipeline stack entry point |
| pipeline_deploy_stage | Pipeline deploy stage entry point |
| dynamodb_stack | Stack creates DynamoDB Tables for Job Auditing and ETL transformation rules |
| glue_stack | Stack creates Glue Jobs and supporting resources such as Connections, S3 Buckets (script and temporary) and an IAM execution Role |
| step_functions_stack | Stack creates an ETL State machine which invokes Glue Jobs and supporting Lambdas - state machine trigger and status notification |
| athena_helper_stack | Stack creates an Athena workgroup with query results bucket ready for demonstration SQL queries |
| Collect-to-Cleanse Glue Script | Glue pySpark job data processing logic for Collect bucket data, which stores results in the Cleanse bucket |
| Cleanse-to-Consume Glue Script | Glue pySpark job data processing logic for Cleanse bucket data, which stores results in the Consume bucket |
| Entity Match Glue Script | Glue pySpark job data processing logic for Entity Matching, which stores results in the Consume bucket |
| ETL Job Auditor | Lambda script to update DynamoDB in case of glue job success or failure |
| ETL Trigger | Lambda script to trigger step function and initiate DynamoDB |
| ETL Transformation Mapping and Specification | Field mapping and transformation specification logic to be used for data processing from Collect to Cleanse |
| ETL Transformation SQL | Transformation SQL logic to be used for data processing from Cleanse to Consume |
| ETL Data Quality Rules | Glue Data Quality rules for quality checks from Cleanse to Consume |
| test | This folder contains pytest unit tests |
| resources | This folder has architecture, process flow diagrams, sample data, and additional documentation |
Security
InsuranceLake uses CDK-nag to ensure AWS resource security recommendations are followed. CDK-nag can generate warnings, which may need to be fixed depending on the context, and errors, which will interrupt the stack synthesis and prevent any deployment.
To force synthesis of all stacks (including the CodePipeline deployed stacks), use the following command:
cdk synth '**'
When this operation is complete, you will also have access to the CDK-nag reports in CSV format in the cdk.out directory and assembly directories. By default, the AWS-Solutions Nag pack is used, but any Nag pack can be selected by adjusting
InsuranceLake uses bandit to check all helper script, Lambda, and Glue Python code.
To scan all application code using bandit, use the following command:
bandit -r --ini .bandit
Unit Testing
The Python CDK unit tests use pytest, which will be installed as part of the solution requirements. The pySpark Glue Job and Python Lambda function unit tests are still under development.
Run tests with the following command (--cov will include a code coverage report):
python -m pytest --cov
Note that without a AWS Glue Docker container, the Glue job tests will be skipped with a message like:
test/test_custom_mapping.py::test_custommapping_renames_field SKIPPED (No pySpark environment found) [ 17%]
To setup your local environment with a Glue container, retrieve the container image from the AWS Glue Dockerhub repository. Ensure you use the right tag for the version of AWS Glue used in the stack (currently v4). Detailed instructions can be found on Developing AWS Glue ETL jobs locally using a container
Integration Testing
- TODO: Automate manual steps
-
Transfer the sample claim data to the Collect bucket (Source system: SyntheticData, Table: ClaimData)
aws s3 cp resources/syntheticgeneral-claim-data.csv s3://<Collect S3 Bucket>/SyntheticGeneralData/ClaimData/
-
Transfer the sample policy data to the Collect bucket (Source system: SyntheticData, Table: PolicyData)
aws s3 cp resources/syntheticgeneral-policy-data.csv s3://<Collect S3 Bucket>/SyntheticGeneralData/PolicyData/
-
Upon successful load of file S3 event notification will trigger the lambda
-
Lambda will insert record into the dynamodb table
{environment}-{resource_name_prefix}-etl-job-auditto track job start status -
Lambda function will trigger the step function. Step function name will be
<filename>-<YYYYMMDDHHMMSSxxxxxx>and provided the required metadata input -
Step functions state machine will trigger the Glue job for Collect to Cleanse data processing.
-
Glue job will load the data into conformed bucket using the provided metadata and data will be loaded to
s3://{environment}-{resource_name_prefix}-{account}-{region}-cleanse/syntheticgeneraldata/claimdata/year=YYYY/month=MM/day=DDin parquet format -
Glue job will create/update the catalog table using the tablename passed as parameter based on folder name
claimdata -
After Collect to Cleanse job completion, Cleanse to Consume Glue job will get triggered in step function
-
Cleanse to Consume Glue glue job will use the transformation logic being provided in Dynamodb as part of prerequisites for data transformation
-
Cleanse to Consume Glue job will store the result set in S3 bucket under
s3://{environment}-{resource_name_prefix}-{account}-{region}-consume/syntheticgeneraldata/claimdata/year=YYYY/month=MM/day=DD -
Cleanse to Consume Glue job will create/update the catalog table
-
After completion of Glue job, Lambda will get triggered in step function to update the Dynamodb table
{environment}-{resource_name_prefix}-etl-job-auditwith latest status -
SNS notification will be sent to the subscribed users
-
To validate the data, please open Athena service and execute query:
select * from syntheticgeneraldata_consume.policydata limit 100
Additional Resources
- InsuranceLake Quickstart AWS Workshop
- General Insurance dashboard on Quicksight's DemoCentral using Consume-ready-data
- Life Insurance dashboard also on Quicksight's DemoCentral
Authors
The following people are involved in the design, architecture, development, testing, and review of this solution:
- Cory Visi, Senior Solutions Architect, Amazon Web Services
- Ratnadeep Bardhan Roy, Senior Solutions Architect, Amazon Web Services
- Isaiah Grant, Cloud Consultant, 2nd Watch, Inc.
- Muhammad Zahid Ali, Data Architect, Amazon Web Services
- Ravi Itha, Senior Data Architect, Amazon Web Services
- Justiono Putro, Cloud Infrastructure Architect, Amazon Web Services
- Mike Apted, Principal Solutions Architect, Amazon Web Services
- Nikunj Vaidya, Senior DevOps Specialist, Amazon Web Services
License Summary
This sample code is made available under the MIT-0 license. See the LICENSE file.
Copyright Amazon.com and its affiliates; all rights reserved. This file is Amazon Web Services Content and may not be duplicated or distributed without permission.


Download files
Download the file for your platform. If you're not sure which to choose, learn more about installing packages.
Source Distribution
Built Distribution
Hashes for aws-insurancelake-etl-3.3.1.tar.gz
| Algorithm | Hash digest | |
|---|---|---|
| SHA256 | 6eb5f275c6b928340a155fd718c01473a70fbdb76075e2ddc1f5333f778ead7b |
|
| MD5 | d53f48303c281bbaa1e6840e1ef181d5 |
|
| BLAKE2b-256 | 3c250a2c31b94093218bada539b49da5f03ec2ce8460f257e3f2922c25e9ce8a |
Hashes for aws_insurancelake_etl-3.3.1-py3-none-any.whl
| Algorithm | Hash digest | |
|---|---|---|
| SHA256 | 1719d6486a633998d920c08d1a1d56998069b60b43c0804d014fc83e4c1a4373 |
|
| MD5 | 501daac584caa2bf24e4be6400cf24a4 |
|
| BLAKE2b-256 | ab51fe36e8dbbeb55fe412b1c266619887d620d319efa75caaa13460f41f43ab |


