Smart Parallel Automated Cryo Electron tomography (SPACEtomo) is a package that - together with SerialEM - completely automates the cryoET data acquisition workflow.

Project description
SPACEtomo
Smart Parallel Automated Cryo Electron tomography (SPACEtomo) is a Python package and set of SerialEM scripts to fully automate the cryoET data collection workflow. Please refer to the publication (pdf) for more details.

Use cases
SPACEtomo allows for a variety of automation levels applicable to a range of samples.
- Automated whole grid montage acquisition, lamella detection and medium mag lamella montage collection is sample independent and can be run using a multi-grid workflow.
- Manual target selection using a user-friendly drag and drop user interface (sample independent).
- Automated target selection based on segmentation of biological classes in Yeast.
Contents
- Hardware
- Installation
- Configuration
- Usage
- Video tutorials
- Troubleshooting
- Recent changes
- Future plans
- Training Data
Hardware
SPACEtomo has only been tested on Thermo Scientific Krios and Glacios instruments equipped with a Gatan K3 or K2, or a Falcon 4 direct electron detector. A recent version of the open-source microscope control software SerialEM (v4.2+) should be installed and calibrated. It also requires the PACEtomo (v1.9.2+) scripts.
If you want to test SPACEtomo on another system, please reach out to me at spacetomo.help@gmail.com.
Installation
SPACEtomo requires SerialEM 4.2 or higher capable of running Python (>=3.9) scripts.
NOTE: A Gatan K2 computer does not support Python >3.7. You can use Python 3.6 together with an external workstation running Python >=3.9 (details below).
You can run the following lines of code in a SerialEM script window to test if Python is configured correctly:
#!Python
import serialem as sem
sem.OKBox("Python works!")
If you get an error message, please consult the SerialEM website on how to setup Python for SerialEM.
Python packages
Additionally, you will require several Python packages. It is best practice to create a virtual environment for SPACEtomo running Python 3.9 or higher (SerialEM compatible versions of Python).
After installing your desired Python version (following commands assume Python 3.9, since most testing was done in this version), create a folder for your virtual environment and run:
C:\Python39\python -m venv <path_to_your_venv>
To activate the virtual environment run:
<path_to_your_venv>\Scripts\activate.bat
The next step will be much easier if you have a network connection. Please contact your responsible IT specialist if it's possible to temporarily allow network connection or setup a proxy.
With network connection, you can run:
pip install --extra-index-url https://download.pytorch.org/whl/cu118 SPACEtomo[gui,predict]
With proxy, you can run:
pip install --proxy <proxy_address> --extra-index-url https://download.pytorch.org/whl/cu118 SPACEtomo[gui,predict]
The --extra-index-url is only necessary if you want to use a CUDA enabled GPU for the prediction tasks. The given URL is for CUDA 11.8. You can check the PyTorch download site for URLs to install different CUDA versions!
NOTE: If the installation fails, you can try SPACEtomo[gui] or only SPACEtomo to install the minimal environment. In that case you will require an external machine to run any deep learning dependent tasks.
Without any network connection, you will have to go through these steps on another Windows machine (e.g. the microscope support PC).
(The Windows machine should be as similar in hardware and software as possible to the SerialEM computer.)
-
Setup the same python version and virtual environment.
-
Create a new folder to save the python packages.
-
In this folder, run:
pip download --extra-index-url https://download.pytorch.org/whl/cu118 SPACEtomo[gui,predict] -
Copy this folder to the SerialEM computer.
-
On the SerialEM computer, open the command prompt and activate the virtual environment with
<path_to_your_venv>\Scripts\activate.bat. -
Navigate to the folder containing the downloaded Python packages and ensure it does not contain anything else!
-
In this folder on the SerialEM computer, run:
FOR %i in (*) DO python -m pip install --no-deps --no-build-isolation %i
If no error messages appear, all necessary packages should be successfully installed. If there are errors, you will have to resolve any compatibility issues. The easiest would be to try the same procedure on a Windows machine more similar to the SerialEM computer.
Here you can find a list of packages and versions that works on our Gatan K3 and K2 computers.
SerialEM Python path
With that, all dependencies should be ready to go!
To let SerialEM access this environment, we have to adjust the SerialEM_properties.txt file (usually found in C:\Program Data\SerialEM) to include the Python path to the folder containing our environment's python.exe:
PathToPython 3.9 <path_to_your_venv>\Scripts
Configuration
Models
To install SPACEtomo, you will have to import the deep learning models and adjust the config file.
After activating your virtual environment in the command prompt with
<path_to_your_venv>\Scripts\activate.bat
you can run the SPACEmodel command:
SPACEmodel list                                 # Lists all imported models
SPACEmodel add --path <path_to_model_file>      # Imports model (.zip for segmentation model, .pt for detection model)
SPACEmodel add --url <url_to_model_file>        # Downloads and imports model
SPACEmodel activate --name <name_of_model>      # Activates model (1 detection and 1 segmentation model are necessary)
SPACEmodel remove --name <name_of_model>        # Removes model
SPACEmodel clear                                # Removes all models
There are 2 types of SPACEtomo models:
- Lamella detection models that use whole grid maps to identify lamella sites.
- Lamella segmentation models that use medium magnification maps of a lamella to create a segmentation.
You can find information on all currently supported models here!
NOTE: If you train your own models, please consider sharing them with the community!
Config
You should also adjust the config file if you use a new model. You can access the config.py file using the SPACEconfig command:
SPACEconfig get --name <file_name>              # Fetches a copy of config.py and saves it to the current directory as <file_name>
SPACEconfig set --name <file_name>              # Applies <file_name> (config.py by default) as new config file
You can edit and adjust the config.py like a text file for your needs.
Model specific config entries
-
WG_model_file: Path to lamella detection model (automatically configured bySPACEmodel add). -
WG_model_pix_size: Pixel size of lamella detection model in nm. -
WG_model_sidelen: Side length of images used for detection model in pixel. -
WG_model_categories: List of category names distinguished by lamella detection model. -
WG_model_gui_colors: List of colors used in GUI to represent lamella categories. -
WG_model_nav_colors: List of colors used in SerialEM to represent lamella categories. -
MM_model_script: Name of script called for lamella segmentation (currently only nnU-Net is supported). -
MM_model_folder: Path to lamella segmentation model (automatically configured bySPACEmodel add) -
MM_model_folds: Folds of nnU-Net model (automatically configured bySPACEmodel add). -
MM_model_pix_size: Pixel size of lamella segmentation model in nm.
Settings for controlling SerialEM externally (not yet fully supported)
SERIALEM_IP: IP of computer running SerialEM (default: "127.0.0.1" for local computer).SERIALEM_PORT: Port for SerialEM connection (default: 48888)SERIALEM_PYTHON_PATH: Path to Python modules on external machine
Settings for development and debugging
DUMMY: Allows testing of some functions without SerialEM (default: False).DEBUG: Additional log output for troubleshooting (default: False).BREAKPOINTS: Waits at every debug output for user to pressBkey.
Persistent acquisition settings
-
WG_montage_overlap: Overlap between neighboring tiles of the LM map for stitching. -
WG_detection_threshold: YOLOv8 confidence threshold for considering a hit a lamella. Raise this value if you have a lot of false positives. -
MM_montage_overlap: Overlap between neighboring tiles of the MM map for stitching. Good stitching is especially important here for reliable target selection. -
MM_padding_factor: MM maps are padded by this factor compared to the lamella bounding box. This accounts for the coordinates being off center or the bounding box prediction being off. -
aperture_control: Does SerialEM have control over the apertures? -
c2_apertures: List of C2 aperture diameters for WG, IM and MM imaging states (see below). If set to[0, 0, 0], no aperture change will be attempted. -
objective_aperture: Size of objective aperture to be inserted when leaving LM.
Instrument specific settings
- To determine the beam diameter on a two condenser lens system like a Thermo Scientific Glacios, the
beam_sizesat thesmallest_c2_aperturehas to be entered for both nano probe and micro probe modes.
SerialEM scripts
The final step before you can run SPACEtomo is to copy the SerialEM scripts into the SerialEM script window. Simply copy the SPACEtomo_run.py script and the SPACEtomo_prepareTargets.py script into a SerialEM script window each. For using SPACEtomo target selection on a manually acquired montage map, you will also need the SPACEtomo_manMap.py script.
If you installed SPACEtomo, you can also run this command to retrieve a copy of the SerialEM scripts:
SPACEtomo scripts
You also need the PACEtomo scripts (v1.9.2+) ready and working inside SerialEM. All tilt series acquisition steps are conducted by PACEtomo, so please setup up your scripts and Low Dose settings according to the PACEtomo documentation.
Optional: You can also copy the SPACEtomo_lamellaDetectionGUI.py and the SPACEtomo_targetSelectionGUI.py to a SerialEM script window to easily open the SPACEtomo GUIs from SerialEM.
Updating
If you want to update SPACEtomo to the latest version, simply activate your virtual environment and run:
pip install SPACEtomo
with network connection or:
pip install --proxy <proxy_address> SPACEtomo
using a proxy.
SPACEtomo models should be retained but please double-check that your config file is still valid!
Details without network connection
- Download the source repository from Github.
- Unzip and copy this folder to the SerialEM computer.
- On the SerialEM computer, open the command prompt and activate the virtual environment with
<path_to_your_venv>\Scripts\activate.bat. - Run:
pip install --no-deps --no-build-isolation <path_to_the_SPACEtomo_repository_folder>\
Usage
The usage instructions for SPACEtomo assume that PACEtomo is already able to run normally on your setup.
Preparation
SPACEtomo requires the setup of at least 3 image states in the SerialEM navigator.
- One image state for whole grid montages (LM maps), at a pixel size <400 nm/px (including binning).
- One image state at intermediate mag (IM), usually around 580x, required to compensate for the coordinate shifts between the low mag and the View mag. This magnification should contain the lamella fully in the FOV when moving the stage to a position on the LM map and it should be fairly well aligned to the View mag.
- One Low Dose mode image state with a View magnification for lamella montages (MM maps), ideally at pixel sizes <2.2 nm/px and a defocus offset of 50-100 μm, as well as the desired Record settings for tilt series acquisition. The smaller the beam diameter in Record mode, the more targets can be selected per lamella.
WARNING: If you name your imaging states in SerialEM, please avoid using numbers in the name. Numbers can confuse SerialEM's GoToImagingState command, which takes both, names or indices, as input and prioritizes names.
Details
When selecting and moving to a point on an LM map, then taking a View image, the selected point will most likely not be in the field of view. Usually, I find that point manually and use the Navigator > Shift to Marker function to adjust the coordinates.To automate this, SPACEtomo moves to a lamella found on the LM map and takes an image at IM that needs to fully contain the lamella despite the offset. It then runs the same lamella detection model and shifts the coordinates to the newly found lamella. The jump from the IM to the View magnification in your Low Dose image state should be minimal since no further compensation is applied.
For optimal results, it is recommended to check or redo the "Mag IS Offsets" calibration for the relevant magnifications.
The "High-Defocus Mag" and especially the "High-Defocus IS" calibrations also help to keep a feature centered when switching from the View to the Record Low Dose area.
The magnifications I use are 82x for LM, 580x for IM and 4800x for MM.
If you intend to do a coma-free alignment and a coma vs image shift calibration, this should be done prior to running SPACEtomo ideally on a carbon support foil grid.
Further recommendations for SerialEM setup
- In the Image alignment & Focus Panel, check Center image shift on tilt axis and set tilt axis offset as described in the PACEtomo documentation.
- Set both, Focus and Trial to offset 0.
- Align shift between Record and View magnifications.
Settings
All session settings are adjusted in the SPACEtomo_run.py script.
The most important settings for the first setup that remain mostly unchanged from session to session are:
| Setting | Description |
|---|---|
WG_image_state |
Image state index used for LM map (grid atlas). |
IM_image_state |
Image state index used for alignment between WG mag and View mag. Typically, ~580x works well for lamellae. |
MM_image_state |
Image state index used for Low Dose mode tilt series acquisition. This can be a list of imaging states to specify imaging states for Record and View separately. |
script_numbers |
List of indices of the [SPACEtomo_run.py, SPACEtomo_prepareTargets.py, PACEtomo.py] scripts in the SerialEM script editor. |
The settings that will typically change from run to run are:
| Setting | Description |
|---|---|
automation_level |
Level 1-5 from only taking the WG map to starting the PACEtomo batch acquisition. |
grid_list |
List of autoloader slots to be imaged (comma-separated in []-brackets). If no cassette is loaded and grid is on stage use ["stage"]. |
lamella |
True if your sample are lamellae that should be detected or False for non-lamella samples. |
exclude_lamella_classes |
List including all classes that will not be further processed. Possible classes depend on the detection model you are using. |
WG_wait_for_inspection |
Pause SPACEtomo before collecting lamella MM maps until detected lamellae have been inspected using the SPACEtomo lamella detection GUI |
MM_wait_for_inspection |
Pause SPACEtomo before acquisition until selected targets have been inspected using the SPACEtomo target selection GUI |
manual_selection |
Skip segmentation step (for samples without trained model) and use SPACEtomo target selection GUI for target selection. |
The final settings are only used for runs of automation level 4+ with automatic target selection:
| Setting | Description |
|---|---|
target_list |
List including all classes of the segmentation that are targeted. Examples for all classes can be found here. |
avoid_list |
List including all classes that should be avoided. |
target_score_threshold |
Can be adjusted to reduce the number of targets. The score is calculated from the overlap of the camera field of view with the segmented classes. The score is not linear, but ranges from 0 to 1, from no target area in the FOV to the FOV being completely covered. A desired class in the center of the camera is upweighted. Generally, larger targets (e.g. nucleus or cell) are more robust to higher thresholds. Classes to be avoided in the FOV can cause a negative score. |
sparse_targets |
Target selection mode useful for small targets like mitochondria or vesicles. If set to False, a rigid grid of points is used for initial target selection, which is more suited to large target areas. |
target_edge |
Can be set to True to target the edges of a segmented class. This could be useful for membrane structure studies (e.g. NPCs). |
penalty_weight |
Factor to downweight the classes of the avoid_list relative to the classes of the target_list. |
extra_tracking |
Set to True if you want to add an extra target for the tracking tilt series that does not contain your desired class. |
max_tilt |
This is the maximum tilt angle during a tilt series. It is used to calculate target spacing without any beam overlap. You can use lower values if you don't care about high angle overlaps and rather have more targets. |
external_map_dir |
Shared folder when running the processing on an external machine (see below). |
Additional settings are available in the config.py, which should generally only need adjustments when updating the deep learning models.
Run
You can run SPACEtomo at different automation levels. It will stop after reaching the final automation level and will let you manually finish the setup if you desire. If you rerun SPACEtomo on the same grid at a higher automation level, it will continue where the previous run finished.
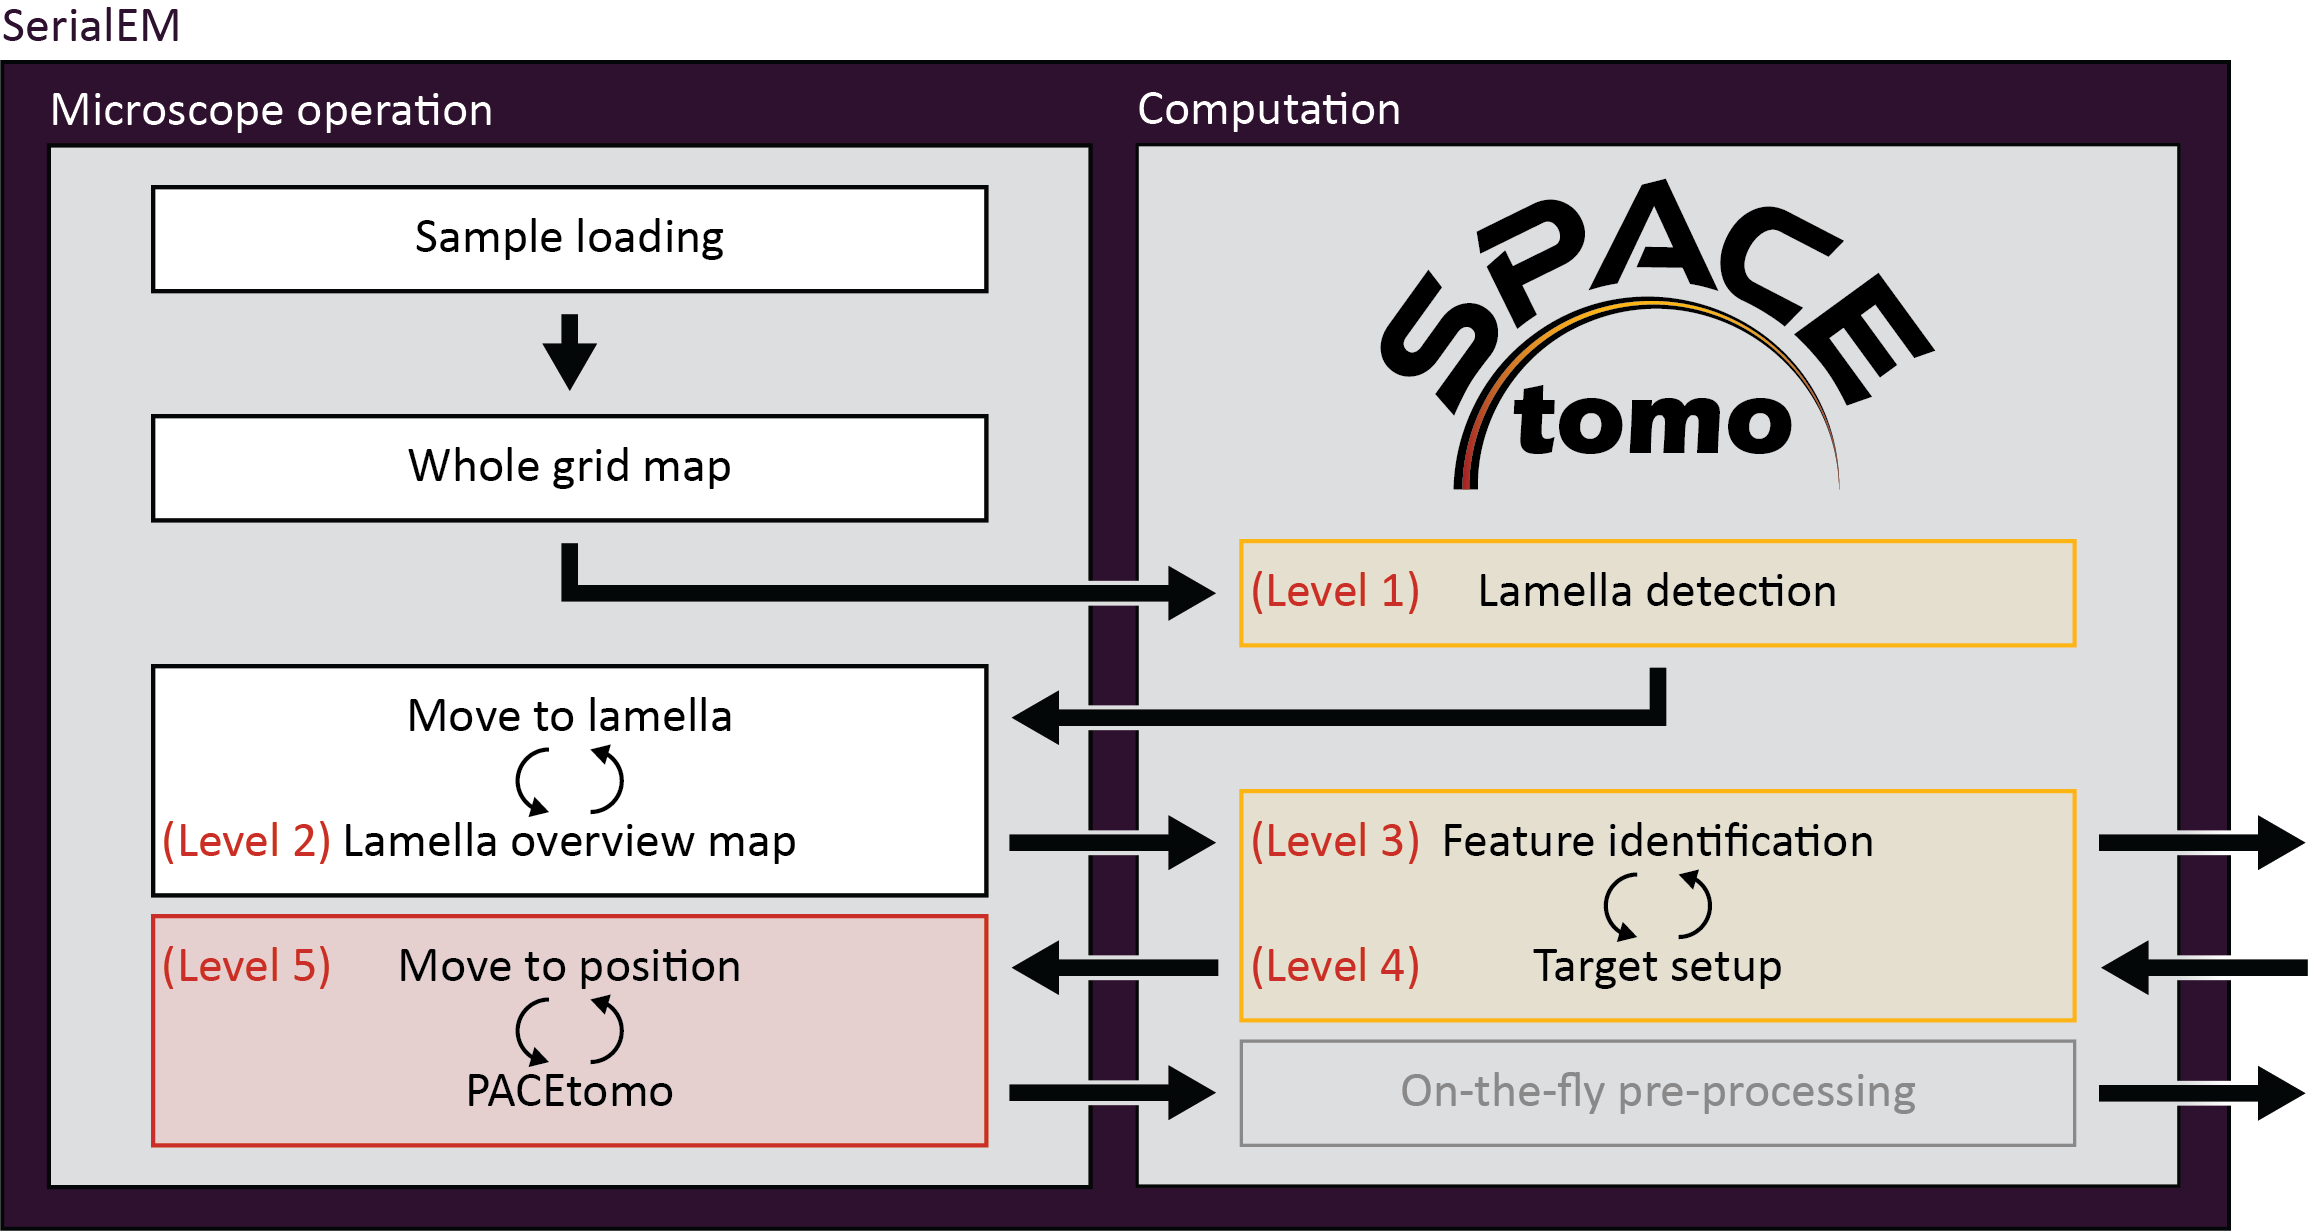
Level 1: Lamella identification
- SPACEtomo will load a grid, collect a LM map of the whole grid and identify the positions of lamellae. Navigator items labeled "PP#" ("Preliminary Position") will be added in SerialEM. If you stop at level 1, you can manually move to the identified lamella and decide where you want to collect a montage or select targets using PACEtomo_selectTargets.py.
Level 2: Lamella montage collection
- This level includes collection of MM maps of each lamella. First, it will then take another image of each lamella at intermediate magnification (IM) to adjust the stage coordinates accordingly and add a navigator item with label "FP#" ("Final Position"). After collecting MM maps at all positions, you can then use these maps for manual target selection. Level 2 is organism independent and should be able to be used for any kind of lamella sample.
Level 3: Feature identification
- Level 3 includes the subsequent segmentation of the lamella montages for manual inspection. This model is organism specific (only Yeast at the time of writing) and new models will be released in the future.
- If you intend to collect lamellae exhaustively, you can use the Yeast model and include "lamella" in the first entry of your target_list. This allows the target setup to use the organism independent classes (e.g. "black", "white", "ice", etc.) to avoid and set up targets everywhere else on the lamella.
- If you set
manual_selection = True, segmentation will be skipped.
Level 4: Target setup
- SPACEtomo will use the generated segmentation to set up targets according to your target selection settings. If you stop at level 4, you will be able to review all selected targets or add additional targets using the Target selection GUI or the PACEtomo_selectTargets.py script.
Level 5: Acquisition
- The highest level of automation will start SerialEM's Acquire at Items routine. Make sure to set it up accordingly in advance.
- You have to select the PACEtomo.py script as the Primary Action and make sure that the PACEtomo settings in the script have been set appropriately. Especially consider these settings when running SPACEtomo:
- The in SPACEtomo determined geo points will be used for sample geometry measurement.
- Set the appropriate
pretiltandrotationvalues as backup if the geometry measurement should fail. - Set
previewAli = FalseandviewAli = Trueto use the SPACEtomo generated view mag virtual maps for alignment, setpreviewAli = TrueandviewAli = Falseto use SerialEM's AlignBetweenMags function to align a Preview image to the View mag virtual maps. Or set both,previewAli = TrueandviewAli = Truefor a two-step realignment. AlignBetweenMags duringpreviewAlirequires some high contrast features in the field of view to work reliably, but offers higher targeting precision for the final tilt series.
- No further tasks in the Acquire at Items dialog are necessary. PACEtomo will realign to the target and run a eucentricity routine. (You can check "Skip Z" moves during realign.)
- Additionally, you have to set the SPACEtomo_prepareTargets.py script as
Run Script after Action. This script will monitor any finishing lamella segmentation that was not ready for target setup before the PACEtomo acquisition started. - There will be no break to do additional microscope alignments before the tilt series acquisition starts. It is recommended to do all necessary alignments (e.g. Beam Tilt PP, coma-free alignment, Coma vs IS calibration, center OL aperture) prior to running SPACEtomo on a carbon film grid.
Multi-grid considerations
If you want to run multiple grids in succession without intervention you can give a list of grids as grid_list. In this case the grid list will be saved as persistent variable inside SerialEM. If you restart the SPACEtomo script later in the same session with a different grid list, you need to run the ClearPersistentVars command in the SerialEM One-Line Scripts panel to ignore the previously given grid list.
While it is possible to run target setup in multi-grid mode, I would not recommend it as the target coordinates might be off after reloading a grid. The SerialEM multi-grid procedure to realign grids after reloading is used when SPACEtomo reloads a grid with an already existing WG map. However, targeting accuracy on a reloaded grid is currently untested.
Lamella Detection GUI
The lamella detection GUI can be used to open whole grid LM maps and visualize detected lamella bounding boxes. You can also add, remove and re-categorize lamellae.
If you selected WG_wait_for_inspection = True, the GUI should open automatically. You can also open it using this command in the command prompt of your virtual environment:
SPACEtomo lamella
You can then find a map image to load. If you want to visualize the results of the automatic lamella detection, go to the SPACE_maps folder created by SPACEtomo during a run and select any file ending with "_wg.png". The GUI will automatically look for any relevant "_boxes.json" file to load lamella coordinates and bounding boxes.
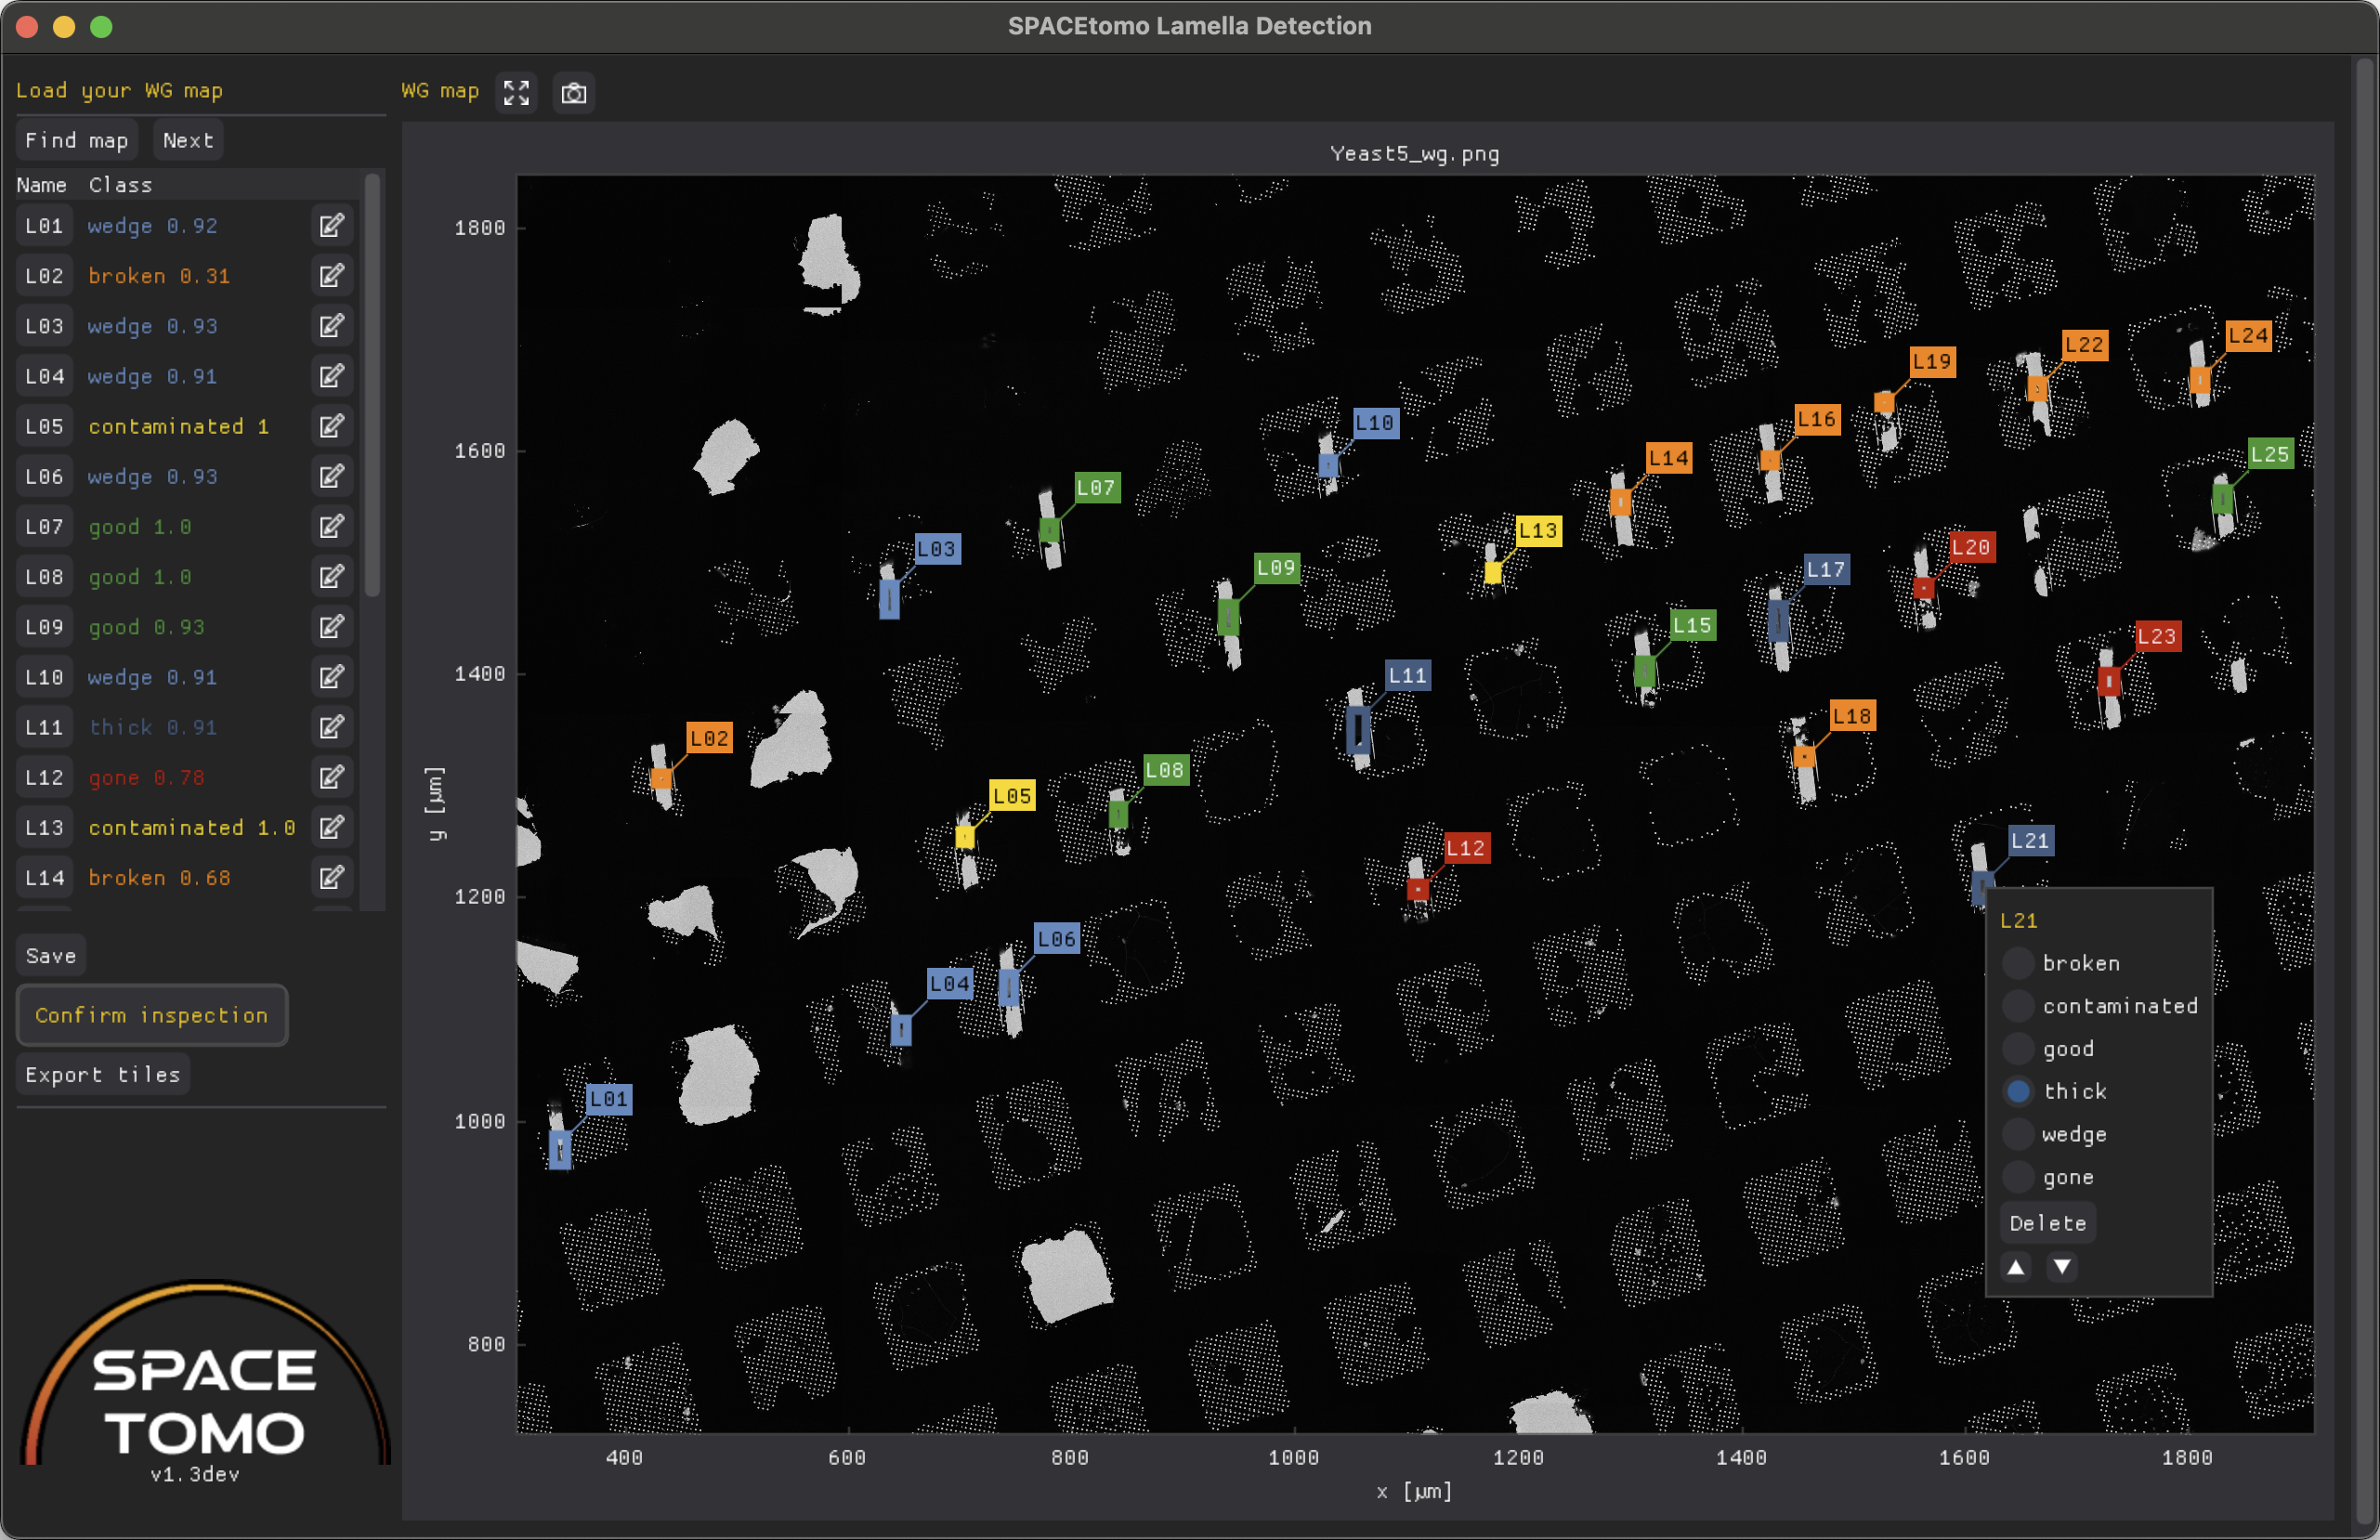
On the top left you will find the Find map and Next buttons to load a WG map.
Once a map is loaded and lamella coordinates are found, a list of all lamellae is displayed with color-coded classes and confidence scores. If you click on a lamella name, its bounding box will be centered in the plot.
Right clicking on a lamella in the plot or clicking the edit icon in the list, will open the editing menu allowing you to re-categorize, delete or reorder any lamella.
You can resize and drag the lamella bounding boxes by holding left click and dragging the corners or sides of the box.
You can also add a new lamella by holding Shift and dragging the left mouse button to draw a bounding box.
Confirm inspection will lock down any editing capabilities and signal SPACEtomo that it can proceed with the next automation step.
Finally, you can use the Export tiles button to export the map and bounding boxes in YOLO format that can later be used for training a new lamella detection model. This data can be found in the YOLO_dataset folder. Please consider submitting this data to me to further improve the general SPACEtomo lamella detection model in the future.
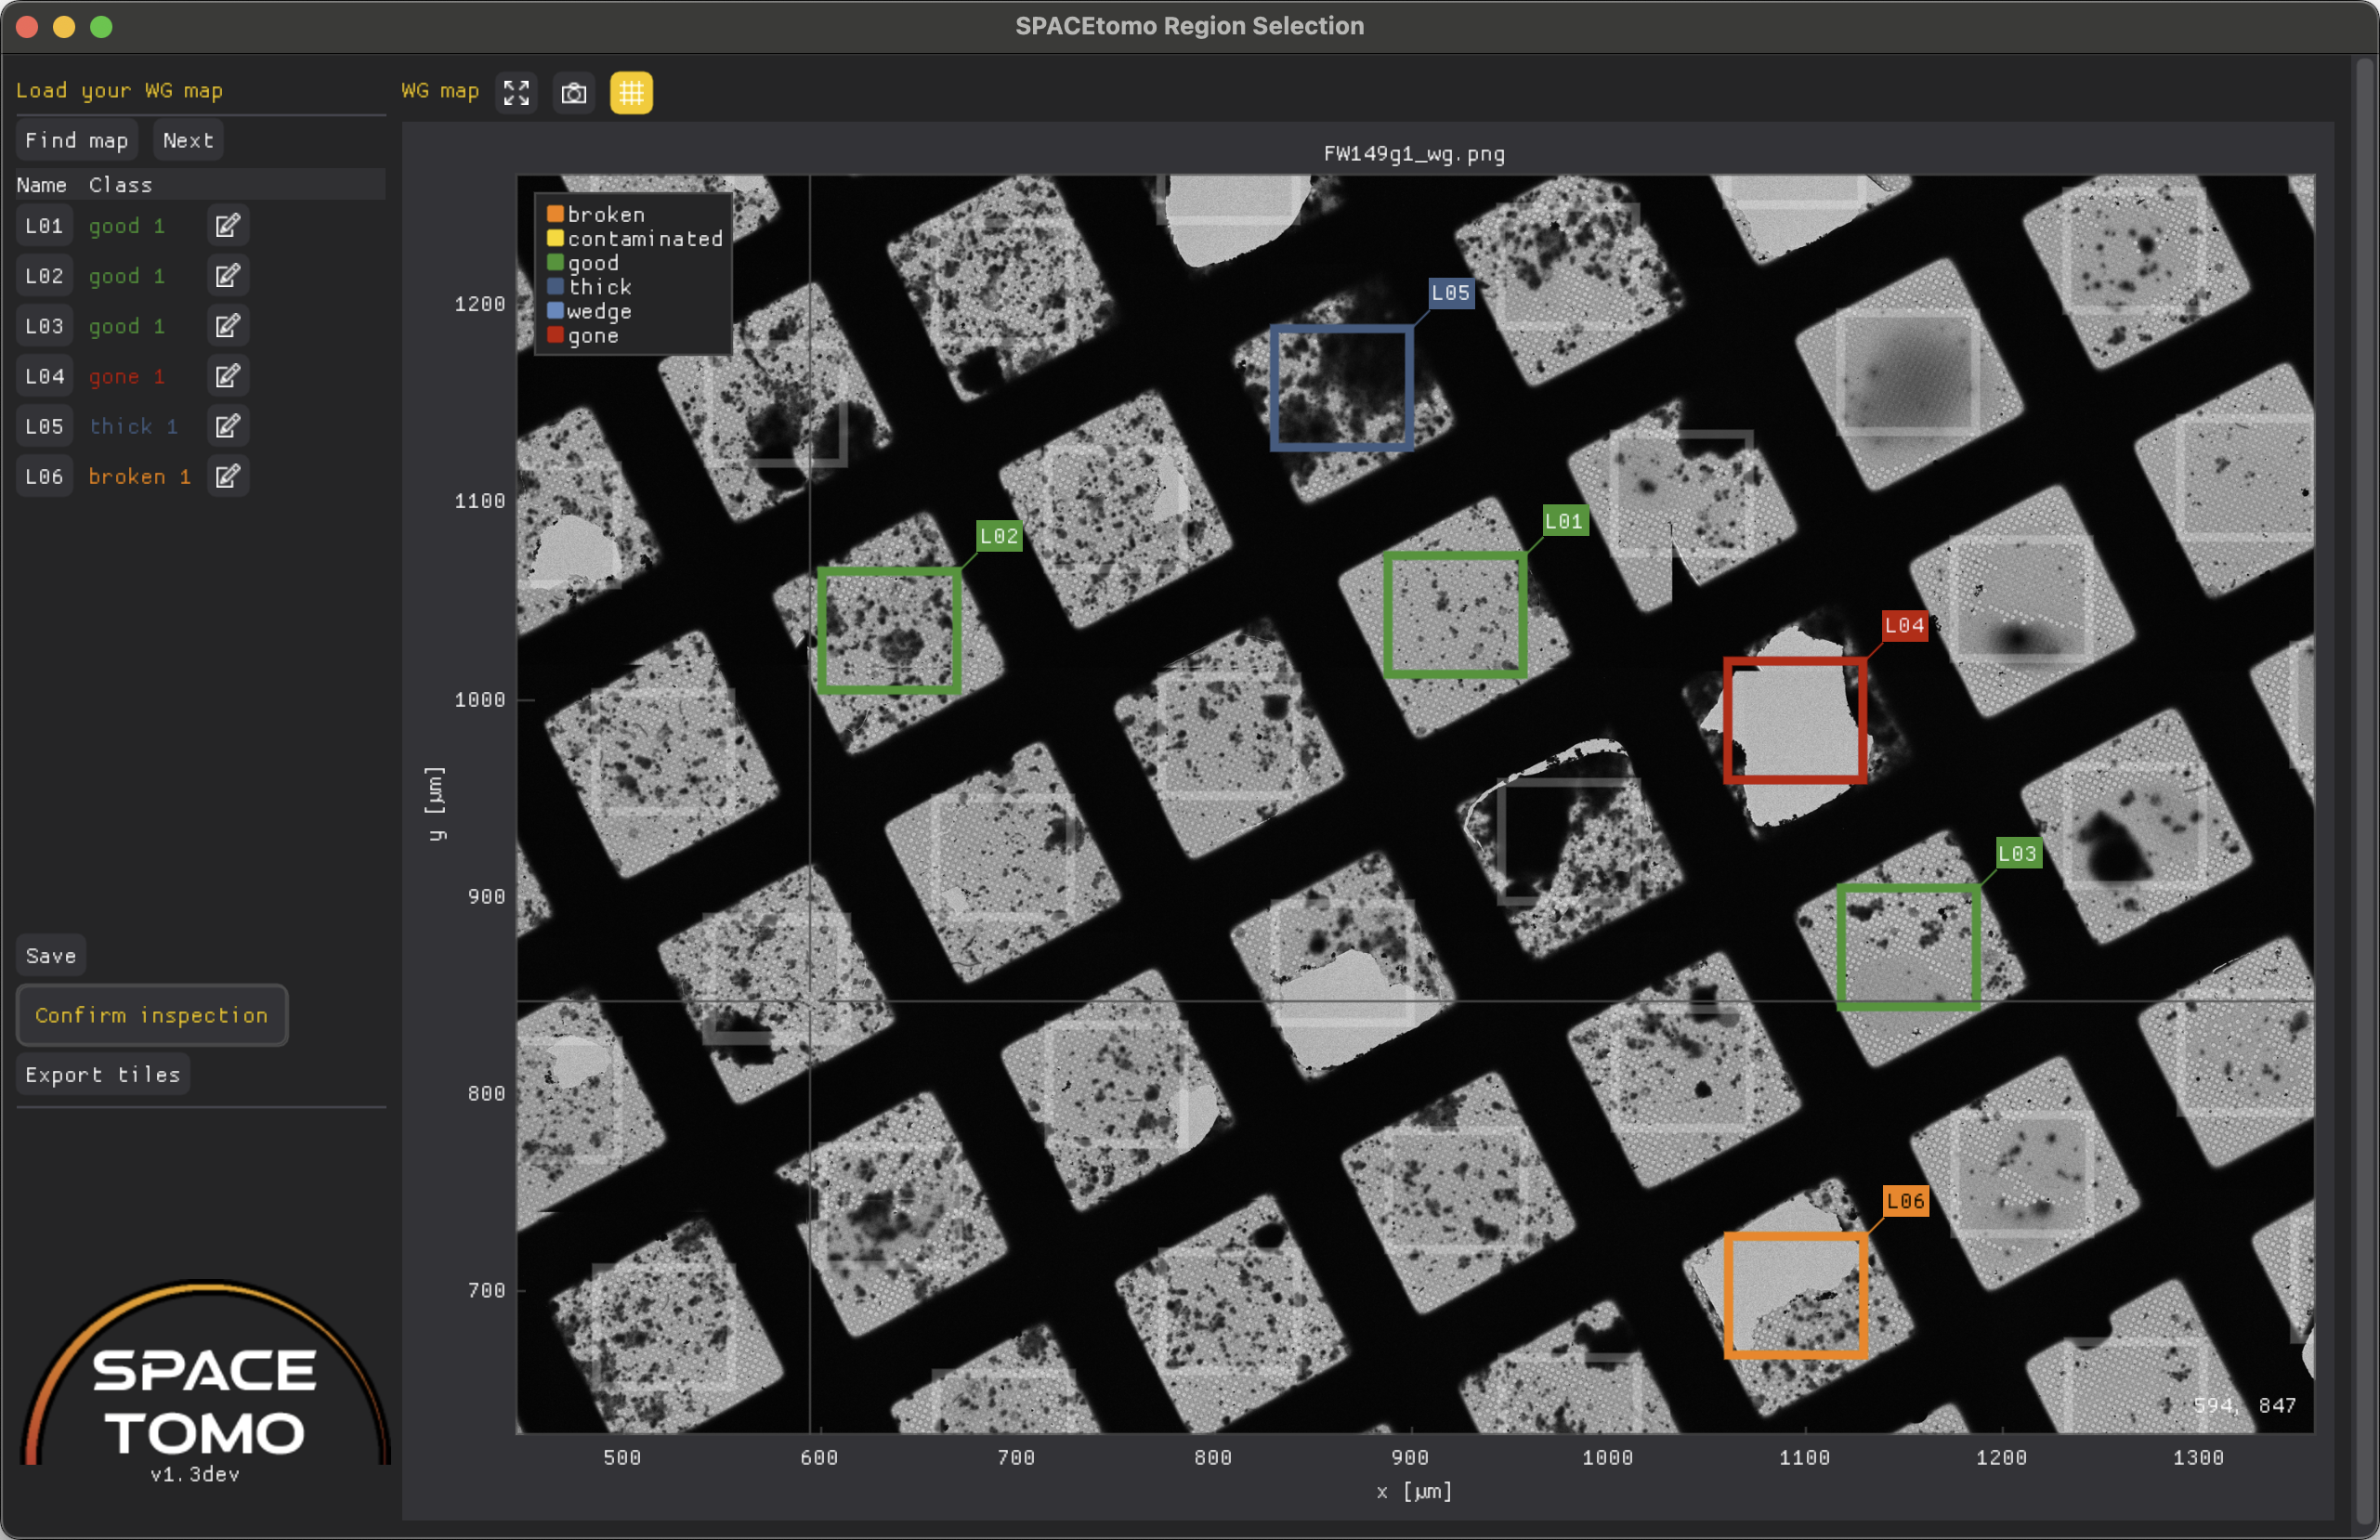
Use on non-lamella samples
When running SPACEtomo with lamella = False, it will automatically try to determine the square pattern of the grid. When you draw your first box on the map, it will use this pattern to suggest boxes for every square. You can simply add them by clicking on them and then adjust their dimensions individually as you can for detected lamella boxes. The grid of suggested boxes can be toggled with the "grid" button on top or by pressing G.
NOTE: SPACEtomo for non-lamella samples is still a work in progress and user-friendliness as well as proper naming will be improved in future versions.
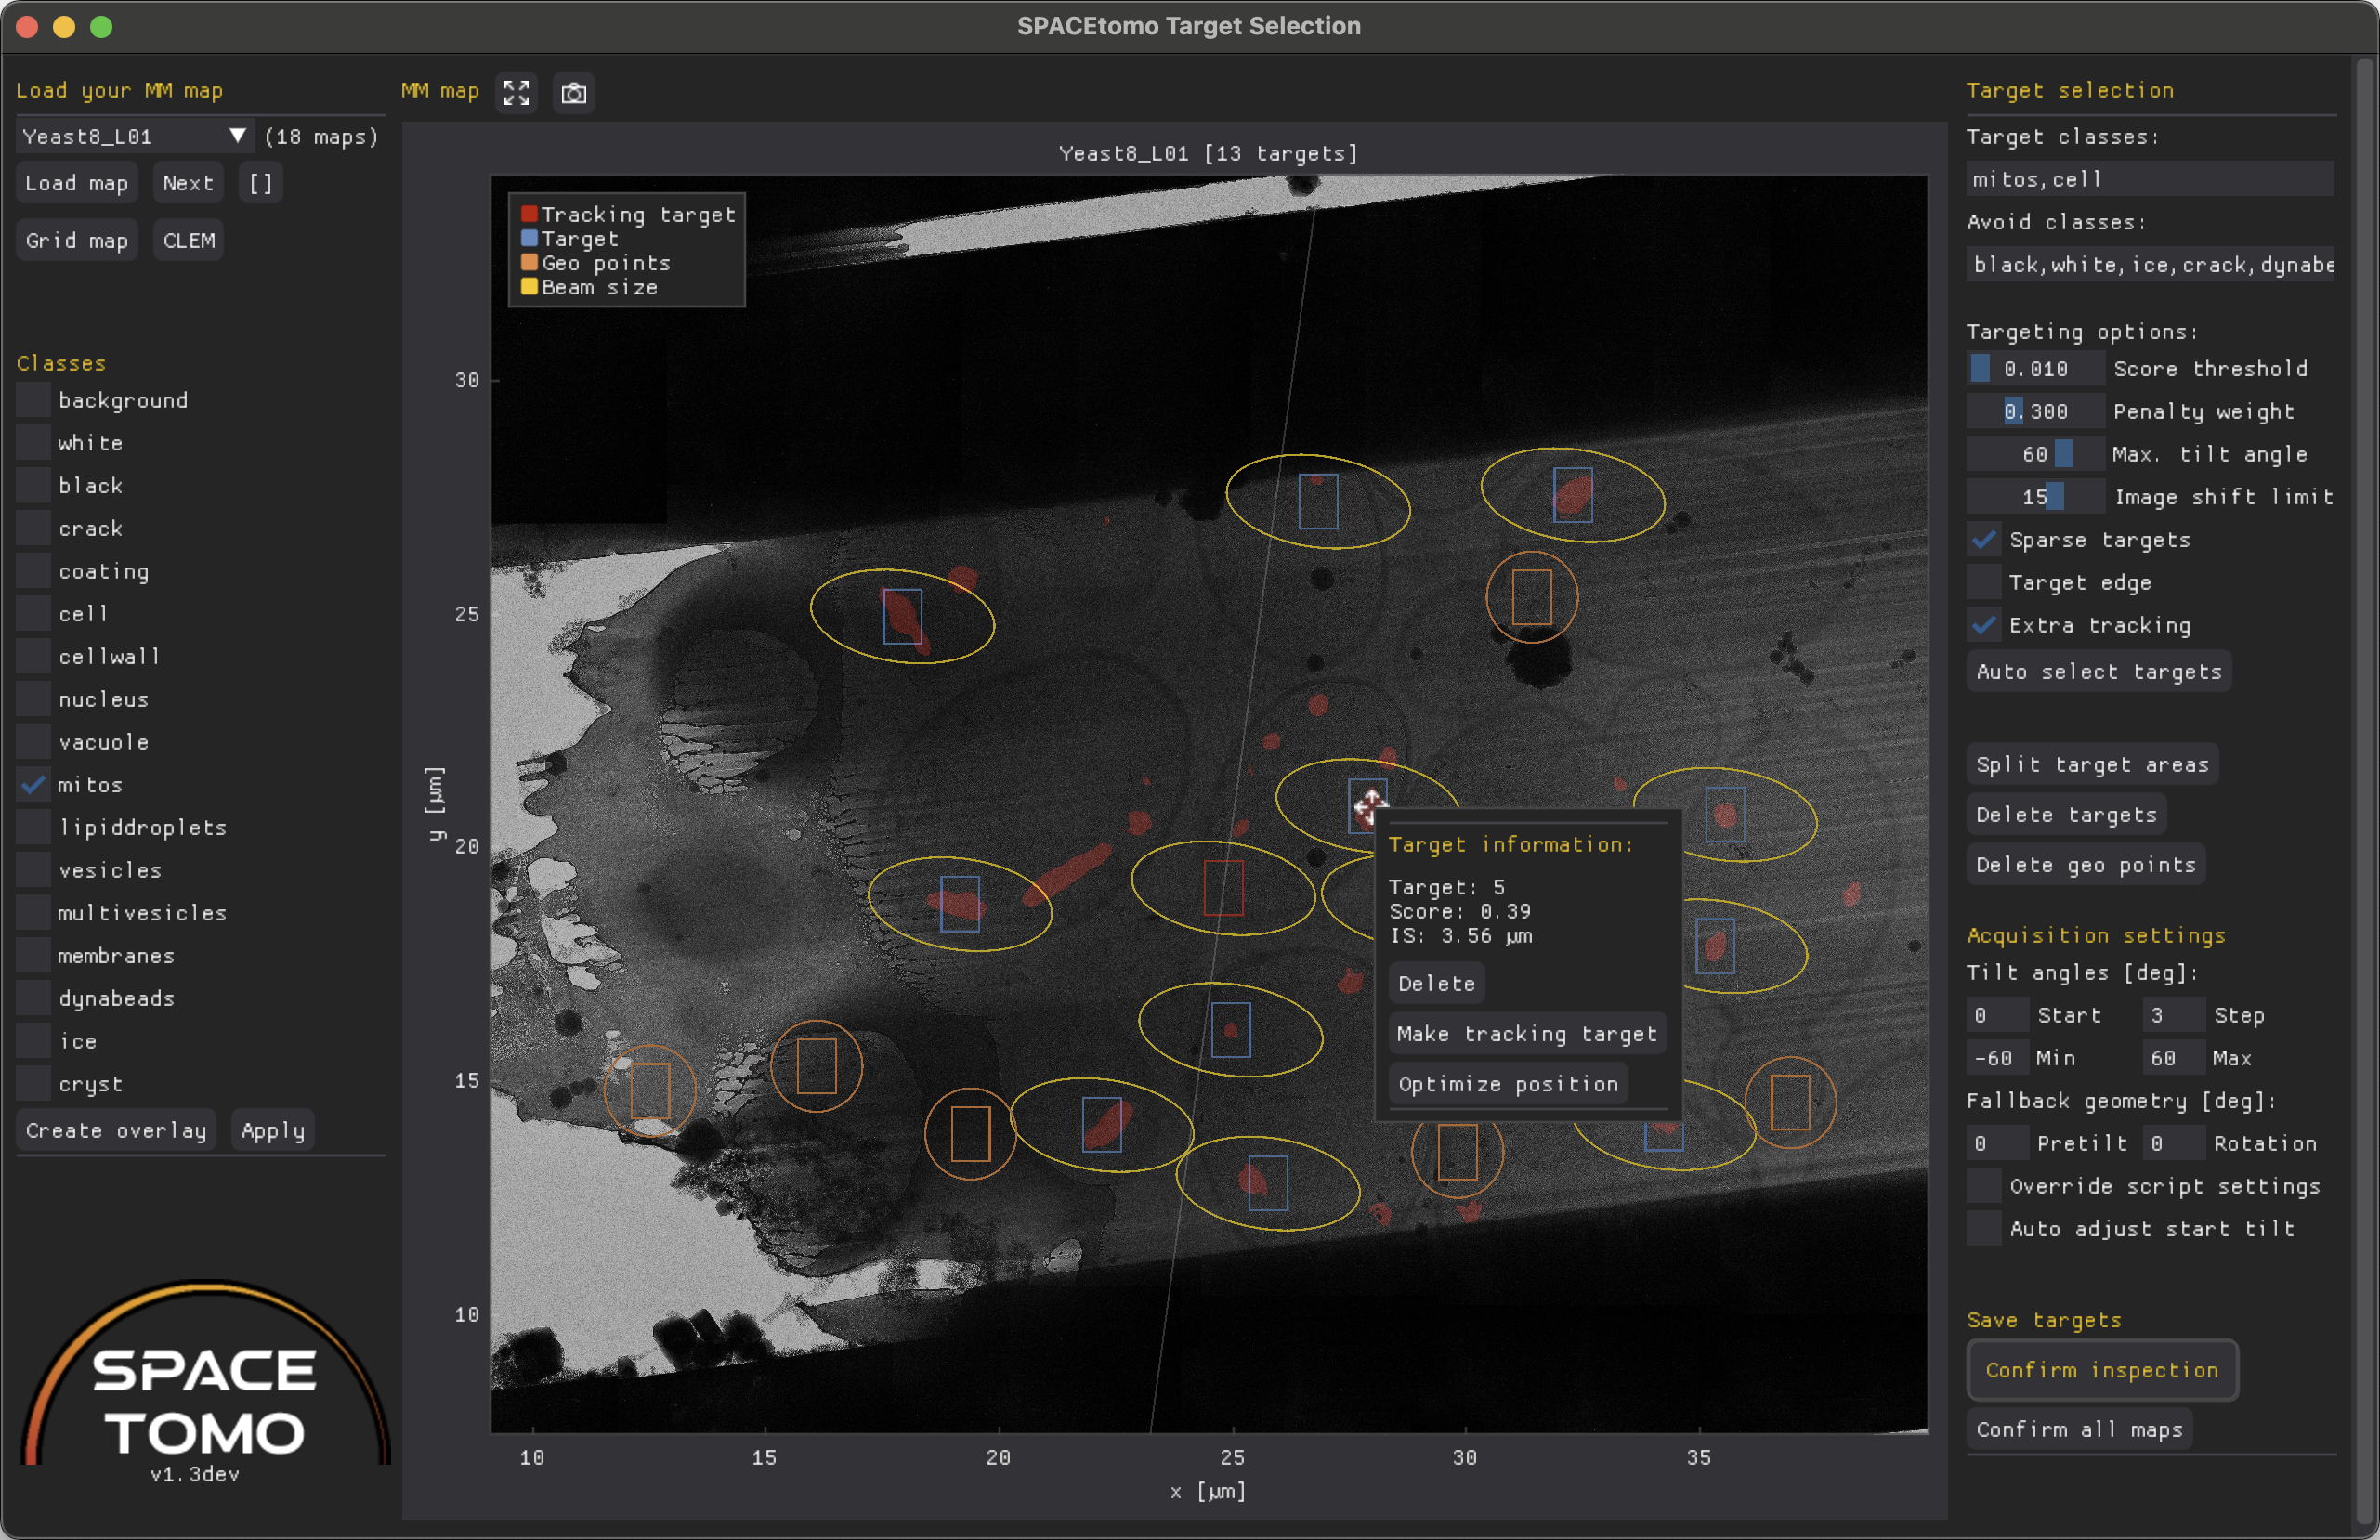
Target selection GUI
The target selection GUI can be used to inspect a segmentation and selected targets, run automated target selection with different parameters and manually select and edit targets.
If you selected MM_wait_for_inspection = True, the GUI should open automatically. You can also open it using this command in the command prompt of your virtual environment:
SPACEtomo targets <path_to_SPACE_maps_folder>
The GUI will make a list of all collected lamella MM maps and lets you select a map to load (takes a minute depending on map size).
If targets have already been selected, it will also show the target positions on the map. You can either run automated target selection again with different parameters, drag targets to a new position, add and remove targets and mark targets as inspected, which allows SPACEtomo to use the coordinates for target setup.
Example on lamella
Example on support film
The left menu consists of 2 sections - map loading and a list of classes.
Load map will load the map selected in the drop down menu, Next will load the following map and the [] button will open a window with an overview over all lamellae.
If you want to reopen the whole grid map you can click on Grid map to restart the Lamella detection GUI. The CLEM button will open the CLEM GUI to facilitate correlated target selection.
The Reacquire button will allow you to schedule the map for reacquisition. Reacquisition will happen ONLY when you run the SPACEtomo_run script again! You can optionally shift the center and the size (padding factor) of the new map.
In case the segmentation step was performed, you can check the boxes of any number of segmented classes in the shown list and click Create overlay to show a red overlay of all selected classes over the map or Apply to use the selected classes as target classes for automated target selection.
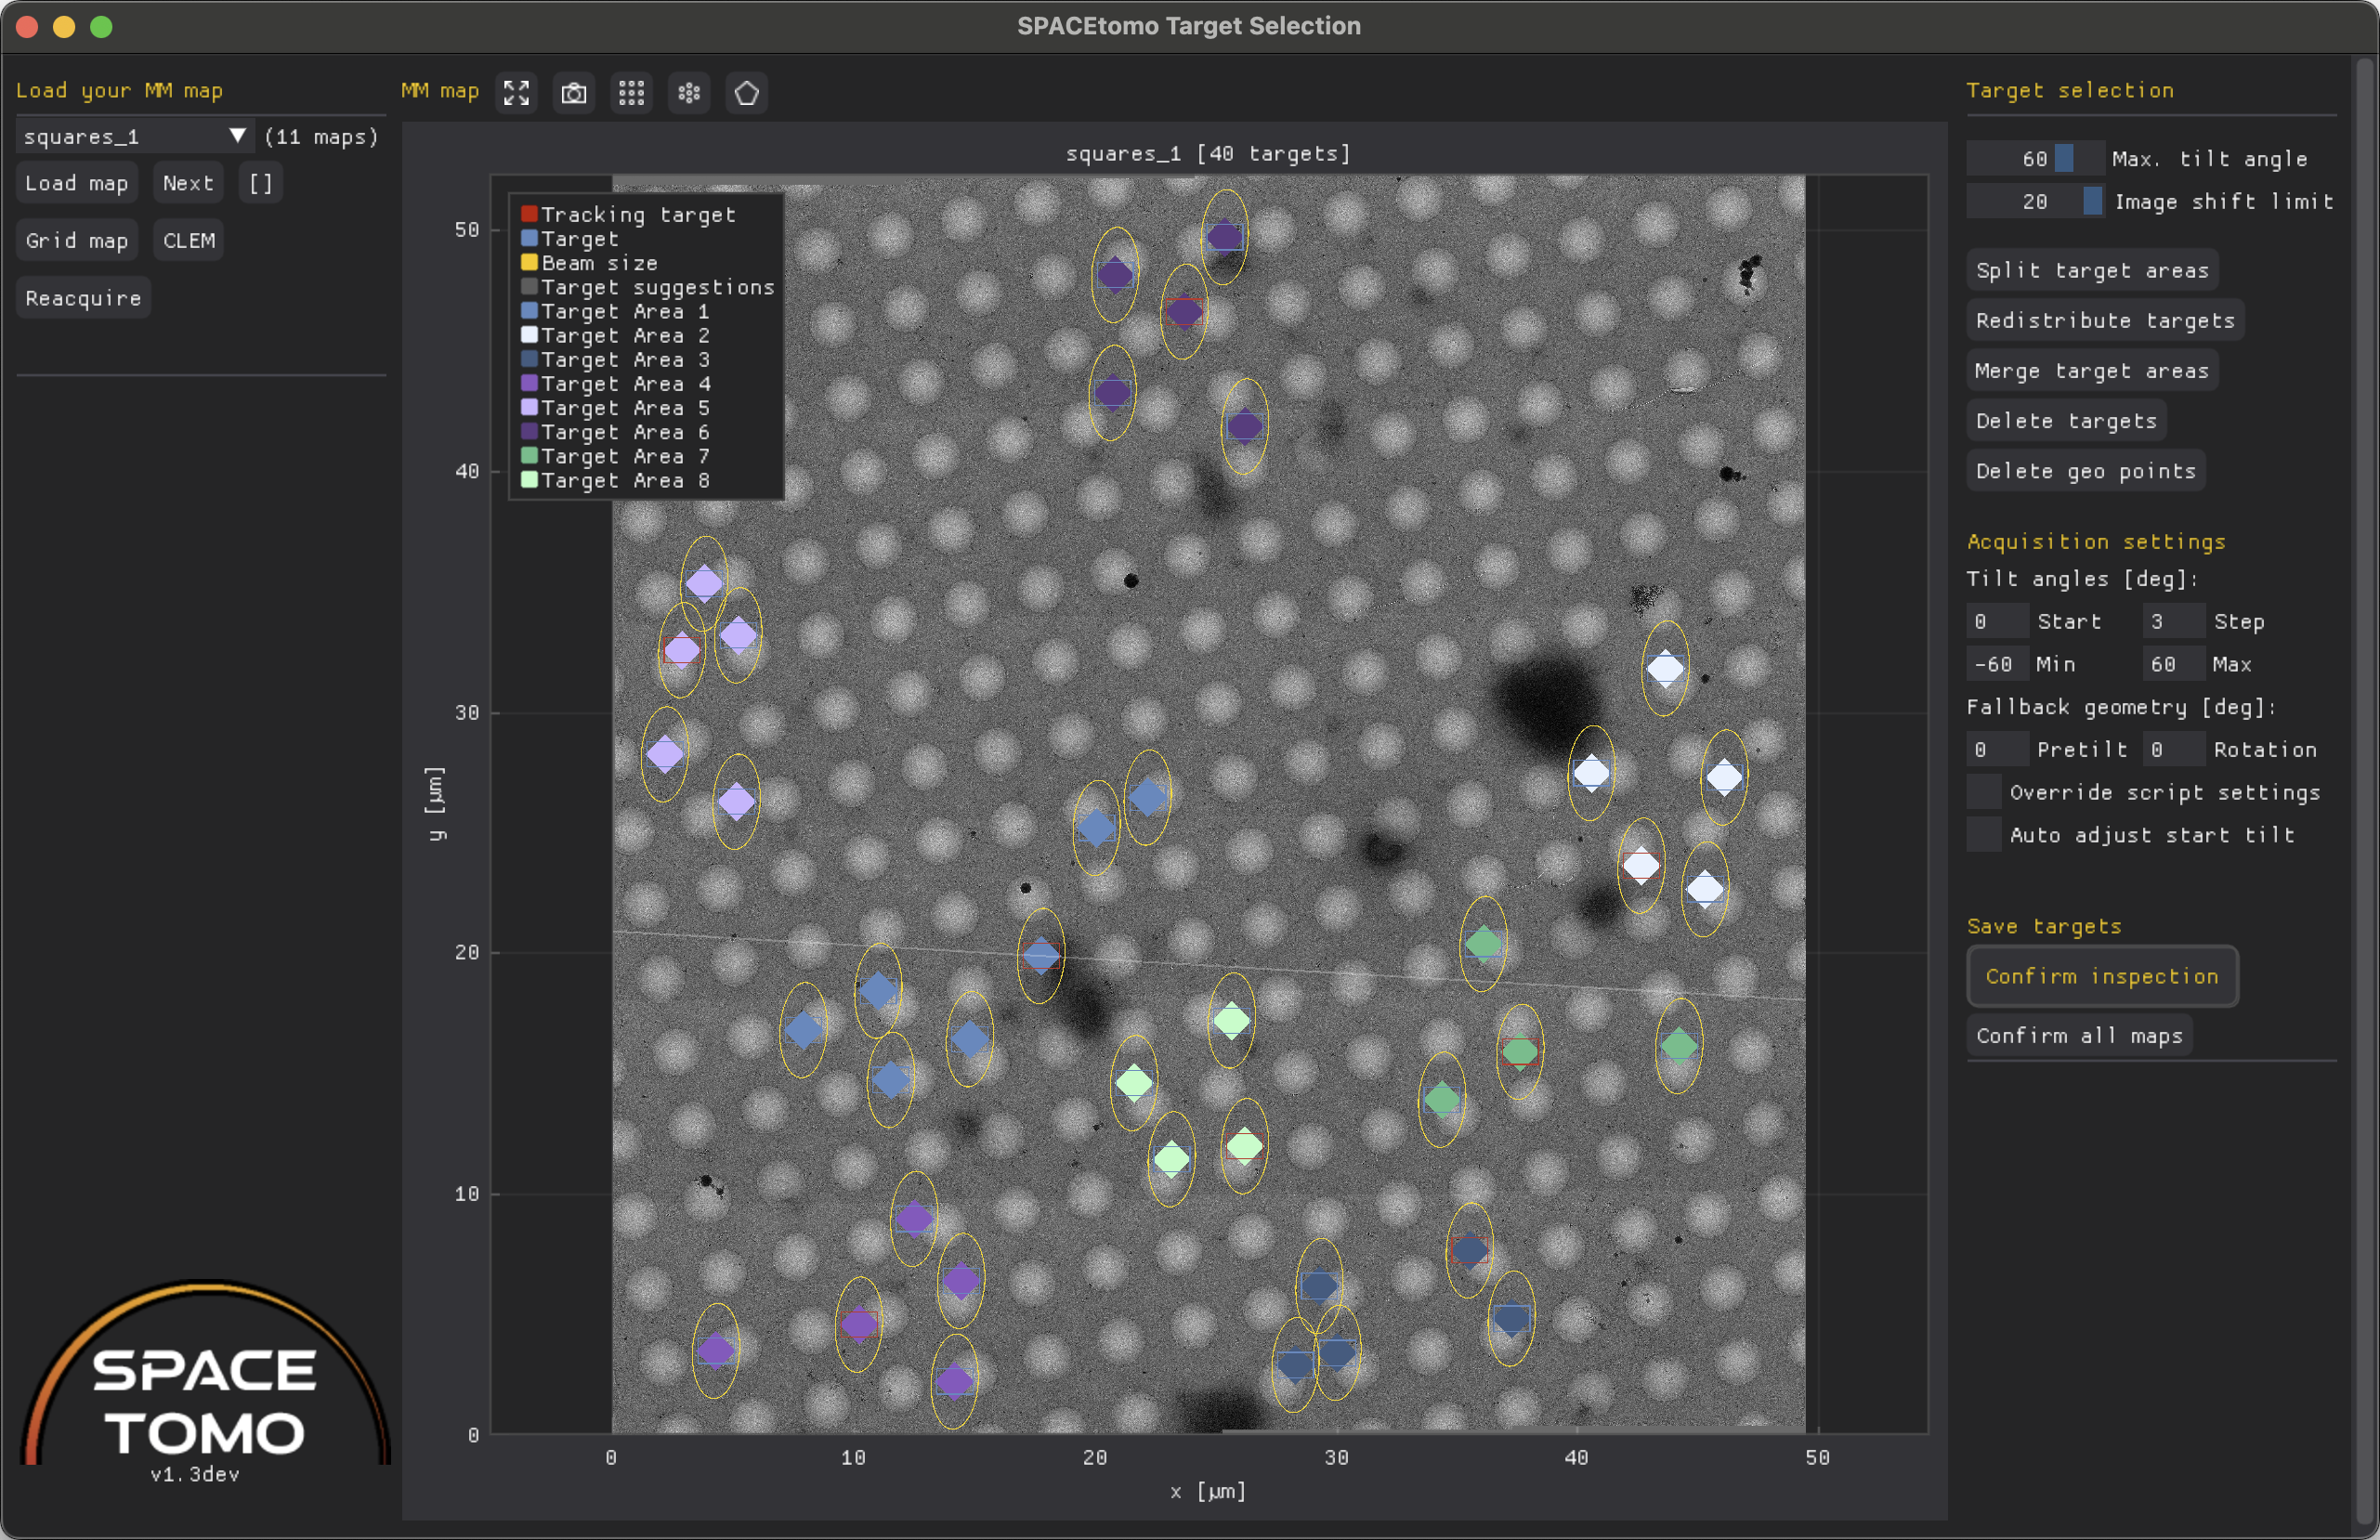
The center plot shows the lamella map as well as the selected targets and geo points. (Geo points will be used to estimate the sample geometry by measuring their relative z-height using SerialEM's autofocus routine.)
- Blue rectangle: Camera field of view (FOV) at Record magnification on target
- Red rectangle: Camera FOV on tracking target
- Orange rectangle: Camera FOV at geo point
- Yellow ellipse: Area exposed to electron beam throughout a tilt series up to the
max_tiltangle. - Orange circle: Area exposed to electron beam around geo point at zero tilt.
- Diamond markers: Center coordinates of respective areas colored by independent target area (= PACEtomo acquisition area). These dots can be dragged to move targets.
- Red asterisk: Target is outside the given image shift range and might be ignored during acquisition. Consider splitting your target area!
More infos about individual targets are shown when you hover over them. You can right click on any target to Delete it, make it a tracking target or optimize its position locally based on the active class selection mask.
The right menu consists of 3 sections - target selection, acquisition settings and saving.
The target selection settings are the same as described above. You can adjust the settings and rerun the target selection by clicking Auto select targets.
Split target areas will attempt to split the targets into independent target areas using k-means clustering. You can then right click on any target and manually move it between target areas using the drop down menu. This can be useful for large lamellae where the image shift limit is not sufficient to collect all targets in parallel or for manually collected montage maps. Redistribute targets will simply assign all targets to the closes tracking area. To merge target areas you can click Merge target areas.
Delete targets will clear all targets and geo points from the list and plot. Delete geo points will clear just the geo points.
The acquisition settings can be used to override any settings specified in the PACEtomo script.
Finally, Confirm inspection will lock down any editing capabilities and signal SPACEtomo that it can proceed with the next automation step.
Patterns and Polygons
If you want to setup targets in a regular fashion, there are currently 2 options. Hole pattern (square dots icon) and dense pattern (hexagonal dots icon) mode can be selected above the plot. The hole pattern icon will only show up, if autocorrelation peaks could be detected. Both modes will display target suggestions in grey. You can add some of these targets by clicking on them or all suggested targets by clicking the Add target suggestions button.
Additionally, you can use polygon mode (pentagon icon) to add a polygon by clicking on the plot. After closing a polygon, you can activate a pattern mode and polygon mode together to only add target suggestions within the bounds of the polygon.
CLEM GUI
The correlative light and electron microscopy (CLEM) interface allows for loading, registration and overlaying of light microscopy data to enable target selection based on fluorescent signals. It is a sub-window of the Target selection GUI and can be opened via the CLEM button.
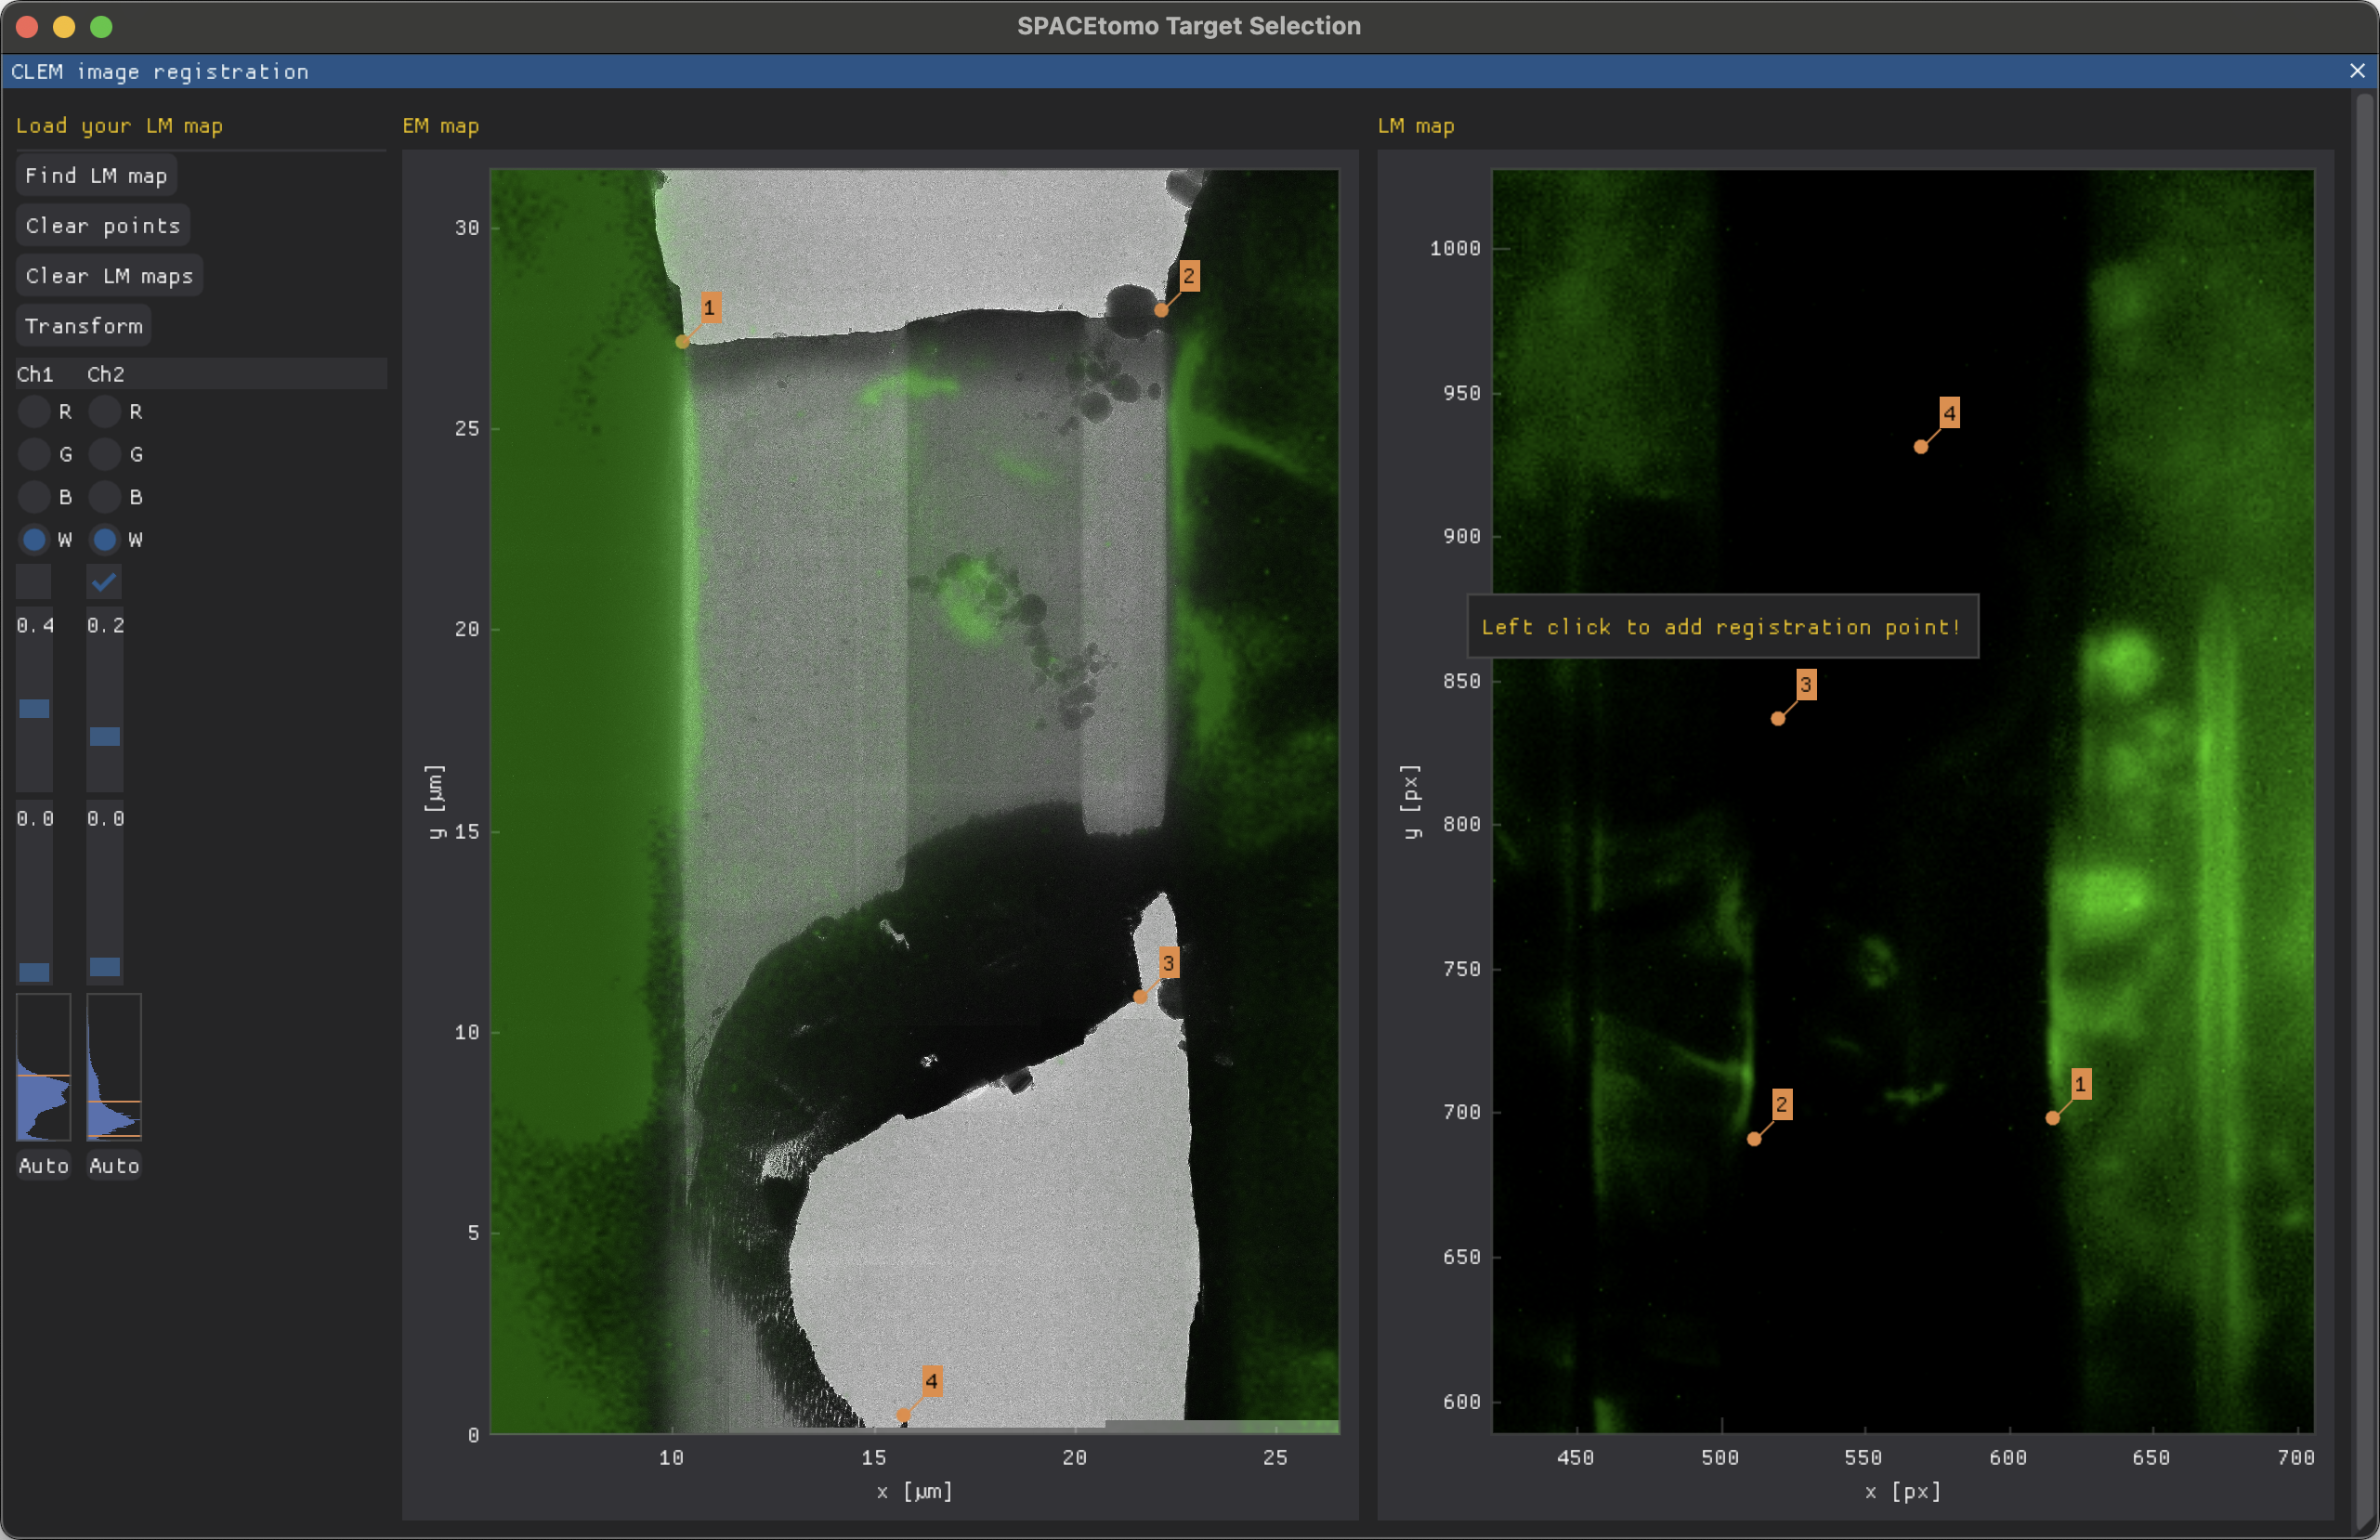
Please load your lamella EM map first as this will reset the CLEM window. After loading your lamella EM map, you can click Find LM map to load single channel PNG or TIF files.
After loading all your channels, you can adjust them separately using the Channel table on the left. Adjustments include color (R, G, B, W), where "W" will keep the original colors of the image, hiding the channel using the checkbox and thresholding using maximum and minimum sliders. The histogram indicates the currently set thresholds using orange lines.
To align EM and LM map, you can add registration points by left clicking on the respective maps. A minimum of 3 points is necessary to calculate the transformation matrix but more are possible. You can also drag existing registration points.
The Transform button will overlay the LM channels on the EM map. You can still adjust the thresholds and hide channels you don't want to see. If you close the CLEM window, the same overlay is also visible on the Target selection plot.
You can now proceed with normal target selection. When you load a new lamella EM map, all LM maps are cleared.
Output
- SPACEtomo will create a subfolder, navigator file and log file for each grid. Any kind of montages and frames are saved according to SerialEM settings.
- All images processed by SPACEtomo and results are saved to a SPACE_maps folder OR to the folder specified as
external_map_dirfor the SPACEtomo run.- Images and montage maps are rescaled to the pixel size of the respective models and saved as PNG images with accompanying .json files containing meta data.
- Lamella bounding boxes are saved in *_boxes.json files.
- Target coordinates are saved in *_points.json files.
- Segmentation files are saved with the suffix _seg for each MM map. Each segmentation inference produces a *_SPACE.log and a *_SPACE.err file for debugging.
- The SPACE_runs.json contains the processing jobs and queue.
- The mic_params.json and tgt_params.json files are necessary to schedule the inference jobs and run the target selection GUI.
- The SPACEtomo_settings.ini file contains the settings for the run.
- The _tgts.txt files are PACEtomo targets files that are used for acquisition.
- Tilt series are output as specified by your SerialEM and PACEtomo settings.
External processing
Depending on your setup, the GPU on the computer running SerialEM might not be powerful enough or not even present. On some systems the OS might also be too old to run some of the required Python packages. In these cases you can install the minimal environment on the SerialEM computer and run most processing steps on an external GPU machine.
To process on an external machine you can specify an external_map_dir in the settings of the SPACEtomo_run.py script. This directory has to be accessible via the network both by the computer running SerialEM and by the external GPU machine.
The external GPU machine requires the same Python packages (full environment) as described above but no SerialEM. Before starting the SPACEtomo run in SerialEM, you can then simply activate the conda environment and run the monitor script:
source <path_to_your_venv>/bin/activate
SPACEmonitor --dir <path_to_external_map_dir> --gpu <comma-separated_list_of_GPUs>
The monitor script will check the map dir periodically, queue any maps to be analyzed, save the segmentation to the same directory and run the target selection algorithms.
SPACEtomo on the SerialEM computer will keep checking the map dir for new coordinate files and setup the targets when appropriate. For inspection of the maps and targets you can run the SPACEtomo targets <path_to_external_map_dir> command as described above either on the SerialEM computer or on the external machine.
Video Tutorials

More coming as soon as possible!
Troubleshooting
In general, if you run into any crashes or problems, please turn on debug output using SPACEconfig debug in a command prompt with activated SPACEtomo virtual environment. Then run SPACEtomo again and include the SerialEM log file when you report the issue!
Here are some common problems that might occur:
- The lamella MM map has a stitching error (e.g. one tile duplicated to a different spot). Use the
Reacquireoption in the GUI and checkJust restitch map. SPACEtomo will attempt to restitch the map on the next run. - In case your lamella montages don't stitch properly, you might need to experiment with the SerialEM montage settings and with the overlap factors in the SPACEtomo config. Redoing the High Defocus Mag calibration might also help.
- If SPACEtomo freezes or crashes when loading an image from the SerialEM buffer, please try just running it again. This issue should be fixed in the latest SerialEM 4.2beta+.
- If you get an error saying something like
unexpected keyword argument 'perform_everything_on_XXX:- nnUNet changed the name of the argument recently from
perform_everything_on_gputoperform_everything_on_device. - Please try to change it accordingly in the SPACEtomo_nnUNet.py script (SPACEtomo v1.1) and try running it again.
- nnUNet changed the name of the argument recently from
- If your tilt series are off target, check if your Record and View mag are aligned in the used image state and consider doing the "High-Defocus IS" calibration for your View mag.
- If your lamella is not in the field of view when switching between low mag and intermediate mag or between intermediate mag and View mag, redo the "Mag IS Offsets" calibrations.
- If SerialEM terminates the script with a montage error concerning an exceeded limit in the Script Control, go to Scripts > Controls and remove any limits that cause the script to terminate.
- If SPACEtomo does not detect any lamellae although lamellae are clearly visible on your WG map, try collecting the map with the energy filter slit in to improve contrast. Please also consider sharing your WG maps with me so I can further improve the lamella detection model!
- If the Navigator keeps asking you to save, check your SEMshortTermCal.txt. If there is a line starting with
NavAutosave, delete it. - To be continued...
Contact
If you could not resolve the issue yourself or you encountered a bug, please report it to the GitHub Issues page or send an email to spacetomo.help@gmail.com.
Recent Changes
Version 1.3 (27.03.2025)
- GUI improvements and bug fixes.
- Reacquisition options of MM maps (e.g. after ice contamination removal).
- Target selection GUI on manually collected montages. (Can be used instead of PACEtomo_selectTargets script.)
- Hole pattern recognition based on autocorrelation peaks.
- Dense pattern target setup optimizing for targets per area using polygon boundary.
- Setup for non-lamellae samples with grid pattern recognition based on autocorrelation peaks.
- More robust centering of MM montages using cross-correlation alignment between mags (thanks to SerialEM 4.2).
- Grid reloading and realignment for multigrid target setup (beta).
- Support for Glacios instruments.
- Lots of bug fixes.
- Minor text fixes.
Version 1.2 (21.11.2024)
- New lamella detection model trained on 3x the training data of the first model.
- New lamella detection GUI allowing for inspection and manual intervention.
- Improved target selection GUI:
- Added options for multiple target areas.
- Added acquisition settings to override PACEtomo settings.
- Sped up map loading by ~30%.
- Added basic fluorescence map loading, registration and overlay for targeting.
- Added command line interface to manage models, open GUIs and monitor folder for external processing.
- Refactored most code to facilitate deployment as Python package.
- Lots of bug fixes and quality of life improvements.
Version 1.1 (12.04.2024)
- Refactored most code to run on external machine and only run SerialEM dependent steps on microscope machine.
- Added GUI for target selection and inspection.
- Allowed for manual target selection.
- Allowed for inspection of targets before acquisition.
- Added multi-grid acquisition.
- Added splitting of collection areas when lamella too big for all targets to be accommodated within image shift limits.
- Added multi GPU support for external processing.
- Made rudimentary interface for training new segmentation models.
- Lots of bug fixes.
- Minor text fixes.
Version 1.0 (15.12.2023)
Release!
Future Plans
- Segmentation models for Chlamydomonas and eukaryotic cells
- Better framework for training your own models
- To be continued... (Let me know if you have wishes or ideas!)
Training Data
SPACEtomo training dataset for lamella detection using YOLOv8
SPACEtomo training dataset for Yeast lamella map segmentation using nnU-Netv2
The segmentation models are based on nnU-Net. To train a new model you will need an image file and a segmentation file with a particular pixel value for each class. You can find further instructions here.
The SPACEtomo training interface (SPACEtomo TI) is a rudimentary interface for training your own model using a human-in-the-loop approach. You can find instructions here.
The interface will guide you through data preparation from lamella maps in .mrc format, conversion to .png files for each class and training of the model in an iterative fashion. However, the actual labeling requires external graphics editing software like Adobe Photoshop, GIMP or Napari.
For my training set, I used Photoshop to segment different classes on different layers by hand. Why Photoshop? My main reason was the support for comfortable labeling using a drawing tablet with pressure sensitivity. I saved each layer as png file separately and used a Python script to combine these images into a single segmentation image. Another script would take the segmentation and output layer images that I could then edit and refine in Photoshop for retraining.
I also want to mention OpenFIBSEM, which includes a Napari-based labelling workflow that can be adapted for nnU-Net. This workflow can make use of general segmentation models for assisted labeling.
Acknowledgements
I want to thank all the people who provided training data for the deep learning models:
- Anna Bieber (MPI Martinsried)
- Cristina Capitanio (MPI Martinsried)
- Matthias Pöge (MPI Martinsried)
- Sven Klumpe (MPI Martinsried)
- Gregor Weiss (ETH Zurich)
- Yoshiyuki Fukuda (Tokushima University / University of Tokyo)
- Helena Watson (Rosalind Franklin Institute)
- Corina Hadjicharalambous (ETH Zurich)
- Jannik Hugener (ETH Zurich)
- Karolina Roganowicz(ETH Zurich)
- Lee Rettberg (ETH Zurich)
- Miriam Weber (ETH Zurich)
- Marlen Petersen (ETH Zurich)
- Tobias Zachs (ETH Zurich)
- Vasil Gaisin (ETH Zurich)
- Yun-Wei Lien (ETH Zurich)
Special thanks to Pavel Afanasyev for guiding me on my way to stepping up my Python level.
Thanks to all the members of the Pilhofer lab who let me troubleshoot SPACEtomo on their samples! I also want to thank Patrick Cleeve for his contributions and everyone who gave me feedback and gave SPACEtomo a try!


