


QCObjects
Welcome to QCObjects. An Open-source framework that empowers full-stack developers to make micro-services and micro-frontends into an N-Tier architecture.
With QCObjects devlopers are also able to code front-end and back-end together using a common syntax in pure JavaScript. It is cross-browser, cross-platform and cross-frame.
Install it, make a textfield or a navigate home functionality, all in just one step.
This document is the Main Reference Documentation!
This repository and readme is hosted at https://qcobjects.dev
Check out the official page of QCObjects at https://qcobjects.com
This project adheres to the Contributor Covenant code of conduct. By participating, you are expected to uphold this code. Please report unacceptable behavior to info@quickcorp.cl.
Contributors are welcome!
You can contribute to QCObjects following the set of guidelines expressed in the file CONTRIBUTING.md
The meaning of the name QCObjects (Do not forget the Q)
Often, some people is confusing QCObjects name with CObjects (perhaps some day it changes, who knows...) but the Q has an important meaning: It means Quick! What the complete name QCObjects does mean is Quick Components and Objects, and that is why the Q, C, O letters are capitalized.
QCObjects Explainer Video
For those who have no time to read all of this today, here is a small video that explains what QCObjects is and what can be done with it.

Table of Contents
- QCObjects
- The meaning of the name QCObjects (Do not forget the Q)
- QCObjects Explainer Video
- Table of Contents
- Principals
- Main features
- Progressive Web Apps (PWA) Adopted Features
- Cross Browser Javascript Framework for MVC Patterns
- Install it, make a textfield or a navigate home functionality, all in just one step.
- Dynamic Components Architecture
- ECMA-262 Specification
- Copyright
- Demo
- DevBlog
- Fork
- Become a Sponsor
- Check out the QCObjects SDK
- Donate
-
Installing
- Using QCObjects with Atom:
- Using QCObjects in Visual Studio Code:
- Installing with NPM:
- Installing the docker playground:
- One-Step Installation Script for Ubuntu 18.x
- One-Step Installation Script for RHEL8
- One-Step Installation Script for Raspberry PI Raspbian 9
- One-Step Installation Script for macOS
- Install and test QCObjects on Microsoft Windows OS
- QCObjects Multi-Cloud Installation
- Using the development version code in the straight way into HTML5:
- Using the CDN minified version code from jsDelivr CDN
- Using the latest non-minified version from jsDelivr CDN
- Using UNPKG CDN
- Using CDNJS
-
Reference
-
Essentials
- QC_Object
- ComplexStorageCache
- asyncLoad
- Class
- QC_Append, append method - Usage:
- The _super_ method
- New
- InheritClass
- ClassFactory
- _Crypt
- GLOBAL
- CONFIG
- Processor
- waitUntil
- Package
- Import
- Export
- Cast
- Tag
- Ready
- Component Class
-
Component HTML Tag
- Available attributes
- ComponentURI
- componentLoader
- buildComponents
- Controller
- View
- VO
- Service
- serviceLoader
- JSONService
- ConfigService
- SourceJS
- SourceCSS
- Effect
- Timer
- List and Math Functions
-
SDK
-
SDK Components
- org.quickcorp.components.ShadowedComponent
- org.quickcorp.components.FormField
- org.quickcorp.components.ButtonField
- org.quickcorp.components.InputField
- org.quickcorp.components.TextField
- org.quickcorp.components.EmailField
- org.quickcorp.components.GridComponent
- org.quickcorp.components.ModalEnclosureComponent
- org.quickcorp.components.ModalComponent
- org.quickcorp.components.SwaggerUIComponent
- org.quickcorp.components.splashscreen.VideoSplashScreenComponent
- SDK Controllers
-
SDK Effects
- org.quickcorp.tools.effects.Move
- org.quickcorp.tools.effects.MoveXInFromRight
- org.quickcorp.tools.effects.MoveXInFromLeft
- org.quickcorp.tools.effects.MoveYInFromBottom
- org.quickcorp.tools.effects.MoveYInFromTop
- org.quickcorp.tools.effects.RotateX
- org.quickcorp.tools.effects.RotateY
- org.quickcorp.tools.effects.RotateZ
- org.quickcorp.tools.effects.Rotate
- org.quickcorp.tools.effects.Fade
- org.quickcorp.tools.effects.Radius
- org.quickcorp.tools.effects.Resize
- org.quickcorp.tools.effects.WipeLeft
- org.quickcorp.tools.effects.WipeRight
- org.quickcorp.tools.effects.WipeUp
- org.quickcorp.tools.effects.WipeDown
- SDK Misc Tools
- SDK Views
- SDK i18n messages
-
SDK Components
-
The QCObjects HTTP2 Built-In Server
- Start serving your files with QCObjects
- Principals of an N-Tier or Multitier architecture
- Micro-services Principals
- Backend settings in config.json
- Backend routing
- The QCObjects Microservice Class and Package
- Generating a Self-Signed Certificate with QCObjects
- Working with a Letsencrypt HTTPS certificate, Certbot and QCObjects
-
Essentials
- Quick Start Guide - Quick Start your PWA (Progressive Web App) - Quick Start your AMP (Accelerated Mobile Page)
-
Start Coding
- Step 1: Start creating a main import file and name it like: cl.quickcorp.js. Put it into packages/js/ file directory
- Step 2: Then create some services inhereting classes into the file js/packages/cl.quickcorp.services.js :
- Step 3: Now it's time to create the components (cl.quickcorp.components.js)
- Step 4: Once you have done the above components declaration, you will now want to code your controllers (cl.quickcorp.controller.js)
- Step 5: To use into the HTML5 code you only need to do some settings between script tags:
- QCObjects CLI Tool
Principals
Here are the principals with QCObjects was made with:
- You should type in JavaScript to code a JavaScript application.
- Everything is an object.
- Every object has a definition.
- On the front-end side, any object can be stacked into the DOM or Virtual-DOM without the need to re-declare its definition.
- Every object has a body.
- A class should be the main definition of an object.
- A class should be easy typed as an object itself.
- Your code should be easily organised into packages.
- Your code should be possible to easily scafold your applications into a clean architecture.
- A component is an entity that has an object representation, and a tag declaration. The content of a component should be possible to be filled up remotely and locally. As a component is an object, it has a body as well, and the body of the component normally is an stacked instance of a DOM element.
- A component can be attached to the DOM or detached from it without affecting its functionality.
- A service call can be extended to scafold its functionality.
- You should be able to import a package remotely.
- You should be able to scafold your code and also controlling your savings on the server side by not doing unnecessary calls to remote sources. You should not need to repeat yourself coding this kind of controls.
- You should be able to code your N-Tier application in a single language or syntax.
- You should be able to apply any template you want to a component, it doesn't matter the what syntax or language the template was written with.
- If an HTML tag is already represented by a DOM object instance, you should not need to duplicate this instance definition in order to render its contents.
- Your HTML main page should be clean. But you should be able to bind what controls the tag behaviour without affecting the HTML syntax.
- The order of execution of your code should be easily understandable and readable from the code, and the rendering process of every component should have and execution control in as many layers you need.
- A layered pattern (like MVC or MVCC) should be present for every component. It doesn't matter if you define every layer or not.
- The behaviour of a component should not be determined by its rendering process.
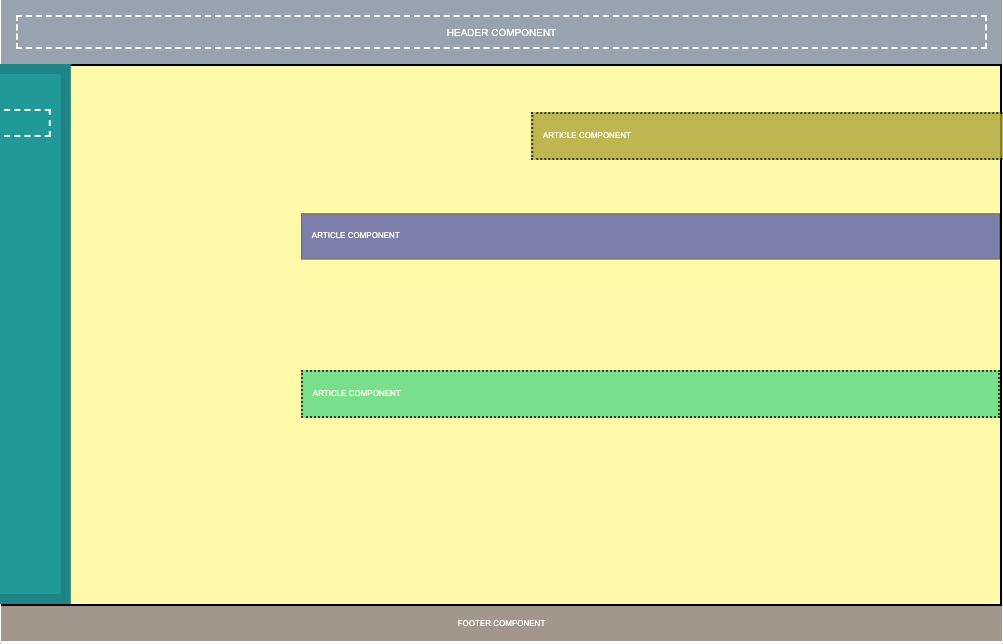
- It is necessary a components stack that splits the DOM into a subjacent tree of attached elements. So now it exists and it is called The QCObjects Nested Components Stack.
- You should be able to extend a component instance. But you should be able to control its dynamic behaviour without affecting its initial declaration.
- You should be able to apply simultaneous visual effects and animations in an easy way to any DOM element instance.
- You should be able to control the visual effects and animations either from CSS or JavaScript without affecting the performance.
- You should be able to control the behaviour of your code Into-the-box and out-of-the-box and survive doing it.
Main features
- Built-In & custom templates for Progressive Web Apps (PWA) and Accelerated Mobile Pages (AMP)
- Revolutionary UI Effects
- Breakthrough backend micro-services
- The simplicity of a wonderful layout design
- Fully usable CLI tools
- Objects & Components driven architecture
- Front-end and back-end together in a full-stack environment
- Recursive routing for components
- Built-In nested components management
- Fully integrated MVC pattern (Model, View, Controller)
- Dynamic Data Objects
- Based on N-Tier Architecture concepts
Progressive Web Apps (PWA) Adopted Features
Prevent Render-blocking resources
To prevent Render-blocking resources, QCObjects has implemented the Package factory function.
On-Demand Resources Load
With a dynamic components driven architecture, QCObjects is rendering every visual resource that is inside of a component only when the component is building itself, and every component is connected to a tree called global.componentsStack that is actually pointing to every component instance and its subcomponents. Every time a component is rebuilt, visual resources are dynamically reloaded on-demand in the most efficient way, so you can forget all the nasty code that you were needing to controll the resource loading process with other frameworks.
Lazy-loading of images in components (use lazy-src instead of src attribute in img tag)
Since the version 2.1.251, QCObjects provide an easy way to lazy load the images, using the latest standard for browsers.
<img src="img/preloader.svg" lazy-src="img/myrealimage.png"/>In the above code, a preloader (light-weight) image is used to be loaded in the first instance, and a lazy-src attribute is used to set the real image to show after lazy loading process. QCObjects will load all the declared tags inside a component in lazy mode if they have a lazy-src attribute, after the component is rebuilt or loaded. Also, QCObjects will use the Intersection Observer API (when available) to determine whether the lazy-src or src image is visually useful to be showed.
The effect of lazy loading is only high visible on the first time the PWA is loaded. The next time, the speed of loading will be significantly increased making more difficult to the human eye to see the result. However this feature makes a lot of difference in terms of user experience when the internet connection has low speed issues or the images are extremely large. This feature is a part of the recommended features for PWAs writen by Mozzila Developers Network in an article about Progressive loading. You can read that article here
If you don't want to use lazy loading for images, you can always keep the normal way of loading by not adding the lazy-src attribute to the tag and using the traditional src.
Cross Browser Javascript Framework for MVC Patterns
QCObjects is a javascript framework designed to make easier everything about the MVC patterns implementation into the pure javascript scope. You don't need to use typescript nor any transpiler to run QCObjects. It runs directly on the browser and it uses pure javascript with no extra dependencies of code. You can make your own components expressed in real native javascript objects or extend a native DOM object to use in your own way. You can also use QCObjects in conjunction with CSS3 frameworks like [Foundation] (https://foundation.zurb.com), [Bootstrap] (https://getbootstrap.com) and mobile javascript frameworks like [PhoneGap] (https://phonegap.com) and OnsenUI (https://onsen.io)
Install it, make a textfield or a navigate home functionality, all in just one step.
QCObjects in installable in your computer, it comes with a CLI Tool and commands to create your application template in one step. Navigate home without leaving the webpage and make a shadowed textfield in one step.
Dynamic Components Architecture
ECMA-262 Specification
See ECMAScript® 2020 Language Specification for reference
Copyright
Copyright (c) Jean Machuca and QuickCorp info@quickcorp.cl
Demo
PWA Live Demo
Check out a live demo of pure QCObjects based frontend Progressive Web App here: PWA QCObjects
Demo Integrating with Foundation
Check out a demo using Foundation components here: Demo Using Foundation
Demo Integrating with Materializecss
Check out a demo using MaterializeCSS here: Demo Using Materializecss
Demo Using Raw CSS
Check out a demo using raw CSS: Demo Using Raw CSS
Example of QCObjects using and manipulating canvas objects
The following code shows how QCObjects can manipulate canvas objects directly and inside components
<!DOCTYPE html>
<html>
    <head>
    	<title>Demo</title>
    	<script type="text/javascript" src="https://cdn.qcobjects.dev/QCObjects.js"></script>
    	<script type="text/javascript">
    		var canvas1,canvas2,canvas3,container;
        CONFIG.set('relativeImportPath','src/');

    		/**
    		 * Main import sentence.
    		 */
    		Import('cl.quickcorp',function (){

    			/**
    			 * Super Container MyOwnBody
    			 */
	    		Class('MyOwnBody',HTMLBodyElement,{
	    			customAttr:'custom',
	    			body:document.body  // breakes default body element and replace with them
	    		});

	    		/**
	    		 * Another custom class definition
	    		 */
	    		Class('MyContainer',HTMLElement,{
	    			width:400,
	    			height:400,
	    			customAttr:'custom attr container'
	    		});


	    		/**
	    		 * Another custom class definition
	    		 */
	    		Class('canvas',HTMLCanvasElement,{
	    			customAttr:'custom'
	    		});

	    		/**
	    		 * Another custom class definition
	    		 */
	    		Class('MyCanvas2',HTMLCanvasElement,{});

	    		body = New(MyOwnBody); // binds to body
	    		body.css({backgroundColor:'#ccc'});

	    		container = Tag('container')[0].Cast(MyContainer); // cast any javascript dom object to QC_Object class
	    		container.css({backgroundColor:'red'}); // access binding in two directions to dom objects

	    		/**
	    		 * Instance a new custom canvas
	    		 */
	    		canvas1 = New(canvas,{
            width:100,
            height:100,
          });
	    		canvas2 = New(canvas,{
            width:200,
	    			height:100,
          });
	    		canvas3 = New(canvas,{
            width:300,
	    			height:50,
          });

	    		canvas1.css({backgroundColor:'#000000'}); // like jquery and another style access
          canvas1.body.style.backgroundColor='#000000'; // standard javascript style access
	    		canvas2.body.style.backgroundColor='#0044AA'; // standard javascript style access
	    		canvas3.body.style.backgroundColor='green'; // standard javascript style access

	    		canvas1.append(); //append canvas1 to body
	    		canvas2.attachIn('container'); // attach or append to specific tag containers
	    		container.append(canvas3); // append canvas3 to custom tag binding

//	    		canvas1.body.remove(); // remove canvas1 from dom
	    		body.append(canvas3); // append canvas3 to body

          // using components
          var c1 = New(Component,{'templateURI':'templatesample.html',cached:false});
          document.body.append(c1); // appends the c1 to the body


    		});

    	</script>
    </head>
    <body>
    	<container id="contentLoader" ></container>
    </body>
</html>
DevBlog
The Official DevBlog of QCObjects is hosted on Hashnode. The DevBlog is personally written by Jean Machuca, the author of QCObjects and and he is explaining in detail how are the best practices and giving the best tips and tricks to use the most advanced features of QCObjects.
Fork
Please fork this project or make a link to this project into your README.md file. Read the LICENSE.txt file before you use this code.
Become a Sponsor
If you want to become a sponsor for this wonderful project you can do it here
Check out the QCObjects SDK
You can check out the QCObjects SDK and follow the examples to make your own featured components
Donate
If you like this code please DONATE!
Installing
Using QCObjects with Atom:
> apm install qcobjects-syntaxhttps://atom.io/packages/qcobjects-syntax
Using QCObjects in Visual Studio Code:
https://marketplace.visualstudio.com/items?itemName=Quickcorp.QCObjects-vscode
Installing with NPM:
> npm install qcobjects-cli -g && npm install qcobjects --save
Installing the docker playground:
docker pull -a quickcorp/qcobjects-playground && docker run -it --name qcobjects-playground --rm -it quickcorp/qcobjects-playground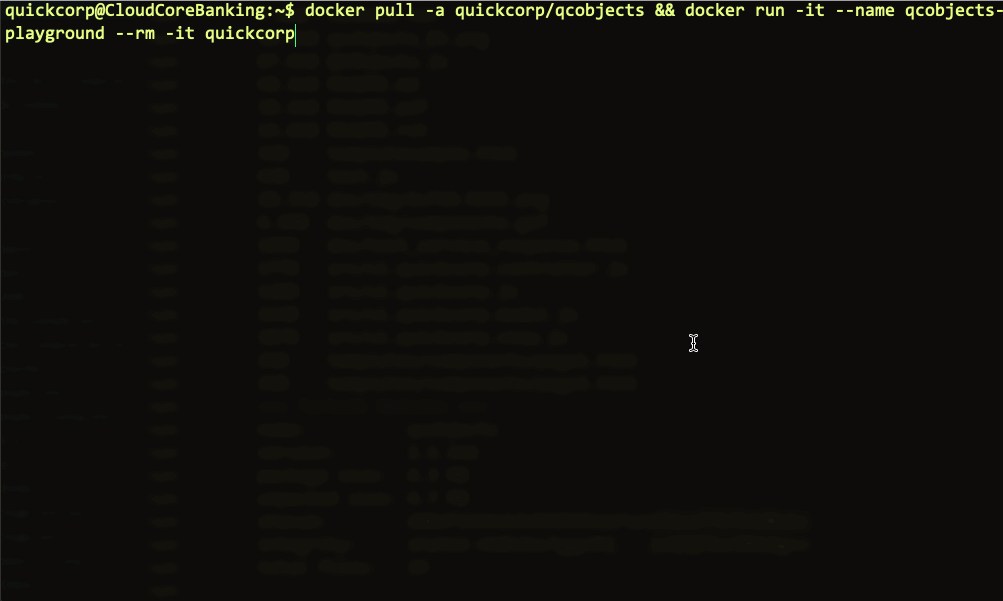
One-Step Installation Script for Ubuntu 18.x
WARNING: Do this only in a fresh|blank|brandnew installation of Ubuntu 18.x, don't do it into an existing production environment. You will be asked for sudo grant permission.
curl -L https://cdn.qcobjects.dev/install_qcobjects_ubuntu18x.sh |shWARNING: I'm not responsible for damaging your infrastructure by using an automated installation script into an unsafe network. Make sure all your repos and scripts are under HTTPS with a valid certificate. For better safe results I recommended you to download the script, edit it for your special needs and then execute it in your machine as local.
One-Step Installation Script for RHEL8
curl -L https://cdn.qcobjects.dev/install_qcobjects_rhel8.sh |shOne-Step Installation Script for Raspberry PI Raspbian 9
su -c "curl -L https://cdn.qcobjects.dev/install_qcobjects_raspbian9.sh |sh" rootOne-Step Installation Script for macOS
Tested on macOS Catalina 10.15.3
curl -L https://cdn.qcobjects.dev/install_qcobjects_macOS.sh | zshInstall and test QCObjects on Microsoft Windows OS
1.- Install the latest version of NodeJS for Windows from here 2.- From cmd install qcobjects-cli using npm
npm i qcobjects-cli -g3.- Create a directory for your project
md mynewproject && cd mynewproject4.- Create a new QCObjects Progressive Web Application
qcobjects create mynewproject --pwa
QCObjects Multi-Cloud Installation
QCObjects is natively supported by the most famous cloud providers. In most of them, you can install it and set everything up and running in just one step.
DigitalOcean One-Click Droplet
If you want to forget apt-get and the config guide. Go straight to deploying your project using a preconfigured 1-Click App including QCObjects CLI, QCObjects-SDK and QCObjects HTTP2 Built-In Server, then spin it up on a Droplet VM or a Kubernetes cluster in 60 seconds or less.
Create Your Own QCObjects DigitalOcean Droplet here
AWS Amazon Machine Images (AMI)
An Amazon Machine Image (AMI) provides the information required to launch an instance. You must specify an AMI when you launch an instance. You can launch multiple instances from a single AMI when you need multiple instances with the same configuration. You can use different AMIs to launch instances when you need instances with different configurations.
An AMI includes the following:
- One or more EBS snapshots, or, for instance-store-backed AMIs, a template for the root volume of the instance (for example, an operating system, an application server, and applications).
- Launch permissions that control which AWS accounts can use the AMI to launch instances.
- A block device mapping that specifies the volumes to attach to the instance when it's launched.
Start building your QCObjects AMI here
Amazon Web Services AWS PIB (Private Amazon Machine Image)
A Private Image lets you build a new AMI by installing AWS Marketplace software on an image you choose from the AMIs available to your AWS account, this allows you to better meet internal specifications for security, management and compliance. As with standard AWS Marketplace AMIs, each Private Image will comprise a subscription for the installed product and have software usage billed via AWS Marketplace.
Start building your QCObjects Amazon Private Image here
Using the development version code in the straight way into HTML5:
<script type="text/javascript" src="https://cdn.qcobjects.dev/QCObjects.js"></script>Using the CDN minified version code from jsDelivr CDN
<script src="https://cdn.jsdelivr.net/npm/qcobjects/QCObjects.min.js"></script>Using the latest non-minified version from jsDelivr CDN
<script src="https://cdn.jsdelivr.net/npm/qcobjects/QCObjects.js"></script>Using UNPKG CDN
<script src="https://unpkg.com/qcobjects@latest/QCObjects.js"></script>Using CDNJS
<script src="https://cdnjs.cloudflare.com/ajax/libs/qcobjects/[VERSION]/QCObjects.js"></script>Where [VERSION] is the corresponding latest version using numeric notation, example: to use version 2.1.420:
<script src="https://cdnjs.cloudflare.com/ajax/libs/qcobjects/2.1.420/QCObjects.js"></script>You don't need to minify QCObjects, but if you still want to use the minified code, you can do this:
<script src="https://cdnjs.cloudflare.com/ajax/libs/qcobjects/2.1.420/QCObjects.min.js"></script>Again, Change 2.1.420 to the number of the version that you want to use.
Reference
Essentials
Here are the essentials symbols and concepts of QCObjects Reference
QC_Object
Basic Type of all elements
ComplexStorageCache
With ComplexStorageCache you can handle a cache for any object and save it in the local storage.
Usage:
var cache = new ComplexStorageCache({
                      index:object.id, // Object Index
                      load:(cacheController)=>{}, // A function to execute for the first time
                      alternate: (cacheController)=>{} // The alternate function to execute from the second time the source coude is loaded
                      });
Example:
var dataObject = {id:1,
                  prop1:1,
                  prop2:2
                };

var cache = new ComplexStorageCache({
    index: dataObject.id,
    load: (cacheController) => {
      dataObject = {
              id:dataObject.id,
              prop1:dataObject.prop1*2, // changing a property value
              prop2:dataObject.prop2
            };
      return dataObject;
    },
    alternate: (cacheController) => {
      dataObject = cacheController.cache.getCached(dataObject.id); // setting dataObject with the cached value
      return;
    }
  });

// Next time you can get the object from the cache
var dataObjectCopyFromCache = cache.getCached(dataObject.id);
console.log(dataObjectCopyFromCache); // will show the very same object value than dataObject
asyncLoad
The asyncLoad function loads a code once in async mode. This is useful to asure some initial process don't replicate its execution and aren't loaded after sensitive code.
Usage:
asyncLoad(()=>{
  // my code here
},args);
// Where args is an array of arguments, it can be the "arguments" special object
Example:
let doSomething = (arg1,arg2)=>{
  asyncLoad((arg1,arg2)=>{
    console.log(arg1);
    console.log(arg2);
  },arguments);
};

doSomething(1,2); // the code of doSomething will be executed once after the rest of asyncLoad queue of functions and before the execution of Ready event.
Class
This is NOT the class definition of ECMAScript 2015 (see class ECMAScript 2015 for reference).
Class is a special function to help you to declare a class in an easier and compatible way. It works cross-browser, and I hope ECMA could adopt something like that in the future. To let javascript not to be confuse about this, QCObjects uses "Class" not "class" (note the Camel Case).
Usage:
Class('MyClassName',MyClassDefinition);Where MyClassDefinition is an object with a QCObjects prototype
Example:
Class('MyClassName',InheritClass,{
  propertyName1:0, // just to declare purpose
  propertyName2:'',
  classMethod1: function (){
    // some code here
    // note you can use "this" object
    return this.propertyName1;
  },
  classMethod2: function () {
    // some code here
    return this.propertyName2;
  }
});

var newObject = New(MyClassName,{
    propertyName1:1, // this initializes the value in 1
    propertyName2:"some value"
});
console.log(newObject.classMethod1()); // this will show number 1
console.log(newObject.classMethod2()); // this will show "some value"
QC_Append, append method
This is a special method inserted to make your life easier when you want to dynamically manipulate the DOM. You can insert even a Component, a QCObjects Object or a DOM Element inside another HTMLElement.
Usage:
[element].append([object or element]);Example:
// This will create a QCObjects class named "canvas" extending a HTMLCanvasElement with a customAttr property that has a "custom" value
Class('canvas',HTMLCanvasElement,{
  customAttr:'custom'
});

// This will declare an instance canvas1 from the class canvas
let canvas1 = New(canvas,{
            width:100,
            height:100,
          });

// This will append the canvas1 object to the document body
document.body.append(canvas1);
The _super_ method
When you extend a QCObjects class from another one, you can use _super_ method to get an instance from the main class definition.
Usage:
_super_('MySuperClass','MySuperMethod').call(this,params)
// where this is the current instance and params are method parameters
Example:
Class('MySuperiorClass',InheritClass,{
  propertyName1:0, // just to declare purpose
  propertyName2:'',
  classMethod1: function (){
    // some code here
    // note you can use "this" object
    return this.propertyName1;
  },
});

Class('MyClassName',MySuperiorClass,{
  propertyName1:0, // just to declare purpose
  propertyName2:'',
  classMethod2: function () {
    // The next line will execute classMethod1 from MySuperiorClass
    // but using the current instance of MyClassName1
    return _super_('MySuperiorClass','classMethod1').call(this);
  }
});

var newObject = New(MyClassName,{
    propertyName1:1, // this initializes the value in 1
    propertyName2:"some value"
});
console.log(newObject.classMethod2()); // this will show the number 1
New
Creates an object instance of a QCObjects class definition.
Usage:
let objectInstance = New(QCObjectsClassName, properties);
// where properties is a single object with the property values
NOTE: In the properties object you can use single values or getter as well but they will be executed once.
Example:
Class('MyCustomClass',Object);
let objectInstance = New(MyCustomClass,{
  prop1:1,
  get randomNumber(){ // this getter will be executed once
    return Math.random();
  }
});

console.log(objectInstance.randomNumber); // it will show console.log(objectInstance.prop1); // it will show number 1
InheritClass
A single common used QCObjects class definition.
ClassFactory
Use ClassFactory to get the Class declaration factory instance of a QCObjects Class You can get either a Class factory from a Package or from the Class queue stack
To retreive the ClassFactory from the Class queue stack you can simply use the name of a Class as calling directly in the code.
Example:
/* When you declare MyClass using Class() it is instantly added to the Class queue stack
* and you can get the factory either using ClassFactory() or calling the name MyClass straight in the code
*/
Class('MyClass',{
	a:1
})
console.log(MyClass == ClassFactory('MyClass')) // it will show true
/* On the other hand, ClassFactory() will be so useful when you define a Class into a Package
*/
Package('org.quickcorp.package1',[
Class('MyClass',{
a:1
})
])
console.log(MyClass == ClassFactory('MyClass')) // it will still show true
// The following line will show true as well
console.log(MyClass == ClassFactory('org.quickcorp.package1.MyClass'))/* The interesting thing is when you have declared more than one Class using the
* same name MyClass into different packages but with different property default values
* and even properties
*/
Package('org.quickcorp.package1',[
Class('MyClass',{
a:1
})
])
Package('org.quickcorp.package2',[
Class('MyClass',{
a:2,
b:1
})
])
// The last declaration of MyClass will be the one survival in the Class queue
// so the reference MyClass in the code will point to that one
console.log(MyClass == ClassFactory('MyClass')) // it will still show true
// In this case as the MyClass defined in the org.quickcorp.package1 will not be the same
// as the one in the org.quickcorp.package2, but the MyClass in the package2 is the last one
// The following line will show false
console.log(MyClass == ClassFactory('org.quickcorp.package1.MyClass'))
// The following line will show true
console.log(MyClass == ClassFactory('org.quickcorp.package2.MyClass'))
// The following line will show false
console.log(ClassFactory('org.quickcorp.package1.MyClass') == ClassFactory('org.quickcorp.package2.MyClass'))The above examples are intentionally done to explain and show how the scope of the Class definitions in QCObjects is protected and handled and it is reflected in the use of ClassFactory.
So you are gonna want to use ClassFactory when you need complete control over the scope when extending Classes
Example
// When normally you extend a Class using the Class queue you do:
Class('MyExtendedClass',MyInheritClass,{
	extendedProp1: 'value of prop',
	extendedProp2: 2
})
/* But to protect the scope from misleading by reference, you can asure that MyInheritClass
is the one you want to extend by declaring it into a package and then extend it
*/
Package('org.quickcorp.mypackage1',[
Class('MyInheritClass',{
sourceProp:1
}),
])
// The following code is a definition of MyExtendedClass into a different package
// org.quickcorp.package2
// extending MyInheritClass using ClassFactory to retreive the Class from the source package
// org.quickcorp.mypackage1
Package('org.quickcorp.mypackage2',[
Class('MyExtendedClass',ClassFactory('org.quickcorp.mypackage1.MyInheritClass'),{
extendedProp1: 'value of prop',
extendedProp2: 2
})
])
// this will show the number 1 (as the inherited default value of sourceProp)
console.log(New(MyExtendedClass).sourceProp)_Crypt
With _Crypt you can encode serializable objects by a passphrase
Example (1):
 var _string = New(_Crypt,{string:'hello world',key:'some encryption md5 key'});
 console.log(_string._encrypt());
 console.log(_string._decrypt()); // decodes encrypted string to the source
Example (2):
 _Crypt.encrypt('hola mundo','12345678866');
 _Crypt.decrypt('nqCelFSiq6Wcpw==','12345678866');
GLOBAL
GLOBAL is a special QCObjects class to reach the global scope. It has a set and a get method to help you to manage the internal GLOBAL properties.
Example:
GLOBAL.set('globalProperty1','some value in global scope');
var globalProperty1 = GLOBAL.get('globalProperty1');
CONFIG
CONFIG is a smart class that manages the global settings of your application. You can get the properties either from a config.json or from the memory previously saved by a set() call.
Usage from memory:
1.- In your initial code set the CONFIG initial values:
CONFIG.set('someSettingProperty','some initial value');2.- Then you can access it from anywhere in your code by using the get method:
var someSettingProperty = CONFIG.get('someSettingProperty');Usage from config.json:
1.- You need to indicate first that you are using a config.json file by setting the "useConfigService" value to true
CONFIG.set('useConfigService',true); // using config.json for custom settings config2.- Once you have set the value above QCObjects will know and look to the next CONFIG settings into the file config.json in the basePath folder of your application.
Usage from an encrypted config.json:
There is also a way to use an encrypted config.json file in order to protect your settings robots that can steal unprotected data from your web application (like API keys web crawlers).
To encrypt your json file go to https://config.qcobjects.dev, put your domain and the config.json content. The tool will encrypt your json and you can copy the encrypted content to insert it in your config.json file. QCObjects will know the data is encrypted and the process to decode the data will be transparent for you.
Dynamic CONFIG Settings
Sometimes you will need to set a value from a source that isn't static, like the ENV vars or another custom source of dynamic data. To get a value using CONFIG from a dynamic source you have to use a processor. There are common processors predefined like $ENV (only available on CLI, Collab and Node) and $config (available on all environments).
Processors are called as a meta value either into the config.json file or in the CONFIG Class.
// file: config.json
{
	"domain":"localhost",
	"env1":"$ENV(ENV1)",
	"customSettings":{
		"value1":"$config(domain)"
	}
}
let value1 = CONFIG.get("customSettings").value1;
// value1 = "localhost";
let env1 = CONFIG.get("env1");
//env1 = (environment variable ENV1)// sets the key "api_key" of the CONFIG settings to a dynamic processor $ENV that recovers the value of API_KEY from the environment variables
CONFIG.set("api_key","$ENV(API_KEY)");
let api_key = CONFIG.get("api_key");
// api_key will contain the value of the system API_KEY environment var
// ($ENV processor returns a valid value only on Node.js , QCObjects CLI and QCObjects Collab engine)Processor
Static Class that used to set custom processors for CONFIG.
Usage:
Processor.setProcessor(processor)Where processor is a named function that receives the arguments of the processor
Example:
You have an environment variable called SERVICE_URL that stores a url of a service. You have to use that value in your config settings in the serviceURL value but you also need to set the host and the port settings using the parsed value of that url. To parse the value of SERVICE_URL environment variable on-demand and fill up the corresponding settings in your config.json, Your config.json file will look like this:
// file: config.json
{
	"serviceURL":"$ENV(SERVICE_URL)",
	"host":"$SERVICE_HOST(SERVICE_URL)",
	"port":"$SERVICE_PORT(SERVICE_URL)"
}
The $SERVICE_HOST and $SERVICE_PORT processors don't exist. To define them, you must use:
// execute the next code in your init.js file or before to load the CONFIG settings

let SERVICE_HOST = function (arg){
	var processorHandler = this; // to make this always works, do not use arrow functions to define your
	let serviceURL = new URL(processorHandler.processors.ENV(arg));
	return serviceURL.host;
}
let SERVICE_PORT = function (arg){
	var processorHandler = this; // to make this always works, do not use arrow functions to define your
	let serviceURL = new URL(processorHandler.processors.ENV(arg));
	return serviceURL.port;
}

Processor.setProcessor(SERVICE_HOST);
Processor.setProcessor(SERVICE_PORT);
Then you only need to set your environment variable SERVICE_URL in your shell
This is only for Unix/Linux systems
export SERVICE_URL="https://example.com:443/path-to-a-resource/"and your settings will be dynamically loaded like this:
{
	"serviceURL":"https://example.com:443/path-to-a-resource/",
	"host":"example.com",
	"port":"443"
}
And you get the corresponding values using CONFIG.get(value)
waitUntil
waitUntil is a helper just in case you are in trouble trying to run a code before a condition is true. The code inside waitUntil will be executed once.
NOTE: This is useful in some cases but an excessive use is not recommended.
Usage:
waitUntil(()=>{
  // the code that will be executed after the condition is true
},()=>{return condition;});
// where condition is what I want to wait for
Example:
let someVar = 0;
waitUntil(()=>{
  console.log('someVar is present');
},()=>{return typeof someVar != 'undefined';});
// where condition is what I want to wait for
Package
Defines a QCObjects package and returns it.
Usage:
Package('packageName',[packageContent]);Where packageContent is an array of QCObjects Classes. If you only pass the packageName param you will get the previously declared package content.
Example (1):
'use strict';
Package('org.quickcorp.main',[
  Class('Main',InheritClass,{
    propertyName1:'propertyValue1',
  }),
  Class('MyCustomClass',InheritClass,{
    propertyName2:'propertyValue2',
  }),
]);
Example (2):
let mainPackage = Package('org.quickcorp.main'); // this will return the previously declared content of package 'org.quickcorp.main'
// mainPackage[0] will be the Main class definition.
// This is useful for code introspection
The packages loading technique present in QCObjects is promise based and also scope oriented. You can ask if a package is loaded simply calling the Package() function passing a package name as an argument.
Import
Imports a package from another JS file
Usage:
Import (packagename,[ready],[external]);Where packagename is the name of the package, ready is a function that will be executed after the package is loaded, and external is a boolean value that indicates if the JS file is in the same origin or it is from another external resource.
Example (1):
Import('org.quickcorp.main');The above code will try to import a JS fila named 'org.quickcorp.main.js' from the path specified in the relativeImportPath settings value present in your CONFIG. Inside the JS file you have to define a package by using Package('org.quickcorp.main',[Class1, Class2...])
Example (2):
Import('org.quickcorp.main',function (){
  console.log('remote import is loaded');
},true);
The above code this time is trying to load the same package but using an external path defined by the remoteImportsPath setting present in your CONFIG
NOTE: In both examples above you have not use or specify the ".js" extension. This it's used by default and can't be changed by security reasons.
Export
Put a symbol (var or function) in the global scope.
Usage:
Export('name of symbol');Example:
(()=>{
  // this is local scope
  let someFunction = (someLocalParam)=>{
    console.log(someLocalParam);
  };
  Export(someFunction); // now, someFunction is in the top level scope.
})();


// this is the top level scope
someFunction('this works');
Cast
Use the Cast method of any DOM element to get the properties of another type of object. This is useful to transform an object type to another giving more flexibility in your code.
Usage:
let resultObject = [element or QCObjects type].Cast(objectToCastFrom);Where objectToCastFrom is an object to get the properties from and put it into the result object returned by Cast.
Example:
Class('MyOwnClass',{
  prop1:'1',
  prop2:2
});

let obj = document.createElement('div').Cast(MyOwnClass);
The above code will create a DOM object and Cast it to MyOwnClass. Because of MyOwnClass is a QCObjects type class, obj will now have a prop1 and prop2 properties, and will now be a QCObjects object instance with a body property that is a div element.
Tag
Tag is a useful function to select any DOM element using selectors. Tag will always return a list of elements, that you can map, sort, and filter as any other list.
Usage:
var listOfElements = Tag(selector);Where selector is a DOM query selector.
Example:
<!DOCTYPE html>
<html>
    <head>
    	<title>Demo</title>
    	<script type="text/javascript" src="https://cdn.qcobjects.dev/QCObjects.js"></script>
    </head>
    <body>
    <div class="myselector">
    <p>Hello world</p>
    </div>
    <script>
    Ready(()=>{
      Tag('.myselector > p').map((element)=>{
        element.innerHTML = 'Hello world! How are you?';
      });
    });
    </script>
    </body>
</html>
In the above code, a paragraph element was created inside a div with a css class named myselector by html, and then is modified dynamically using the QCObjects Tag function. If you are familiar with query selector frameworks like JQuery, you will love this one.
Ready
Assign a function to run after everything is done by QCObjects and after the window.onload event. Use it to prevent 'undefined' DOM objects error.
Usage:
Ready(()=>{
  // My init code here!
});
Note that if you define dynamic components by using a HTML "component" tag, the dynamic content load will not trigger Ready events. To catch code everytime a dynamic component is loaded, use a Controller done method instead.
You will use Ready implementation mostly when you want to implement QCObjects in conjunction with another framework that needs it.
Component Class
A QCObjects class type for components.
Properties
[Component].domain Returns a string with the domain of your application. It is automatically set by QCObjects at the load time.
[Component].basePath Returns a string with the base path url of your application. It is automatically set by QCObjects at the load time.
NOTE: If you want to change the components base path, you have to use CONFIG.set('componentsBasePath','new path relative to the domain') in your init code.
[Component].templateURI Is a string representing the component template URI relative to the domain. When is set, the component will load a template and append the inner content into the body childs as a part of the DOM. To set this property, it is recommended to use the ComponentURI helper function.
[Component].tplsource Is a string representing the source where the template will be loaded. It can be "default" or "none". A value of "default" will tell QCObjects to load the template from the templateURI content. A value of "none" will tell QCObjects not to load a template from anywhere.
[Component].url Is a string representing the entire url of the component. It is automatically set by QCObjects when the component is instantiated.
[Component].name Is a string representing the name of a component. The name of a component can be any alphanumeric value that identifies the component type. It will be internally used by ComponentURI to build a normalised component template URI.
[Component].method Is a string representing a HTTP or HTTPS method. By default, every component is set to use the "GET" method. In the most of cases, you don't need to change this property.
[Component].data Is an object representing the data of the component. When QCObjects loads a template, it will get every property of data object and bind it to a template label representing the same property inside the template content between double brakets (example: {{prop1}} in the template content will represent data.prop1 in the component instance). NOTE: To refresh the data bindings it is needed to rebuild the component (see the use of [Component].rebuild() method for more details ).
[Component].reload Is a boolean value that tells QCObjects when to force reload the content of a component from the template or not. If its value is true, the template content will be replacing the current DOM childs of the component body element. If its value is false, the template content will be added after the las component body child.
[Component].cached Is a boolean value that tells QCObjects if the component needs to be cached or not. When a component is cached, the template content loaded from templateURI will be loaded once. You can set this property either as a static property of the Component Class to set the default value for every next component object instance, or setting the individual value of the property in every component definition. In a world where the performance matters, to give more flexibility to the cache behaviour is needed more than ever.
[Component].routingWay Returns a string representing the routing way. Its value can be "hash", "pathname" or "search". NOTE: To change the routingWay of every component it is recommended to use CONFIG.set('routingWay','value of a valid routing way') in your init code.
[Component].validRoutingWays Returns a list representing the valid routing ways. QCObjects uses this to internally validate the routingWay which was used to build the component routings.
[Component].routingNodes Returns a NodeList object representing the list of nodes that were loaded by the component routing builder.
[Component].routings Returns a list with the component routings built when the component was instantiated.
[Component].routingPath Returns a string representing the current routing path
[Component].routingSelected Returns an object representing the current routing of the component
[Component].subcomponents Returns a list of components that are childs of the component instance.
[Component].body Is a DOM element representing the body of the component. NOTE: Every time a component body is set, it will trigger the routings builder for this component.
Methods
[Component].set('prop',value) Sets a value for a component property.
[Component].get('prop') Returns the value of a component property
[Component].rebuild() Rebuilds the component. It will force a call for the componentLoader with this component when it's needed.
[Component].Cast(ClassName or ComponentClassName) Returns the cast of a component definition into another one. This is useful to dynamically merge components definitions.
[Component].route() Forces the component routings builder to reload the routings of the component. This will result in a rebuild call when it's needed.
[Component].fullscreen() Puts the component in fullscreen mode.
[Component].closefullscreen() Closes the fullscreen mode.
[Component].css(css object) Sets the css properties for the component.
[Component].append(component or QCObjects object) Appends a component as a child of the current component body
[Component].attachIn(selector) Attaches a current component body to any element in the given selector.
Component HTML Tag
Is a HTML tag representation of a component instance. Every declaration of a <component></component> tag will generate a related instance of a QCObjects component. While a component tag is not an instance itself, you can even define some instance properties by setting the related tag attribute when it is available.
Available attributes
Below is a list of the available attributes for a component tag
The name Attribute
<component name>
Sets the name of the related component instance built by QCObjects.
Usage:
<component name="name_of_component"></component>Example:
<!-- index.html -->
<!DOCTYPE html>
<html>
    <head>
    	<title>Demo</title>
    	<script type="text/javascript" src="https://cdn.qcobjects.dev/QCObjects.js"></script>
    </head>
    <body>
      <!-- this will load the contents of ./templates/main[.tplextension] file -->
      <component name="main"></component>
    </body>
</html>
The cached Attribute
<component cached>
Sets the cached property if the related instance of a component.
NOTE: Only a value of "true" can be set in order to tell QCObjects that the component template content has to be cached. Any other value will be interpreted as false.
Usage:
<component name="name_of_component" cached="true"></component>The data property tag declaration
<component data-property1 data-property2 ...>
Sets a static value of a property for the data object in the component instance.
NOTE: Data property tag declaration was thought with the purpose to give some simple way to mocking a dynamic component with template assignments. Don't use it thinking it is a bidirectional way data binding. While you can get a bidirectional way behaviour accesing a data object from a component instance, it is not the same for the component tag. Data property declaration in component tags is only one way data binding because of components tree architecture.
The controllerClass Attribute
<component controllerClass>
Defines a custom Controller Class for the component instance
Usage:
<component name="name_of_component" controllerClass="ControllerClassName"></component>The viewClass Attribute
<component viewClass>
Defines a custom View Class for the component instance
Usage:
<component name="name_of_component" viewClass="ViewClassName"></component>The componentClass Attribute
<component componentClass>
Defines a custom Component Class for the component instance
Usage:
<component name="name_of_component" componentClass="ComponentClassName"></component>The effecClass Attribute
<component effectClass>
Defines a custom Effect Class for the component instance
Usage:
<component name="name_of_component" effectClass="EffectClassName"></component>The template-source Attribute
<component template-source>
Sets the tplsource property of the related instance of a component. Possible values are "none" or "default".
Usage:
<component name="name_of_component" template-source="none"></component>The tplextension Attribute
<component tplextension>
Sets the tplextension property of the related instance of a component. Possible values are any file extension. Default value is "html"
Usage:
<component name="name_of_component" tplextension="tpl.html"></component>ComponentURI
Is a helper function to let you define the templateURI for a component in a normalised way.
Example:
var templateURI = ComponentURI({
  'COMPONENTS_BASE_PATH':CONFIG.get('componentsBasePath'),
  'COMPONENT_NAME':'main',
  'TPLEXTENSION':"tpl.html",
  'TPL_SOURCE':"default"
});

console.log(templateURI); // this will show something like "templates/components/main.tpl.html" depending on your CONFIG settings
componentLoader
Loads a component instance in a low level, and appends the component template content to the component body. In the most of cases you won't need to call componentLoader in order to load a component. This is automatically called by QCObjects when it's needed. componentLoader returns a promise that is resolved when the component load is done and rejected when the component load was failed.
Usage:
[Promise] componentLoader(componentInstance,load_async)Where componentInstance is a component instance created by New(ComponentDefinitionClass)
Example:
componentLoader(componentInstance,load_async).then(
  (successStandardResponse)=>{
    // component load successful
    var request = successStandardResponse.request;
    var component = successStandardResponse.component;
  },(failStandardResponse)=>{
    // component load failed
    var component = failStandardResponse.component;
  });
buildComponents
Rebuilds every component that is a child element of the DOM element who owns the method. In the most of cases, you won't need to call buildComponents in order to build or rebuild every component in the DOM. This is automatically called by QCObjects when it's needed.
Usage:
[element].buildComponents()Example:
document.buildComponents()Controller
A built-in QCObjects Class to define a controller
View
A built-in QCObjects View to define a view
VO
A built-in QCObjects Class to define a value object
Service
A QCObjects class type for services.
Properties
[Service].domain Returns a string with the domain of your application. It is automatically set by QCObjects at the load time.
[Service].basePath Returns a string with the base path url of your application. It is automatically set by QCObjects at the load time.
[Service].url Is a string representing the entire url of the service. It can be absolute or relative to the basePath when it applies. It can be also an external url.
NOTE: To load a service of an external resource you need to specify the external parameter to true using serviceLoader.
[Service].name Is a string representing the name of a component. The name of a service can be any alphanumeric value that identifies the service instance. It isn't a unique ID but only a descriptive name.
[Service].method Is a string representing a HTTP or HTTPS method. Possible values are: "GET", "POST", "PUT", ... any other that is accepted by REST services calls.
[Service].data Is an object representing the data of the service. When QCObjects loads a service. It receives the response and interpretes it as a template. So once a service response is obtained, it will get every property of data object and bind it to a template label representing the same property inside the template content between double brakets (example: {{prop1}} in the template content will represent data.prop1 in the service instance).
[Service].cached Is a boolean value that tells QCObjects if the service response needs to be cached or not. When a service is cached, the template content loaded from the service url will be loaded only once. You have to set this value to false for every Service instance you define in order to asure the service is loaded from the resource but not the storage cache.
Methods
[Service].set('prop',value) Sets a value for a service property.
[Service].get('prop') Returns the value of a service property
serviceLoader
Loads a service instance and returns a promise that is resolved when the service has a successful response load and is rejected when it fails loading the response.
Usage:
[Promise] serviceLoader(serviceInstance)Example:
Class('MyTestService',Service,{
    name:'myservice',
    external:true,
    cached:false,
    method:'GET',
    headers:{'Content-Type':'application/json'},
    url:'https://api.github.com/orgs/QuickCorp/repos',
    withCredentials:false,
    _new_:()=>{
      // service instantiated
    },
    done:()=>{
      // service loaded
    }
});
var service = serviceLoader(New(MyTestService,{
  data:{param1:1}
})).then(
  (successfulResponse)=>{
    // This will show the service response as a plain text
    console.log(successfulResponse.service.template);
  },
  (failedResponse)=>{

  });
JSONService
Is a built-in definition for a JSON Service Class
Properties
[JSONService].domain Returns a string with the domain of your application. It is automatically set by QCObjects at the load time.
[JSONService].basePath Returns a string with the base path url of your application. It is automatically set by QCObjects at the load time.
[JSONService].url Is a string representing the entire url of the service. It can be absolute or relative to the basePath when it applies. It can be also an external url.
NOTE: To load a service of an external resource you need to specify the external parameter to true using serviceLoader.
[JSONService].name Is a string representing the name of a component. The name of a service can be any alphanumeric value that identifies the service instance. It isn't a unique ID but only a descriptive name.
[JSONService].method Is a string representing a HTTP or HTTPS method. Possible values are: "GET", "POST", "PUT", ... any other that is accepted by REST services calls.
[JSONService].data Is an object representing the data of the service. When QCObjects loads a service. It receives the response and interpretes it as a template. So once a service response is obtained, it will get every property of data object and bind it to a template label representing the same property inside the template content between double brakets (example: {{prop1}} in the template content will represent data.prop1 in the service instance).
[JSONService].cached Is a boolean value that tells QCObjects if the service response needs to be cached or not. When a service is cached, the template content loaded from the service url will be loaded only once. You have to set this value to false for every Service instance you define in order to asure the service is loaded from the resource but not the storage cache.
Methods
[JSONService].set('prop',value) Sets a value for a service property.
[JSONService].get('prop') Returns the value of a service property
Example:
Class('MyTestJSONService',JSONService,{
    name:'myJSONservice',
    external:true,
    cached:false,
    method:'GET',
    withCredentials:false,
    url:'https://api.github.com/orgs/QuickCorp/repos',
    _new_:function (){
      // service instantiated
      delete this.headers.charset; // do not send the charset header
    },
    done:function (result){
      _super_('JSONService','done').call(this,result);
    }
});
var service = serviceLoader(New(MyTestJSONService,{
  data:{param1:1}
})).then(
  (successfulResponse)=>{
    // This will show the service response as a JSON object
    console.log(successfulResponse.service.JSONresponse);
  },
  (failedResponse)=>{

  });
ConfigService
Is a built-in Class definition to load the CONFIG settings from a config.json file
Example:
// To set the config.json file relative url
ConfigService.configFileName='config.json'; // it is done by default
CONFIG.set('useConfigService',true); // using config.json for custom settings config
SourceJS
Use SourceJS as a static Class that is helping you to load external JS dependencies. This is commonly used to load libraries that are external and that not follow the QCObjects packages syntax.
Example:
Class("MyNewController",Controller,{
	_new_:function (){
		var controller = this;
		controller.dependencies.push(
			New(SourceJS,{
				external:false,
				url:'doc/js/my-js-resource.js',
				done:function(){
					logger.debug("Dependency loaded")
				}})
			);
	}
})
SourceCSS
A static Class that is used to load an external CSS resource.
Class("MyNewController",Controller,{
	dependencies:[],
	done (){
		this.dependencies.push(New(SourceCSS,{
			external:false,
			url:CONFIG.get('basePath')+'css/my-css-resource.css'
		}));
	}
});
Effect
Effect is a super class to define custom effects.
Example:
Class('CustomFade',Effect,{
	duration:500, // milliseconds of duration
	apply: function (){
		// You need the following line to apply a Fade effect in runtime
		_super_('Fade','apply').apply(this,arguments);
	}
})
Timer
Timer is a special implementation of requestAnimationFrame to emulate the creation of thread instances, so you can handle runtime paralell processing in a little bit more efficient way.
NOTE: As it is currently depending in requestAnimationFrame availability it only works on modern browsers.
Example:
Timer.thread({
		duration:300, // duration in milliseconds
		timing(timeFraction,elapsed){
			return timeFraction; // you can change this line to return a custom math function for timing
		},
		intervalInterceptor(progress){
			if (progress>=100){
				// do whatever you want here
			}
		}
});
List and Math Functions
ArrayList
A Class definition used to manage lists
let myvar = New(ArrayList,[1,2,3]);ArrayCollection
An extended definition for advanced handling of collections
let collection = New(ArrayCollection, {source:[0,1,2]});[ArrayList or Array].unique
Filters an Array or an ArrayList object to obtain only unique elements. NOTE: It only filters a single value sequence.
let my_unique_list = [0,1,2,1,2].unique()
// will result in: my_unique_list = [ 0, 1, 2 ]
[ArrayList or Array].table
This is intended for shell scripts use only. It shows a table of the values in the list.
["a","b","c","d"].table()
// it will show
┌─────────┬────────┐
│ (index) │ Values │
├─────────┼────────┤
│    0    │  'a'   │
│    1    │  'b'   │
│    2    │  'c'   │
│    3    │  'd'   │
└─────────┴────────┘
[ArrayList or Array].sort
Sorts the elements of the array or list.
let my_sorted_array = [3,3,4,0,2,1].sort()
// my_sorted_array = [ 0, 1, 2, 3, 3, 4 ]
let my_sorted_list = New(ArrayList,{source:[3,3,4,0,2,1]}).source.sort()
// my_sorted_list = [ 0, 1, 2, 3, 3, 4 ][ArrayList or Array].sortBy
Sorts a list of objects by a property value.
let my_ordered_list = [
												{"b":1,"a":2},
												{"b":2,"a":1},
												{"b":3,"a":3},
											].sortBy("a")
// it will result in
[
	{ b: 2, a: 1 },
	{ b: 1, a: 2 },
	{ b: 3, a: 3 }
]
[ArrayList or Array].matrix
Generates a matrix in one dimension.
Usage
[].matrix (length, [value]) Where length is the number of elements and the optional value is the value of each element, it can be any value of any type.
let matrix = Array.matrix(10);
// matrix = [
  0, 0, 0, 0, 0,
  0, 0, 0, 0, 0
]
let matrix = ArrayList.matrix(10,1);
// matrix = [
1, 1, 1, 1, 1,
1, 1, 1, 1, 1
]let a = 1, b = 2;
let c = ArrayList.matrix(10,{a,b})
// c = [
{ a: 1, b: 2 },
{ a: 1, b: 2 },
{ a: 1, b: 2 },
{ a: 1, b: 2 },
{ a: 1, b: 2 },
{ a: 1, b: 2 },
{ a: 1, b: 2 },
{ a: 1, b: 2 },
{ a: 1, b: 2 },
{ a: 1, b: 2 }
][ArrayList or Array].matrix2d
Creates a 2D matrix.
let matrix2d = ArrayList.matrix2d(2,1);
// [ [ 1, 1 ], [ 1, 1 ] ]
[ArrayList or Array].matrix3d
Creates a 3D matrix.
let matrix3d = ArrayList.matrix3d(3,"a");
// it will result in a 3x3 matrix with the value "a" on every element
[
  [ [ 'a', 'a', 'a' ], [ 'a', 'a', 'a' ], [ 'a', 'a', 'a' ] ],
  [ [ 'a', 'a', 'a' ], [ 'a', 'a', 'a' ], [ 'a', 'a', 'a' ] ],
  [ [ 'a', 'a', 'a' ], [ 'a', 'a', 'a' ], [ 'a', 'a', 'a' ] ]
]
range
Python like function to create a range list. You can use it in conjunction with ArrayList.matrix, ArrayList.matrix2d and ArrayList.matrix3d to generate complex matrix ranges.
Usage
range(length) or range(initialIndex, finalIndex) range() without any params returns an empty list range(0) returns a list with one element with value 0
logger.debugEnabled=true;

for (var i in range(10)){
	(!isNaN(i) && logger.debug(i))
}

// the above code will show
[DEBUG] 0
[DEBUG] 1
[DEBUG] 2
[DEBUG] 3
[DEBUG] 4
[DEBUG] 5
[DEBUG] 6
[DEBUG] 7
[DEBUG] 8
[DEBUG] 9
[DEBUG] 10logger.debugEnabled=true;
// same result will be obtained iterating the range first
for (var i in {...range(10)}){
logger.debug(i)
}
// the above code will show
[DEBUG] 0
[DEBUG] 1
[DEBUG] 2
[DEBUG] 3
[DEBUG] 4
[DEBUG] 5
[DEBUG] 6
[DEBUG] 7
[DEBUG] 8
[DEBUG] 9
[DEBUG] 10// a bit shorter syntax for the same result
range(10).map(n=>logger.debug(n))let normalizedMatrix = ArrayList.matrix(3,range(2));
// normalizedMatrix = [ [ 0, 1, 2 ], [ 0, 1, 2 ], [ 0, 1, 2 ] ]let my3dmatrix = ArrayList.matrix3d(3,range(0,1));
// my3dmatrix will be
[
[
[ [0, 1], [0, 1], [0, 1] ],
[ [0, 1], [0, 1], [0, 1] ],
[ [0, 1], [0, 1], [0, 1] ]
],
[
[ [0, 1], [0, 1], [0, 1] ],
[ [0, 1], [0, 1], [0, 1] ],
[ [0, 1], [0, 1], [0, 1] ]
],
[
[ [0, 1], [0, 1], [0, 1] ],
[ [0, 1], [0, 1], [0, 1] ],
[ [0, 1], [0, 1], [0, 1] ]
]
]Array.sum
Sums the elements of an array.
let s = [1,2,3].sum()
// s = 6
Array.avg
Computes the average value of the elements in the Array
let average = [10,5].avg()
// average = 7.5
Array.min
Returns the min value from the elements of an Array.
let minValue = [1,2,3].min()
// minValue = 1
Array.max
Returns the max value from the elements of an Array
let maxValue = [1,2,3].max()
// maxValue = 3
SDK
SDK Components
org.quickcorp.components.ShadowedComponent
ShadowedComponent Class is a custom component class designed to allow you to create a component using the Shadow DOM of browsers. Read more about Shadowed Components on [this article on Hackernoon] (https://www.hackernoon.com/shadowed-components-and-qcobjects-kd703yld).
Usage:
<component componentClass="ShadowedComponent"></component>org.quickcorp.components.FormField
FormField is a Class for QCObjects custom components that allows you to inject a Form Field generic behavior to your components. It has a reverse data-binding feature to detect the values of the DOM fields inside your form and assign them to the data values of your component. By this way, you don't loose performance making an old-fashioned two-way data binding based on observables. To implement this advanced behavior. You only need to do the following:
1.- Assign a data-field attribute to the DOM tag inside the component body, with the corresponding field name in your data object.
2.- To your component tag, assign FormField in the componentClass attribute.
3.- To recover the data of the form inside your component, just use the componentInstance.data object. Every property of the componentInstance.data object will be linked by the binding events with the value properties on every DOM object of the form that has a data-field assigned.
Usage:
<!-- Where you place the component -->
<component name="myform" componentClass="FormField"></component>
<!-- template: myform.tpl.html -->
<label for="email"><b>Email</b></label>
<input data-field="email" type="email" placeholder="Enter Email" name="email" required>
<label for="psw"><b>Password</b></label>
<input data-field="name" type="text" placeholder="Enter Your Name" name="name" required>data-field="name" will be matched with this.data.name inside the component class and will be updated everytime a data binding event is triggered. The same will happen to data-field="email" and so on.
FormField.executeBindings():
The method executeBindings of FormField component will find the data-field attribute values and match them with the corresponding data fields in the component instance.
Data Binding Event Change:
Inside of the body of your component, when it is a FormField component, every time the DOM dispatches a "change" event, it will trigger the executeBindings method of your component.
Data Binding Event Blur:
Inside of the body of your component, when it is a FormField component, every time the DOM dispatches a "Blur" event, it will trigger the executeBindings method of your component.
Data Binding Event Focus:
Inside of the body of your component, when it is a FormField component, every time the DOM dispatches a "Focus" event, it will trigger the executeBindings method of your component.
Data Binding Event Keydown:
Inside of the body of your component, when it is a FormField component, every time the DOM dispatches a "Keydown" event, it will trigger the executeBindings method of your component.
org.quickcorp.components.ButtonField
ButtonField is a sub-definition of FormField, that is commonly used for almost the same purpose of FormField. The main difference between ButtonField and FormField is that ButtonField has a <button> DOM element as the body of the component by default. And FormField hasn't a pre-defined body.
Usage:
<component name="name_of_component" componentClass="ButtonField"></component>org.quickcorp.components.InputField
InputField is a sub-definition of FormField, that is commonly used for almost the same purpose of FormField. The main difference between InputField and FormField is that InputField has a DOM element as the body of the component by default. And FormField hasn't a pre-defined body.
Usage:
<component name="name_of_component" componentClass="InputField"></component>org.quickcorp.components.TextField
ButtonField is a sub-definition of FormField, that is commonly used for almost the same purpose of FormField. The main difference between InputField and FormField is that ButtonField has a <textarea> DOM element as the body of the component by default. And FormField hasn't a pre-defined body.
Usage:
<component name="name_of_component" componentClass="TextField"></component>org.quickcorp.components.EmailField
EmailField is a sub-definition of FormField, that is commonly used for almost the same purpose of FormField. The main difference between ButtonField and FormField is that ButtonField has a <input> DOM element as the body of the component by default. And FormField hasn't a pre-defined body.
Usage:
<component name="name_of_component" componentClass="EmailField"></component>org.quickcorp.components.GridComponent
GridComponent has a predefined name assigned to the value "grid", so be aware of it when you use this component class. Also, GridComponent is intended to be used in conjunction with GridController to expand its behavior to a CSS Grid.
Usage:
<component componentClass="GridComponent" ...></component>Example:
<component rows="2" cols="2" componentClass="GridComponent" controllerClass="GridController">
  <!-- It is recommended to use subcomponents as the Grid elements-->
	<component name="name_of_subcomponent1"></component>
	<component name="name_of_subcomponent2"></component>
	<component name="name_of_subcomponent3"></component>
	<component name="name_of_subcomponent4"></component>
</controller>
The above example will draw a css grid of two columns and two rows and place the subcomponents into it.
Don't forget this file:
<!-- file: grid.tpl.html, you can use the grid template either to draw the grid itself or to draw a loading information -->
<p>Loading grid...</p>
org.quickcorp.components.ModalEnclosureComponent
org.quickcorp.components.ModalComponent
org.quickcorp.components.SwaggerUIComponent
It is used to inject a swagger-ui DOM needed to the Swagger UI API. Learn more in this article of QCObjects DevBlog called Working with Swagger UI as a QCObjects Component
Usage:
<component componentClass="SwaggerUIComponent" controllerClass="SwaggerUIController" ></component>org.quickcorp.components.splashscreen.VideoSplashScreenComponent
A powerful component definition to allow you create an awesome Video Splash Screen for your progressive web app.
Example:
<!-- Add the splash screen component tag as the first component in your HTML document -->
<component componentClass="VideoSplashScreenComponent"
	data-background="./img/splash/splashscreen-aqua.png"
	data-video_mp4="./img/splash/splashscreen-aqua.mp4"
	data-video_webm="./img/splash/splashscreen-aqua.webm"
	data-video_ogg="./img/splash/splashscreen-aqua.ogv" duration="5000">
	<img slot="logo" alt="logo" src="./img/logo-qcobjects-white.svg"></div>
</component>
<!-- Then you can put your main component as always -->
<component name="main" cached=true controllerClass="MainController">
</component>
SDK Controllers
org.quickcorp.controllers.GridController
GridController is intended to be used in conjunction with GridComponent to allow you to create a CSS grid to place subcomponents. More info in org.quickcorp.components.GridComponent
org.quickcorp.controllers.DataGridController
DataGridController will take the data of your component and map a set of subcomponents to fill it up. This is commonly used to render a dynamic list of components. It used a subcomponentClass attribute value in the component tag to determine what component definition to use to build and render every sub-component. The data on every sub-component will be filled up with the value of the element mapped to the sub-component.
Usage:
<component name="name_of_component" controllerClass="DataGridController" subcomponentClass="SubComponentClass">
</component>
Example:
Suppose you have to render a list of profiles. Every profile has a profile picture, a name and an email. You want to use a card to represent every profile in the list.
So you define a CardComponent to render the picture, the name and email of an element in the list.
Class("CardComponent",Component,{
	name:"card", // this will point to templates/components/card.tpl.html
	data:{ // the value of this object will be overriden by DataGridController
		name:"<name of contact>",
		email:"email@example.com",
		profilePicture:"img/photo.png"
	}
})
<!-- template: card.tpl.html -->
<img src="{{profilePicture}}"/>
<h3>{{name}}</h3>
<p>{{email}}</p>Then, you have to place a component to generate the list of cards.
<component name="loading_list" componentClass="MyListComponent" controllerClass="DataGridController"
subcomponentClass="CardComponent">
</component>
<!-- template: loading_list.tpl.html -->
<p>Loading list...</p>Last, you have to define MyListComponent to assign the dynamic data of the list.
Class("MyListComponent",Component,{
	data:[
		{ // the value of this object will be mapped to a subcomponent by DataGridController
			name:"<name of contact>",
			email:"email@example.com",
			profilePicture:"img/photo.png"
		},
		{ // the value of this object will be mapped to a subcomponent by DataGridController
			name:"<name of contact>",
			email:"email@example.com",
			profilePicture:"img/photo.png"
		},
		{ // the value of this object will be mapped to a subcomponent by DataGridController
			name:"<name of contact>",
			email:"email@example.com",
			profilePicture:"img/photo.png"
		}
	]
})
The resulting component will be a list of CardComponent with the data of every profile mapped into them by DataGridController.
org.quickcorp.controllers.ModalController
org.quickcorp.controllers.FormValidations
FormValidations is used to handle default validations for the FormController
Usage:
FormValidations.getDefault(validationName)Where validationName is the name of the validation present in the validations property of the FormController
org.quickcorp.controllers.FormController
The FormController definition is intended to help you to handle dynamic forms. By using the normalised syntax of the FormController definition, you don't have to code the complexity of the logic of a submit form, as it is atomised here in three steps.
- Assign a serviceClass
- Define the formSettings
- Asign or code the field validations
[FormController].serviceClass
It is the string name of the Class definition. FormController will load this class using the ClassFactory helper function, so the name can be a complete package name plus definition.
[FormController].formSettings
It is an object with the special properties of the form. The default settings are: backRouting:'#', loadingRouting:'#loading', nextRouting:'#signupsuccessful'. These settings are meant to handle the flow behavior of the form.
loadingRouting is the name of the routing that will be triggered while the serviceClass is beign called until the service loader returns a response.
backRouting is the name of the routing that will be triggered if the call for the serviceClass fails.
nextRouting is the name of the routing that will be triggered when the call for the serviceClass finishes OK.
[FormController].validations
It is an object with the helper functions that you want to define to validate every form field. When you define a validation function for a field, FormController will ask if the execution of that function returns true before to submit the form.
To define validations for the fields of the form, you just need to add them as a part of the validations property.
Usage:
	// Let's say you have a form field called "name"
	validations: {
		name (){
			return (fieldName, dataValue, element)=> {
				return [true ... or false condition];
			}
		}, //... add a validation for every form field that you want to be validated
	}
You can also use FormValidations.getDefault for simplicity.
	// Let's say you have a form field called "name"
	validations: {
		name (){
			return FormValidations.getDefault('name')
		}, //... add a validation for every form field that you want to be validated
	}
[FormController].formSaveTouchHandler
This method is internally used by FormController to call the serviceClass as a submit action. It will be binded to any click or touch event of any element inside the form that has a CSS ".submit" class assigned.
Example:
<button class="submit"><p>Send</p></button>When the click or touch event of the above button is triggered, FormController will call the service defined in serviceClass, this action will be done by formSaveTouchHandler. If you like to change this behavior just override this method in your custom controller.
A complete example of FormController
Below is a complete example of a definition for a Signup Form using FormController.
// First, define a service class that will be called on submit.
Class('SignupClientService',JSONService,{
	name:'signup',
	external:true,
	cached:false,
	method:'POST',
	url:Service.basePath+'createaccount',
	withCredentials:false,
	_new_:()=>{
		// service instantiated
	},
	done:(successfulResponse)=>{
		// service loaded
			_super_('JSONService','done').call(successfulResponse.service,successfulResponse);
			console.log(successfulResponse.service.JSONresponse);
	}
})
// To safe extend FormController, we extend first from Controller, then
// we use a defaultController to instance a new FormController
Class('SignupFormController',Controller,{
serviceClass: 'SignupClientService',
formSettings:{ /* routings that will be triggered once the serviceClass is called*/
backRouting:'#',
loadingRouting:'#loading',
nextRouting:'#signupsuccessful'
},
validations: { /* validation definitions for every field in the form to be validated before submit */
name (){
return FormValidations.getDefault('name')
},
email (){
return FormValidations.getDefault('email')
},
comment (){
return function (fieldName, dataValue, element){
return (dataValue !== '')?(true):(false);
}
}
},
defaulController:null,
_new_:function (o){
o.serviceClass = this.serviceClass;
o.formSettings = this.formSettings;
o.validations = this.validations;
// here we instance a defaultController with a New FormController
// passing the o object declaration coming from the components stack building process.
this.defaulController = New(FormController,o);
},
done: function (){
// we define a custom done callback function to inject a custom behavior as well as calling the defaultController behavior
logger.debugEnabled=true;
var controller = this.defaulController;
try {
controller.done.call(controller);
}catch (e){
logger.debug('Unable to execute default behavior');
}
}
})<!-- A Shadowed Component to render the signup forms -->
<!-- template: signup-form.tpl.html -->
<form action="#" style="border:1px solid #ccc;border-radius:20px">
<div class="container">
<slot name="title">
<h1>Signup Form</h1>
</slot>
<slot name="subtitle">
<p>Please fill up this form to ask for a quote.</p>
</slot>
<hr />
<slot id="field_control" name="field-control">
</slot>
<hr />
<slot name="submit_button"></slot>
</div>
</form><!-- A signup form using the shadowed component signup-form -->
<!-- template: signup.tpl.html -->
<component name="signup-form" shadowed="true" controllerClass="SignupFormController">
<h1 slot="title">Signup Form</h1>
<p slot="subtitle">Please fill up this form to ask for a quote.</p>
<label slot="field-control" id="name_label" for="name"><b>🧑 Full Name</b></label>
<input slot="field-control" type="text" pattern="^[a-zA-Z]+(([',. -][a-zA-Z ])?[a-zA-Z]*)*$" title="Please write your full name" placeholder="Full Name" name="name" data-field="name" aria-labelledby="name_label" required>
<label slot="field-control" id="email_label" for="email"><b>📧 Email</b></label>
<input slot="field-control" type="email" pattern="^[\w-\.]+@([\w-]+\.)+[\w-]{2,4}$" title="Please write a right email address" placeholder="Enter Email" name="email" data-field="email" aria-labelledby="email_label" required>
<label slot="field-control" for="comment" id="comment_label"><b>📝 Comment</b></label>
<textarea slot="field-control" name="comment" title="Please write a comment" rows="10" cols="100" data-field="comment" aria-labelledby="comment_label"></textarea>
<p slot="field-control">By submitting this form you agree to our <a href="#" style="color:dodgerblue">Terms & Privacy</a>.</p>
<div class="clearfix">
<button aria-label="Cancel" onclick="location.href='/#'" role="button" tabindex="-1" type="button" class="cancelbtn"><p>Cancel</p></button>
<button aria-label="Send" role="button" tabindex="-1" type="button" class="signupbtn submit"><p>Send</p></button>
</div>
</component>org.quickcorp.controllers.SwaggerUIController
It is used to inject a swagger-ui DOM needed to the Swagger UI API. Learn more in this article of QCObjects DevBlog called Working with Swagger UI as a QCObjects Component
Usage:
<component componentClass="SwaggerUIComponent" controllerClass="SwaggerUIController" ></component>SDK Effects
QCObjects has an Effect definition to handle and produce new effects and transitions for the components. Below are some custom effect definitions that will help you to build amazing visual features to your components. To improve the performance, effects are changing CSS internally to apply the effect in a smart way. And all the effects engine is based on the requestAnimationFrame definition, read more here
org.quickcorp.tools.effects.Move
Moves a DOM object from one position to another.
Usage:
Move.apply(element, xfrom, yfrom, xto, yto)Example:
// The next line will move all the images from (0,0) to (10,10)
Tag('img').map(img => Move.apply(img,0,0,10,10))
org.quickcorp.tools.effects.MoveXInFromRight
Moves an element from the right side in X axis to the original position of the object.
Usage:
MoveXInFromRight.apply(element)Example:
// the next line will move every canvas on the document from right side to its original position
Tag('canvas').map(canvas => MoveXInFromRight.apply(canvas));
org.quickcorp.tools.effects.MoveXInFromLeft
Moves an element from the left side in X axis to the original position of the object.
Usage:
MoveXInFromLeft.apply(element)Example:
// the next line will move every canvas on the document from left side to its original position
Tag('canvas').map(canvas => MoveXInFromLeft.apply(canvas));
org.quickcorp.tools.effects.MoveYInFromBottom
Moves an object of the DOM from bottom to its original position using Y axis.
Usage:
MoveYInFromBottom.apply(element)Example:
// the next line will move the body of every component named "comp1" from bottom to its original position
Tag('component[name=comp1]').map(componentBody => MoveYInFromBottom.apply(componentBody));
org.quickcorp.tools.effects.MoveYInFromTop
Moves an object of the DOM from top to its original position using Y axis.
Usage:
MoveYInFromTop.apply(element)Example:
// the next line will move the body of every component named "comp1" from top to its original position
Tag('component[name=comp1]').map(componentBody => MoveYInFromTop.apply(componentBody));
org.quickcorp.tools.effects.RotateX
Rotates an object in X axis.
Usage:
RotateX.apply(element, angleFrom, angleTo)angleFrom and angleTo represent an angle value expressed in degrees, starting from 0 (zero) to 360.
Example:
// the next line will rotate in X axis the div called #id from 180 degrees to 240 degrees
Tag('div#id').map(div => RotateX.apply(div, 180, 240));
org.quickcorp.tools.effects.RotateY
Rotates an object in Y axis.
Usage:
RotateY.apply(element, angleFrom, angleTo)angleFrom and angleTo represent an angle value expressed in degrees, starting from 0 (zero) to 360.
Example:
// the next line will rotate in Y axis the div called #id from 0 degrees to 270 degrees
Tag('div#id').map(div => RotateY.apply(div, 0, 270));
org.quickcorp.tools.effects.RotateZ
Rotates an object in Z axis.
Usage:
RotateZ.apply(element, angleFrom, angleTo)angleFrom and angleTo represent an angle value expressed in degrees, starting from 0 (zero) to 360.
Example:
// the next line will rotate in Z axis the div called #id from 0 degrees to 60 degrees
Tag('div#id').map(div => RotateZ.apply(div, 0, 60));
org.quickcorp.tools.effects.Rotate
Rotates an object in X, Y, Z axes. All axes will rotate in paralell at the same time producing a 3d visual effect perception.
Usage:
Rotate.apply(element, angleFrom, angleTo)angleFrom and angleTo represent an angle value expressed in degrees, starting from 0 (zero) to 360.
Example:
// the next line will rotate in X, Y and Z axes the div called #id form 0 to 270 degrees
Tag('div#id').map(div => Rotate.apply(div, 0, 270));
org.quickcorp.tools.effects.Fade
Produces a fade effect by lowering the opacity of the element.
Usage:
Fade.apply(element, alphaFrom, alphaTo)alphaFrom and alphaTo are numbers between 0 (zero) and 1.
// the following line will fade a <b class="header"> element from 0.5 (mid visibility) to 1 (full visibility)
Tag('b.header').map(header=>Fade.apply(header, 0.5, 1))
org.quickcorp.tools.effects.Radius
Rounds the corner of an element
Usage:
Radius.apply(element, radiusFrom, radiusTo)radiusFrom and radiusTo are numeric values.
Example:
// the next line will round the corners of every image in the document
Tag('img').map(element => Radius.apply(element, 0, 100))
org.quickcorp.tools.effects.Resize
Usage:
Resize.apply(element, scaleFrom, scaleTo)scaleFrom and scaleTo are numeric values. A value of 1 is regular size, a value of 2 is double size, a value between 0 and 1 is a small scale.
Example:
// the next line will make a zoom-out effect on every image in the document
Tag('img').map(element => Resize.apply(element, 2,0))

// the next line will make a zoom-in effect on every image in the document
Tag('img').map(element => Resize.apply(element, 0,1))

// the next line will make a zoom-in-out effect on every image in the document
Tag('img').map(element => Resize.apply(element, 2,1))
org.quickcorp.tools.effects.WipeLeft
Makes a Wipe effect from Left side to the origin of the element.
Usage:
WipeLeft.apply(element, scaleFrom, scaleTo)scaleFrom and scaleTo are numeric values. A value of 1 is regular size, a value of 2 is double size, a value between 0 and 1 is a small scale.
Example
Tag('img').map(element => WipeLeft.apply(element,0,1))org.quickcorp.tools.effects.WipeRight
Makes a Wipe effect from right side to the origin of the element.
Usage:
WipeRight.apply(element, scaleFrom, scaleTo)scaleFrom and scaleTo are numeric values. A value of 1 is regular size, a value of 2 is double size, a value between 0 and 1 is a small scale.
Example
Tag('img').map(element => WipeRight.apply(element,0,1))org.quickcorp.tools.effects.WipeUp
Makes a Wipe effect from down to up the origin of the element.
Usage:
WipeUp.apply(element, scaleFrom, scaleTo)scaleFrom and scaleTo are numeric values. A value of 1 is regular size, a value of 2 is double size, a value between 0 and 1 is a small scale.
Example
Tag('img').map(element => WipeUp.apply(element,0,1))org.quickcorp.tools.effects.WipeDown
Makes a Wipe effect from up to down the origin of the element.
Usage:
WipeDown.apply(element, scaleFrom, scaleTo)scaleFrom and scaleTo are numeric values. A value of 1 is regular size, a value of 2 is double size, a value between 0 and 1 is a small scale.
Example
Tag('img').map(element => WipeDown.apply(element,0,1))SDK Misc Tools
org.quickcorp.tools.canvas.CanvasTool
org.quickcorp.tools.layouts.BasicLayout
SDK Views
Below are a set of pre-defined views for common use.
org.quickcorp.views.GridView
A generic GridView definition for use with grids.
SDK i18n messages
The QCObjects i18n engine allows you to define custom messages . Learn more in this article in the DevBlog called i18n Internationalisation for your Progressive Web Apps
org.quickcorp.i18n_messages.i18n_messages
Used to call the i18n engine.
Usage:
  Class('i18n_messages_<custom lang>', i18n_messages,{
		...
	})
Example
'use strict';
// file: js/packages/org.quickcorp.i18n_messages.es.js
Package('org.quickcorp.i18n_messages.es', [
  Class('i18n_messages_es', i18n_messages, {
    messages: [
       // ... your custom language dictionary is here
      {
         "en":"This is a paragraph",
         "es":"Esto es un párrafo"
      },
      {
         "en":"Welcome to my new app",
         "es":"Bienvenido a mi nueva app"
      }
    ]
  }),
  {
		// the next line generates an instance of the i18n engine and attaches it automatically in the package
    _i18n_messages_es: New(i18n_messages_es)
  }
]);
The QCObjects HTTP2 Built-In Server
The QCObjects HTTP2 Built-In Server will help you to test your application in a local environment before to deploy to a production environment. For production environment it is recommended to use QCObjects HTTP2 Built-In Server under Ubuntu 18.x or newer and NodeJS 12.x or newer.
Start serving your files with QCObjects
To start using the QCObjects HTTP2 Built-In Server, you just go to your project path and execute the following command line in your bash shell:
> qcobjects launch mynewappor
> qcobjects-server
It will start serving the files inside the folder you are present, unsing a built-in HTTP2 Server with the default configuration settings.
Principals of an N-Tier or Multitier architecture
QCObjects was designed to work into a professional environment. There are many ways and paradigms to use when you define your software architecture. One recommended is using a Multitier or N-Tier architecture.
The benefits of a Multitier or N-Tier architecture are scalability and reliability of the systems that are demanding higger impact and performance. To go deep into this concepts would unnecessary enlarge this reference document but you can read more about this concepts in the following external links (only for reference and study):
- Miltitier Architecture
- 3 Tier Architecture
- Milti Tier Application
- N Tier Architecture System Concepts and Tips
Micro-services Principals
The main goal of a microservice is that you can compact a fragment of backend functionality in a piece of code that can be called remotely from another backend or frontend terminal. Basically you can split a high level backend service into a multiple small micro-services that can complete the task. There are thousands of good examples of this kind of pattern adoption. You can read more about this concept in the following external links (only for reference and study):
With QCObjects you can code your microservices in a way more fancy, clean and quick.
Backend settings in config.json
You can also use config.json in the backend side to make some tunning and custom settings for backend, specially useful for making the microservice routes.
Below is an example of a customised config.json file including the backend settings:
{
  "documentRoot":"/home/qcobjects/projects/mynewapp/",
  "relativeImportPath":"js/packages/",
  "basePath":"/home/qcobjects/projects/mynewapp/",
  "projectPath":"/home/qcobjects/projects/mynewapp/",
  "domain":"mynewapp.qcobjects.com",
  "dataPath":"/etc/qcobjects/data/",
  "private-cert-pem":"/etc/letsencrypt/live/mynewapp.qcobjects.com/fullchain.pem",
  "private-key-pem":"/etc/letsencrypt/live/mynewapp.qcobjects.com/privkey.pem",
  "backend":{
    "routes":[
      {
        "path":"/createaccount",
        "microservice":"org.quickcorp.backend.signup",
        "responseHeaders":{}
      }
    ]
  }
}
Backend routing
Inside your config.json file you can set the backend routes for your microservices. For every microservice route, a path and a microservice package string is required.
{
  "backend":{
    "routes":[
      {
        "path":"/createaccount",
        "microservice":"org.quickcorp.backend.signup"
      }
    ]
  }
}
When you set up the backend routes, the QCObjects HTTP2 Built-In Server will know how to handle the calls for every path defined. For every other path that is undefined by the backend routes settings, the server will handle the call with the default behavior, that is using a static file as response if it exists. With that in mind you can use QCObjects either to manage and serve static files or dynamically served files when you need it.
The QCObjects Microservice Class and Package
When you set up a backend route definition, you need to specify a microservice package. This microservice package is a QCObjects definition of a package with a Microservice class extended from a BackendMicroservice class already defined by QCObjects.
Below is an example of a microservice package definition, writen in the file org.quickcorp.backend.signup.js
'use strict';
const fs = require('fs');

Package('cl.quickcorp.backend.signup',[
  Class('Microservice',BackendMicroservice,{
    body:{
      "jsonrpc": "2.0",
      "result": "",
      "id": 1
    },
    saveToFile: function (filename,data){
      logger.debug('Writing file: '+filename);
      fs.writeFile(filename, data, (err) => {
        if (err) throw err;
        console.log('The file has been saved!');
      });
    },
    post:function (data){
      let submittedDataPath = CONFIG.get('dataPath'); // this is filled out from qcobjects-server
      let filename = submittedDataPath+'signup/signup'+Date.now().toString()+'.json';
      console.log('DATA RECEIVED: '+data);
      this.saveToFile(filename,data);
    }
  })
]);
The above microservice is saving a file with the data received from a post request, and answering a jsonrpc 2.0 standard output. Read more about JSON RPC 2.0 Specification here
QCObjects HTTP2 Built-In Server will make a call to the post() method of the Microservice class definition only when a post request is made to the right path defined into the config.json referencing the name of the package as the initial indexing point of reference.
In order to allow QCObjects understand and execute your microservies in the right way, inside a microservice package, a Microservice class definition is required, and also the Microservice class definition must to extend the BackendMicroservice class that is a part of QCObjects built-in classes.
Generating a Self-Signed Certificate with QCObjects
> qcobjects-createcertWorking with a Letsencrypt HTTPS certificate, Certbot and QCObjects
Quick Start Guide
Quick Start your PWA (Progressive Web App)
> qcobjects create --pwa mynewappQuick Start your AMP (Accelerated Mobile Page)
> qcobjects create --amp mynewappStart Coding
Step 1: Start creating a main import file and name it like: cl.quickcorp.js. Put it into packages/js/ file directory
"use strict";
/*
* QuickCorp/QCObjects is licensed under the
* GNU Lesser General Public License v3.0
* [LICENSE] (https://github.com/QuickCorp/QCObjects/blob/master/LICENSE.txt)
*
* Permissions of this copyleft license are conditioned on making available
* complete source code of licensed works and modifications under the same
* license or the GNU GPLv3. Copyright and license notices must be preserved.
* Contributors provide an express grant of patent rights. However, a larger
* work using the licensed work through interfaces provided by the licensed
* work may be distributed under different terms and without source code for
* the larger work.
*
* Copyright (C) 2015 Jean Machuca,<correojean@gmail.com>
*
* Everyone is permitted to copy and distribute verbatim copies of this
* license document, but changing it is not allowed.
*/


Import ('external/libs');
Import ('cl.quickcorp.model');
Import ('cl.quickcorp.components');
Import ('cl.quickcorp.controller');
Import ('cl.quickcorp.view');

Package('cl.quickcorp',[
  Class('FormValidator',Object,{

  }),
]);
Step 2: Then create some services inhereting classes into the file js/packages/cl.quickcorp.services.js :
"use strict";
/*
* QuickCorp/QCObjects is licensed under the
* GNU Lesser General Public License v3.0
* [LICENSE] (https://github.com/QuickCorp/QCObjects/blob/master/LICENSE.txt)
*
* Permissions of this copyleft license are conditioned on making available
* complete source code of licensed works and modifications under the same
* license or the GNU GPLv3. Copyright and license notices must be preserved.
* Contributors provide an express grant of patent rights. However, a larger
* work using the licensed work through interfaces provided by the licensed
* work may be distributed under different terms and without source code for
* the larger work.
*
* Copyright (C) 2015 Jean Machuca,<correojean@gmail.com>
*
* Everyone is permitted to copy and distribute verbatim copies of this
* license document, but changing it is not allowed.
*/


Package('cl.quickcorp.service',[
	Class('FormSubmitService',JSONService,{
	    name:'mySubmitService',
	    external:true,
	    cached:false,
	    method:'POST',
	    withCredentials:false,
	    url:'https://api.github.com/orgs/QuickCorp/repos',
	    _new_:function (){
	      // service instantiated
	      delete this.headers.charset; // do not send the charset header
	    },
	    done:function (result){
	      _super_('JSONService','done').call(this,result);
	    },
			fail: function(result) {
	      //TODO negative case
	      console.log("***** ERROR");
	    }
  })
])
Step 3: Now it's time to create the components (cl.quickcorp.components.js)
"use strict";
/*
* QuickCorp/QCObjects is licensed under the
* GNU Lesser General Public License v3.0
* [LICENSE] (https://github.com/QuickCorp/QCObjects/blob/master/LICENSE.txt)
*
* Permissions of this copyleft license are conditioned on making available
* complete source code of licensed works and modifications under the same
* license or the GNU GPLv3. Copyright and license notices must be preserved.
* Contributors provide an express grant of patent rights. However, a larger
* work using the licensed work through interfaces provided by the licensed
* work may be distributed under different terms and without source code for
* the larger work.
*
* Copyright (C) 2015 Jean Machuca,<correojean@gmail.com>
*
* Everyone is permitted to copy and distribute verbatim copies of this
* license document, but changing it is not allowed.
*/
Package('cl.quickcorp.components',[
	Class('MyCustomComponent',Component,{
	  name:'mycustomcomponent',
	  cached:false,
	  controller:null,
	  view:null,
		templateURI:ComponentURI({
			'COMPONENTS_BASE_PATH':Component.basePath,
			'COMPONENT_NAME':'mycustomcomponent',
			'TPLEXTENSION':'tpl.html',
			'TPL_SOURCE':'default'
		})
	})
]);
Step 4: Once you have done the above components declaration, you will now want to code your controllers (cl.quickcorp.controller.js)
"use strict";
/*
* QuickCorp/QCObjects is licensed under the
* GNU Lesser General Public License v3.0
* [LICENSE] (https://github.com/QuickCorp/QCObjects/blob/master/LICENSE.txt)
*
* Permissions of this copyleft license are conditioned on making available
* complete source code of licensed works and modifications under the same
* license or the GNU GPLv3. Copyright and license notices must be preserved.
* Contributors provide an express grant of patent rights. However, a larger
* work using the licensed work through interfaces provided by the licensed
* work may be distributed under different terms and without source code for
* the larger work.
*
* Copyright (C) 2015 Jean Machuca,<correojean@gmail.com>
*
* Everyone is permitted to copy and distribute verbatim copies of this
* license document, but changing it is not allowed.
*/
"use strict";
Package('cl.quickcorp.controller',[
	Class('MainController',Controller,{
		_new_:function (){
			//TODO: Implement
			logger.debug('MainController Element Initialized');
		}
	}),
	Class('MyAccountController',Controller,{
		component: null,
		done:function (){
			var controller = this;


			logger.debug('MyAccountController Element Initialized');
			this.component.body.setAttribute('loaded',true);

		},
		_new_:function (o){
			//TODO: Implement
			this.component = o.component;

		}
	}),
]);
Step 5: To use into the HTML5 code you only need to do some settings between script tags:
<script>
CONFIG.set('relativeImportPath','js/packages/');
CONFIG.set('componentsBasePath','templates/components/');
CONFIG.set('delayForReady',1); // delay to wait before executing the first ready event, it includes imports
CONFIG.set('preserveComponentBodyTag',false); // don't use <componentBody></componentBody> tag

Import('cl.quickcorp'); # this will import your main file: cl.quickcorp.js into js/packages/ file path
</script>
QCObjects CLI Tool
Usage
qcobjects [options] [command]
Options
-V, --version output the version number -h, --help output usage information
Commands
create [options] <appname> Creates an app with <appname>
publish [options] <appname> Publishes an app with <appname>
generate-sw <appname> Generates the service worker <appname>
launch <appname> Launches the application
Use:
$ qcobjects-cli [command] --help For detailed information of a command
