custom-logger 
custom-logger is a simple, highly customizable logging plugin for node.js.
To install this module simply run:
npm install custom-loggerI'm still very much still learning node.js, and this is my first "official" module. If you notice any unusual or depracated coding behaviors be sure to let me know, like I said, I'm still learning! (:
If you have any questions or feedback, or need any help using this module, please contact @felix_mc.
Basic Usage
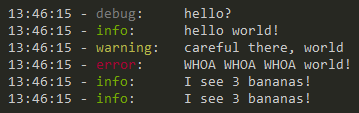
var log = ; log; log; log; log; log; log;The above code will render to:
custom-logger uses logging levels and different event types to determine what is being outputed at any given time. Below are the default events and their respective logging levels:
0 => debug
1 => info
2 => warn
3 => error
As you can see above, you can use the level parameter in the config method to set the current logging level. You can call on the config method on the log object at any time throughout your code to change the log level or other options.
custom-log will only show events whose level is equal to or higher than the one set. For example a level of 0 will show all event types, whereas a level of 2 will only show the event types warning and error. By default the logging level is 0.
You can pass any number of parameters to logging methods (like log.info() or log.error), regardless of whether they are a default method or one that you created (see below). custom-logger will join all parameters together in one string, converting JSON and other non-string parameters to strings automatically.
Customizing Events Types
One cool thing you can do with custom-logger is you easily create your own additional event types:
log; log; //outputs "fatal: program is dead"In the parameters passed to the new method, the key (debugger) is the method to be added to the module, where as the event property is what is going to be displayed in the log as the event type. Don't the get two confused!
You can also overwrite the default events (info, warn, error) with your own if you'd like to:
log;However, if all you you want to do is change some of the properties, you can also do the following:
log; log; //output should be cyan nowMake sure not to pass anything to the info method when you are configuring it, otherwise you'll probably get an error. This is the only ugly part of the syntax (hopefully!), I will probably fix it at a later time.
Log Formatting
Template
Using custom-logger you can also configure how the console output will look like. It uses some simple templating patterns to do so:
%event%     => the type of event being logged, such as "info" or "warning"
%message%   => the message to be displayed, such as "server started!"
%timestamp% => customizable datetime (see below) for when the event occured
%padding%   => space characters that help align the current %event%. See details sections below for more
By default the format string is:
%timestamp% - %event%:%padding% %message%
Which produces the output:
01:08:24 - debug:     hello?
01:08:24 - info:      hello world!
01:08:24 - warning:   carefule there, world!
01:08:24 - error:     WHOA WHOA WHOA world?!
You can specify the output format like so:
var log = ;Which would output to:
debug   [01:06:26]:  hello?
info    [01:06:26]:  hello world!
warning [01:06:26]:  carefule there, world!
error   [01:06:26]:  WHOA WHOA WHOA world?!
If you were to remove %padding% from the format string, the output would be:
debug [01:10:12]:  hello?
info [01:10:12]:  hello world!
warning [01:10:12]:  carefule there, world!
error [01:10:12]:  WHOA WHOA WHOA world?!
I hope this helps illustrate the purpose of %padding%.
Timestamp
You can also modify the format of the actual %timestamp%. By default it's HH:MM:ss. You can change it as follows:
var log = ;Which should look familiar to those familiar with date formatting in other programming languages. For more information on formatting the timestamp, see this. Since this modules relies on the dateFormat library, any values valid for dateFormat should be valid here too.
Overwriting Global Config
You can also overwrite global settings for log template and timestamp format based on individual event types, either when you create them or by modifying existing ones:
log; log;Further Details
Colors
If you'd like to further customize colors or formatting of your events, take a look at the colors modules that this module depends on. Any color/formatting value that's valid for that module, should be fine to pass to the color parameter when creating/configuring an event type.
Padding
Say you have three event types with the event properties as follows: info, warning, error.
The %padding% value is going to be different for each of the events when they are displayed. The way it's calculated is that it finds the string length of the longest event, and subtracts it from the string length of the current event, and then returns a string containg that many spaces.
For examples, the longest string of the above events is warning, with 7 characters. Here's how it's being worked out:
info.length = 4     ===>  7 - 4 = 3  ===> "   "
warning.length = 7  ===>  7 - 7 = 0  ===> ""
error.length = 5    ===>  7 - 5 = 2  ===> "  "
If this confuses you, don't worry much about it, you don't have to use it. I simply included it to make outputing to the console prettier.
Message Formatting
Messages can be formatted using util.format by setting the config option messageFormatting to true. This defaults to false to ensure backward compatibility with versions prior to 0.3.1.
For example:
log // Outputs "I see 3 bananas!" log; log; // Outputs "I see 3 bananas!"