
botbuilder-storage
![]()

![]()
An npm module, to be used with the Bot Builder SDK for Node.js, that adds several storage adapters to your toolkit. Configure your bot to automatically save conversation state data in either MongoDB, DynamoDB and Redis. Auto-cleanup is supported in the form of configurable TTL settings.
Installation
npm install --save botbuilder-storage
In addition, depending on the selected adapter, you will need to install another module to connect to either:
- MongoDB =>
npm install --save mongodb - DynamoDB =>
npm install --save aws-sdk - Redis =>
npm install --save redis
General Usage
To use any of the included adapters, you need to follow these three steps:
- Instantiate a client with any of the aforementioned dependencies.
- Create a storage adapter with the client and settings object.
- Configure the bot to use this newly created adapter.
About time-to-live (TTL)
All of the included adapters have configurable TTL support. This will act as a timeout for the stored data. After the timeout has expired, the state will automatically be deleted. But each time any state object is modified and saved by invoking session.save() in the dialog, that particular state will receive a new, recomputed expiration value based on the configured settings.
As shown in the example below, all values should express the number of seconds the state data should be stored, and a different expiration value can be defined for each type of state the bot manages. Since you would use userData to save state that persists across multiple conversations, you would typically want to assign a large value for that state. On the other hand, for conversationState and privateConversationState the duration could be kept significantly shorter.
const settings: {
    /* other settings */
    ttl: {
        // Assign values that express the number of seconds the date should be stored.
        // Each time state is updated, the affected object will receive a new TTL value.
        userData: 3600 * 24 * 365 // a year, expressed in seconds,
        conversationData: 3600 * 24 * 7 // a week,
        privateConversationData: 3600 * 24 * 7
    }
}
Usage with MongoDB
To enable TTL (time-to-live) when using MongoDB, you will first need to create a TTL index on the "expireAt" field like this:
db.your_collection.createIndex( { "expireAt": 1 }, { expireAfterSeconds: 0 } )
The expireAfterSeconds: 0 means the inserted document will expire at the specific clock time as defined in the expireAt field.
For more information on this topic, visit the MongoDB docs.
// Example usage
// =============

// Import dependencies
const { MongoClient } = require('mongodb'); // v3.x.x
const { MongoBotStorage } = require('botbuilder-storage');

// Instantiate the bot with a connector instance
const bot = new UniversalBot(connector);

// Connect to your host
MongoClient.connect(host, (err, client) => {
        if (err) { throw err };

        // Define the adapter settings
        const settings = {
            // Required. This is the collection where all
            // the conversation state data will be saved.
            collection: "your_collection_name",

            // Optional but recommended!
            ttl: {
                userData: 3600 * 24 * 365 // a year,
                conversationData: 3600 * 24 * 7 // a week,
                privateConversationData: 3600 * 24 * 7
            }
        }
        // Select the datebase with the client
        client = client.db('your_db_name');

        // Instantiate the adapter with the client and settings.
        const adapter = new MongoBotStorage(client, settings)

        // Configure the bot to use the adapter.
        bot.set('storage', adapter);
    });
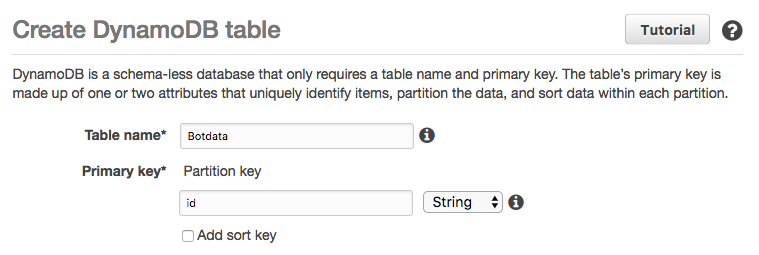
Usage with DynamoDB
When using this module with Amazon's DynamoDB, the setup will be a little different compared to MongoDB.
Assuming you already have an AWS account, you will need to:
- create a table
- choose a primary key (just a partition key, no sort key needed)
- provision it with read and write capacity.
The easiest way to do this is through AWS' web-based console.
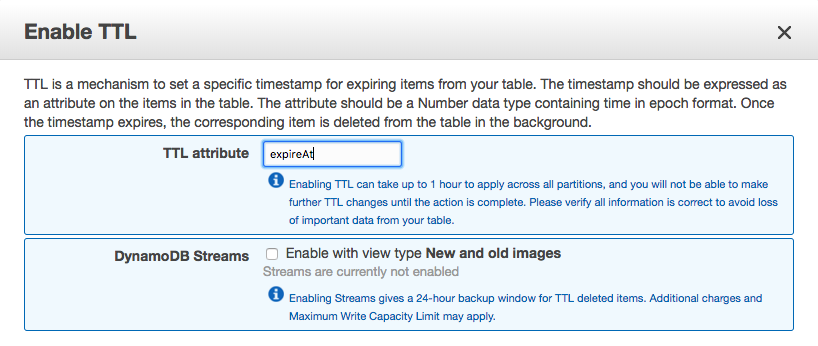
It is strongly recommended to enable TTL when using this module with DynamoDB. This is because, in DynamoDB, deleting many items at once on a table that only has a primary key without a sort key an no secondary index, is only possible by sending a single delete command per item. This is clearly not an ideal solution.
To enable TTL (time-to-live) when using DynamoDB, define a TTL attribute named "expireAt" like this:
// Example usage
// =============

// Import dependencies
const DynamoDB = require('aws-sdk/clients/dynamodb');
const { DynamoBotStorage } = require('botbuilder-storage');

// Instantiate the bot with a connector instance
const bot = new UniversalBot(connector);

// Create a DynamoDB client and select the AWS
// region that hosts your instance of DynamoDB.
const client = new DynamoDB({ region: "us-east-1" });

// Define the adapter settings
const settings = {
    // Required
    tableName: "your_table_name",

    // Required
    primaryKey: "your_primary_key",

    // Optional but strongly recommended!
    ttl: {
        userData: 3600 * 24 * 365 // a year,
        conversationData: 3600 * 24 * 7 // a week,
        privateConversationData: 3600 * 24 * 7
    }
};

// Instantiate the adapter with the client and settings.
const adapter = new DynamoBotStorage(client, settings)

// Configure the bot to use the adapter.
bot.set('storage', adapter);
Usage with Redis
Using this module with Redis does not require any additional setup, but it should be noted that storing your bot's state data in Redis is only recommended when the bot does not need to save any state that should persist across different conversations with the user.
// Import dependencies
const redis = require('redis');
const { RedisBotStorage } = require('botbuilder-storage');

// Instantiate the bot with a connector instance
const bot = new UniversalBot(connector);

// Create a Redis client
const client = redis.createClient({ host, prefix: 'bot:state:' });

// Define the adapter settings
const settings = {
    // Optional but recommended!
    ttl: {
        userData: 3600 * 24 * 365 // a year,
        conversationData: 3600 * 24 * 7 // a week,
        privateConversationData: 3600 * 24 * 7
    }
};

// Instantiate the adapter with the client and settings.
const adapter = new RedisBotStorage(client, settings)

// Configure the bot to use the adapter.
bot.set('storage', adapter);
Further reading
To learn more about how your bot manages its state data and how you can control it, read this page from the Bot Framework documentation.
License
MIT