Provides basic multi-tenancy features for OpenWISP (using the Django web-framework)


Project description


Implementation of user management and multi-tenancy for OpenWISP (built with python & django).

Deploy it in production
An automated installer is available at ansible-openwisp2.
Install stable version from pypi
Install from pypi:
pip install openwisp-usersInstall development version
Install tarball:
pip install https://github.com/openwisp/openwisp-users/tarball/masterAlternatively you can install via pip using git:
pip install -e git+git://github.com/openwisp/openwisp-users#egg=openwisp_usersSetup (integrate in an existing django project)
INSTALLED_APPS in settings.py should look like the following:
INSTALLED_APPS = [
    'django.contrib.auth',
    'django.contrib.contenttypes',
    'django.contrib.sessions',
    'django.contrib.messages',
    'django.contrib.staticfiles',
    'openwisp_utils.admin_theme',
    # overrides some templates in django-allauth
    'openwisp_users.accounts',
    'django_extensions',
    'allauth',
    'allauth.account',
    'allauth.socialaccount',
    'rest_framework',
    'rest_framework.authtoken',
    # must come before the django admin
    # to override the admin login page
    'openwisp_users',
    'django.contrib.admin',
    'django.contrib.sites',
    'drf_yasg',
]
also add AUTH_USER_MODEL, SITE_ID and AUTHENTICATION_BACKENDS to your settings.py:
AUTH_USER_MODEL = 'openwisp_users.User'
SITE_ID = 1
AUTHENTICATION_BACKENDS = [
    'openwisp_users.backends.UsersAuthenticationBackend',
]urls.py:
from django.conf.urls import include, url
from django.contrib import admin
from django.contrib.staticfiles.urls import staticfiles_urlpatterns

urlpatterns = [
    url(r'^admin/', include(admin.site.urls)),
    url(r'^accounts/', include('allauth.urls')),
    url(r'^api/v1/', include('openwisp_users.api.urls')),
]

urlpatterns += staticfiles_urlpatterns()
Add following in settings.py to configure email verification success view:
ACCOUNT_EMAIL_CONFIRMATION_ANONYMOUS_REDIRECT_URL = 'email_confirmation_success'
ACCOUNT_EMAIL_CONFIRMATION_AUTHENTICATED_REDIRECT_URL = 'email_confirmation_success'
For additional steps to properly configure allauth in your project, please refer to their documentation: allauth documentation installation section.
Installing for development
Install sqlite:
sudo apt-get install sqlite3 libsqlite3-dev openssl libssl-devInstall your forked repo:
git clone git://github.com/<your_fork>/openwisp-users
cd openwisp-users/
pip install -e .[rest]
Install test requirements:
pip install -r requirements-test.txtStart Redis
docker-compose up -dCreate database:
cd tests/
./manage.py migrate
./manage.py createsuperuser
Launch development server:
./manage.py runserverYou can access the admin interface at http://127.0.0.1:8000/admin/.
Run tests with:
# --parallel and --keepdb are optional but help to speed up the operation
./runtests.py --parallel --keepdb
Settings
OPENWISP_ORGANIZATION_USER_ADMIN
type: |
boolean |
default: |
False |
Indicates whether the admin section for managing OrganizationUser items is enabled or not.
It is disabled by default because these items can be managed via inline items in the user administration section.
OPENWISP_ORGANIZATION_OWNER_ADMIN
type: |
boolean |
default: |
True |
Indicates whether the admin section for managing OrganizationOwner items is enabled or not.
Find out more information about organization owners.
OPENWISP_USERS_AUTH_API
type: |
boolean |
default: |
True |
Indicates whether the REST API is enabled or not.
OPENWISP_USERS_AUTH_THROTTLE_RATE
type: |
str |
default: |
100/day |
Indicates the rate throttling for the Obtain Authentication API endpoint.
Please note that the current rate throttler is very basic and will also count valid requests for rate limiting. For more information, check Django-rest-framework throttling guide.
OPENWISP_USERS_AUTH_BACKEND_AUTO_PREFIXES
type: |
tuple |
default: |
tuple() |
A tuple or list of international prefixes which will be automatically tested by the authentication backend of openwisp-users when parsing phone numbers.
Each prefix will be prepended to the username string automatically and parsed with the phonenumbers library to find out if the result is a valid number of not.
This allows users to log in by using only the national phone number, without having to specify the international prefix.
REST API
To enable the API the setting OPENWISP_USERS_AUTH_API must be set to True.
Live documentation
A general live API documentation (following the OpenAPI specification) at /api/v1/docs/.
Browsable web interface
Additionally, opening any of the endpoints listed below directly in the browser will show the browsable API interface of Django-REST-Framework, which makes it even easier to find out the details of each endpoint.
Obtain Authentication Token
/api/v1/users/token/This endpoint only accepts the POST method and is used to retrieve the Bearer token that is required to make API requests to other endpoints.
Example usage of the endpoint:
http POST localhost:8000/api/v1/users/token/ username=openwisp password=1234

HTTP/1.1 200 OK
Allow: POST, OPTIONS
Content-Length: 52
Content-Type: application/json
Date: Wed, 13 May 2020 10:59:34 GMT
Server: WSGIServer/0.2 CPython/3.6.9
Vary: Cookie
X-Content-Type-Options: nosniff
X-Frame-Options: DENY

{
    "token": "7a2e1d3d008253c123c61d56741003db5a194256"
}
Authenticating with the user token
The authentication class openwisp_users.api.authentication.BearerAuthentication is used across the different OpenWISP modules for authentication.
To use it, first of all get the user token as described above in Obtain Authentication Token, then send the token in the Authorization header:
# get token
TOKEN=$(http POST :8000/api/v1/users/token/ username=openwisp password=1234 | jq -r .token)

# send bearer token
http GET localhost:8000/api/v1/firmware/build/ "Authorization: Bearer $TOKEN"
List of endpoints
Since the detailed explanation is contained in the Live documentation and in the Browsable web page of each point, here we’ll provide just a list of the available endpoints, for further information please open the URL of the endpoint in your browser.
Change User password
PUT /api/v1/users/user/{id}/password/List Groups
GET /api/v1/users/group/Create new Group
POST /api/v1/users/group/Get Group detail
GET /api/v1/users/group/{id}/Change Group detail
PUT /api/v1/users/group/{id}/Patch Group detail
PATCH /api/v1/users/group/{id}/Delete Group
DELETE /api/v1/users/group/{id}/List Email Addresses
GET /api/v1/users/user/{id}/email/Add Email Address
POST/api/v1/users/user/{id}/email/Get Email Address
GET /api/v1/users/user/{id}/email/{id}/Change Email Address
PUT /api/v1/users/user/{id}/email/{id}/Patch Email Address
PATCH /api/v1/users/user/{id}/email/{id}/Make/Unmake Email Address Primary
PATCH /api/v1/users/user/{id}/email/{id}/Mark/Unmark Email Address as Verified
PATCH /api/v1/users/user/{id}/email/{id}/Remove Email Address
DELETE /api/v1/users/user/{id}/email/{id}/List Organizations
GET /api/v1/users/organization/Create new Organization
POST /api/v1/users/organization/Get Organization detail
GET /api/v1/users/organization/{id}/Change Organization detail
PUT /api/v1/users/organization/{id}/Patch Organization detail
PATCH /api/v1/users/organization/{id}/Delete Organization
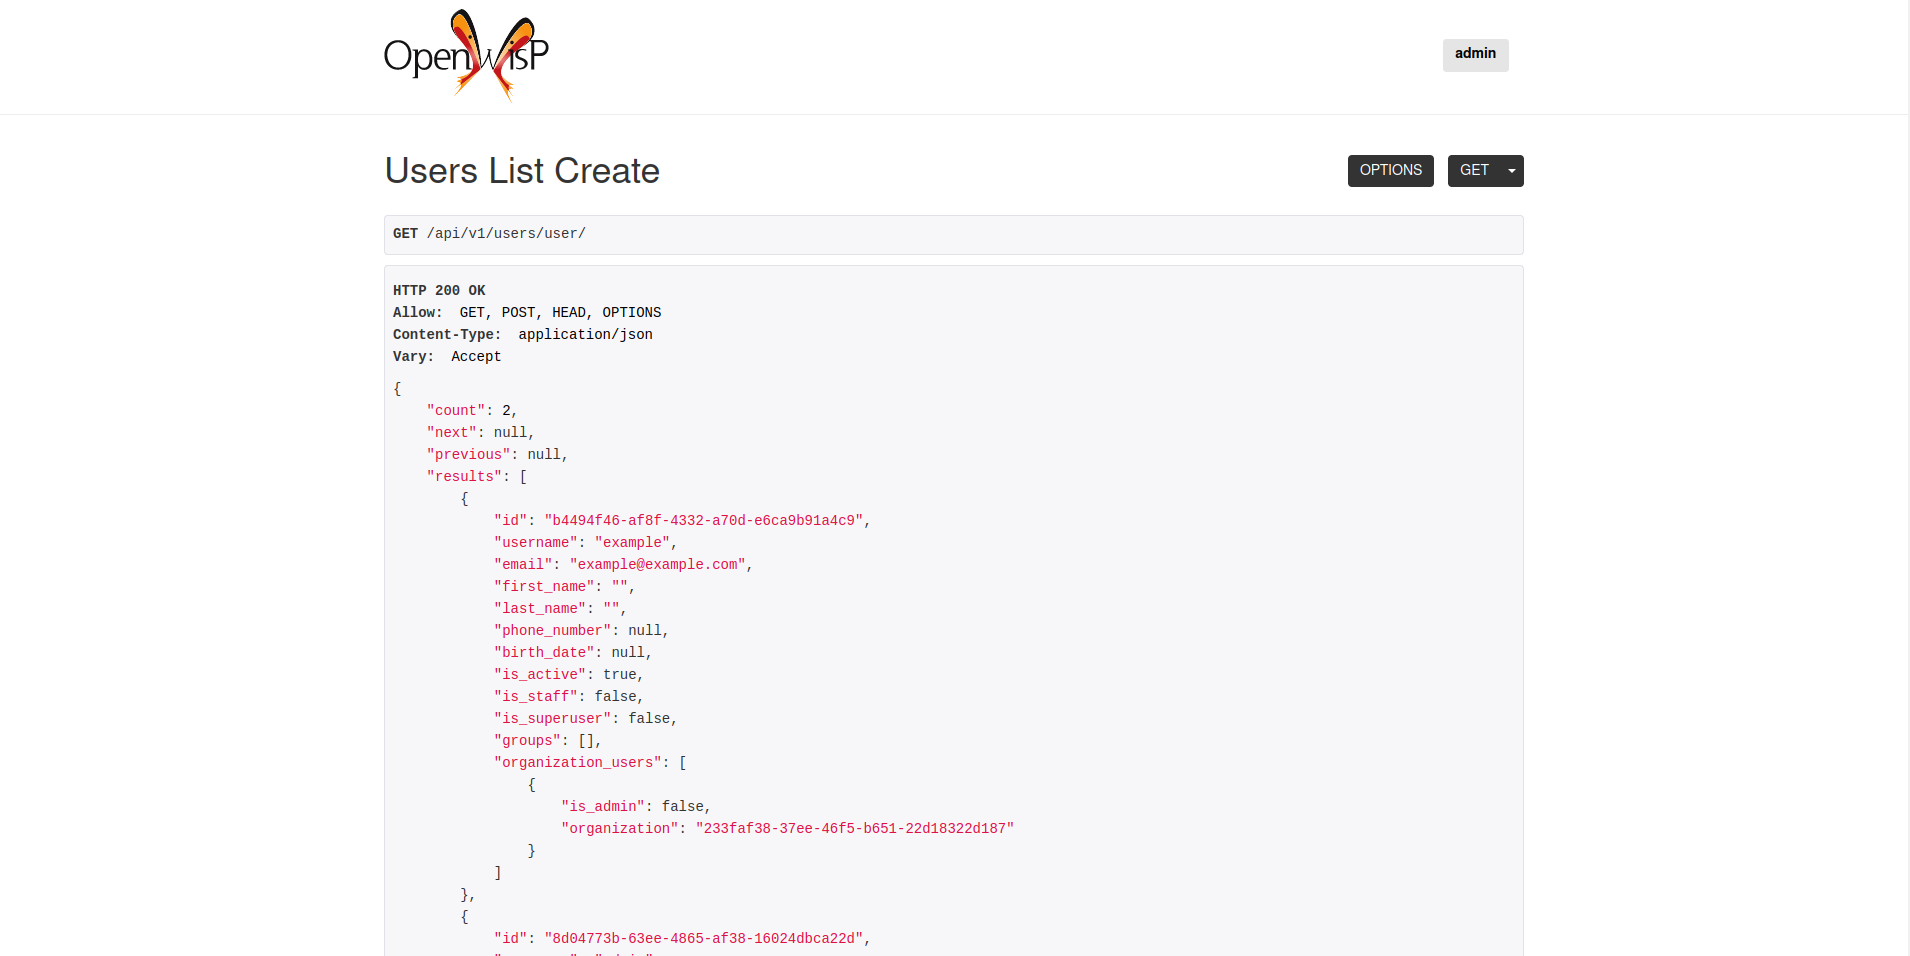
DELETE /api/v1/users/organization/{id}/List Users
GET /api/v1/users/user/Create User
POST /api/v1/users/user/Get User detail
GET /api/v1/users/user/{id}/Change User detail
PUT /api/v1/users/user/{id}/Patch User detail
PATCH /api/v1/users/user/{id}/Delete User
DELETE /api/v1/users/user/{id}/Organization permissions
Here’s a summary of the default permissions:
All users who belong to the Administrators group and are organization managers (OrganizationUser.is_admin=True), have the permission to edit the organizations details which they administrate.
Only super users have the permission to add and delete organizations.
Only super users and organization owners have the permission to change the OrganizationOwner inline or delete the relation.
Organization Owners
An organization owner is a user who is designated as the owner of a particular organization and this owner can not be deleted or edited by other administrators, only superusers have the permission to do this.
By default, the first manager of an organization is designated as the owner of that organization.
If the OrganizationUser instance related to the owner of an organization is deleted or flagged as is_admin=False, the admin interface will return an error informing users that the operation is not allowed, the owner should be changed before attempting to do that.
Organization membership helpers
The User model provides methods to check whether the user is a member, manager or owner of an organization in an efficient way.
These methods are needed because an user may be administrator in one organization, but simple end-user is another organization, so we need to easily distinguish between the different use cases and at the same time avoid to generate too many database queries.
import swapper

User = swapper.load_model('openwisp_users', 'User')
Organization = swapper.load_model('openwisp_users', 'Organization')

user = User.objects.first()
org = Organization.objects.first()
user.is_member(org)
user.is_manager(org)
user.is_owner(org)

# also valid (avoids query to retrieve Organization instance)
device = Device.objects.first()
user.is_member(device.organization_id)
user.is_manager(device.organization_id)
user.is_owner(device.organization_id)
is_member(org)
Returns True if the user is member of the Organization instance passed. Alternatively, UUID or str can be passed instead of an organization instance, which will be interpreted as the organization primary key; this second option is recommended when building the organization instance requires an extra query.
This check shall be used when access needs to be granted to end-users who need to consume a service offered by an organization they’re member of (eg: authenticate to a public wifi service).
is_manager(org)
Returns True if the user is member of the Organization instance and has the OrganizationUser.is_admin field set to True. Alternatively, UUID or str can be passed instead of an organization instance, which will be interpreted as the organization primary key; this second option is recommended when building the organization instance requires an extra query.
This check shall be used when access needs to be granted to the managers of an organization users who need to perform administrative tasks (eg: download the firmware image of their organization).
is_owner(org)
Returns True if the user is member of the Organization instance and is owner of the organization (checks the presence of an OrganizationOwner instance for the user). Alternatively, UUID or str can be passed instead of an organization instance, which will be interpreted as the organization primary key; this second option is recommended when building the organization instance requires an extra query.
There can be only one owner for each organization.
This check shall be used to avoid that managers would be able to take control of an organization and exclude the original owner without their consent.
organizations_dict
The methods described above use the organizations_dict property method under the hood, which builds a dictionary in which each key contains the primary key of the organization the user is member of, and each key contains another dictionary which allows to easily determine if the user is manager (is_admin) and owner (is_owner).
This data structure is cached automatically and accessing it multiple times over the span of multiple requests will not generate multiple database queries.
The cache invalidation also happens automatically whenever an OrganizationUser or an OrganizationOwner instance is added, changed or deleted.
Usage exmaple:
>>> user.organizations_dict
... {'20135c30-d486-4d68-993f-322b8acb51c4': {'is_admin': True, 'is_owner': False}}
>>> user.organizations_dict.keys()
... dict_keys(['20135c30-d486-4d68-993f-322b8acb51c4'])
organizations_managed
This attribute returns a list containing the primary keys of the organizations which the user can manage.
Usage example:
>>> user.organizations_managed
... ['20135c30-d486-4d68-993f-322b8acb51c4']
organizations_owned
This attribute returns a list containing the primary keys of the organizations which the user owns.
Usage example:
>>> user.organizations_owned
... ['20135c30-d486-4d68-993f-322b8acb51c4']
Authentication Backend
The authentication backend in openwisp_users.backends.UsersAuthenticationBackend allows users to authenticate using their email or phone_number instead of their username. Authenticating with the username is still allowed, but email has precedence.
If the username string passed is parsed as a valid phone number, then phone_number has precedence.
Phone numbers are parsed using the phonenumbers library, which means that even if the user adds characters like spaces, dots or dashes, the number will be recognized anyway.
When parsing phone numbers, the OPENWISP_USERS_AUTH_BACKEND_AUTO_PREFIXES setting allows to specify a list of international prefixes that can be prepended to the username string automatically in order to allow users to log in without having to type the international prefix.
The authentication backend can also be used as follows:
from openwisp_users.backends import UsersAuthenticationBackend

backend = UsersAuthenticationBackend()
backend.authenticate(request, identifier, password)
Django REST Framework Authentication Classes
1. openwisp_users.api.authentication.BearerAuthentication
Based on the rest_framework.authentication.TokenAuthentication, BearerAuthentication is the primary authentication class for REST APIs implemented across all modules of OpenWISP.
Kindly refer to authenticating with the user token section for usage information.
2. openwisp_users.api.authentication.SesameAuthentication
It provides authentication to a REST view using tokens generated by django-sesame. It is primarily used for providing password-less authentication e.g. in magic login links.
Configuration of django-sesame is required for the functioning of this authentication class. Please refer to django-sesame documentation for more information.
Django REST Framework Permission Classes
The custom Django REST Framework permission classes IsOrganizationMember, IsOrganizationManager and IsOrganizationOwner can be used in the API to ensure that the request user is in the same organization as requested object and is organization member, manager or owner respectively. Usage example:
from openwisp_users.api.permissions import IsOrganizationManager
from rest_framework import generics

class MyApiView(generics.APIView):
    permission_classes = (IsOrganizationManager,)
organization_field
type: |
string |
default: |
organization |
organization_field can be used to define where to look to find the organization of the current object. In most cases this won’t need to be changed, but it does need to be changed when the organization is defined only on a parent object.
For example, in openwisp-firmware-upgrader, organization is defined on Category and Build has a relation to category, so the organization of Build instances is inferred from the organization of the Category.
Therefore, to implement the permission class correctly, we would have to do:
from openwisp_users.api.permissions import IsOrganizationManager
from rest_framework import generics

class MyApiView(generics.APIView):
    permission_classes = (IsOrganizationManager,)
    organization_field = 'category__organization'
This will translate into accessing obj.category.organization. Ensure the queryset of your views make use of select_related in these cases to avoid generating too many queries.
DjangoModelPermissions
The default DjangoModelPermissions class doesn’t checks for the view permission of any object for GET requests. The extended DjangoModelPermissions class overcomes this problem. In order to allow GET requests on any object it checks for the availability of either view or change permissions.
Usage example:
from openwisp_users.api.permissions import DjangoModelPermissions
from rest_framework.generics import ListCreateAPIView

class TemplateListCreateView(ListCreateAPIView):
    serializer_class = TemplateSerializer
    permission_classes = (DjangoModelPermissions,)
    queryset = Template.objects.all()
Note: DjangoModelPermissions allows users who are either organization managers or owners to view shared objects in read only mode.
Standard users will not be able to view or list shared objects.
Django REST Framework Mixins
Filtering items by organization
The custom Django REST Framework mixins FilterByOrganizationMembership, FilterByOrganizationManaged and FilterByOrganizationOwned can be used in the API views to ensure that the current user is able to see only the data related to their organization when accessing the API view.
They work by filtering the queryset so that only items related to organizations the user is member, manager or owner of, respectively.
These mixins ship the Django REST Framework’s IsAuthenticated permission class by default because the organization filtering works only on authenticated users. Always remember to include this class when overriding permission_classes in a view.
Usage example:
from openwisp_users.api.mixins import FilterByOrganizationManaged
from rest_framework import generics

class UsersListView(FilterByOrganizationManaged, generics.ListAPIView):
    """
    UsersListView will show only users from organizations managed
    by current user in the list.
    """
    pass

class ExampleListView(FilterByOrganizationManaged, generics.ListAPIView):
    """
    Example showing how to extend ``permission_classes``.
    """
    permission_classes = FilterByOrganizationManaged.permission_classes + [
        # additional permission classes here
    ]
Checking parent objects
Sometimes, the API view needs to check the existence and the organization field of a parent object.
In such cases, FilterByParentMembership, FilterByParentManaged and FilterByParentOwned can be used.
For example, given a hypotetical URL /api/v1/device/{device_id}/config/, the view must check that {device_id} exists and that the user has access to it, here’s how to do it:
import swapper
from rest_framework import generics
from openwisp_users.api.mixins import FilterByParentManaged

Device = swapper.load_model('config', 'Device')
Config = swapper.load_model('config', 'Config')

# URL is:
# /api/v1/device/{device_id}/config/

class ConfigListView(FilterByParentManaged, generics.DetailAPIView):
    model = Config

    def get_parent_queryset(self):
        qs = Device.objects.filter(pk=self.kwargs['device_id'])
        return qs
Multi-tenant serializers for the browsable web UI
Django REST Framework provides a browsable API which can be used to create HTTP requests right from the browser.
The relationship fields in this interface show all the relationships, without filtering by the organization the user has access to, which breaks multi-tenancy.
The FilterSerializerByOrgMembership, FilterSerializerByOrgManaged and FilterSerializerByOrgOwned can be used to solve this issue.
These serializers do not allow non-superusers to create shared objects.
Usage example:
from openwisp_users.api.mixins import FilterSerializerByOrgOwned
from rest_framework.serializers import ModelSerializer
from .models import Device

class DeviceSerializer(FilterSerializerByOrgOwned, ModelSerializer):
    class Meta:
        model = Device
        fields = '__all__'
The include_shared boolean attribute can be used to include shared objects in the accepted values of the multi-tenant serializers.
Shared objects have the organization field set to None and can be used by any organization. A common use case is shared templates in OpenWISP Controller.
Usage example:
from openwisp_users.api.mixins import FilterSerializerByOrgOwned
from rest_framework.serializers import ModelSerializer
from .models import Book

class BookSerializer(FilterSerializerByOrgOwned, ModelSerializer):
    include_shared = True

    class Meta:
        model = Book
        fields = '__all__'
To filter items based on the organization of their parent object, organization_field attribute can be defined in the view function which is inheriting any of the mixin classes.
Usage example: organization_field.
Admin Multitenancy mixins
MultitenantAdminMixin: adding this mixin to a ModelAdmin class will make it multitenant-capable (users will only be able to see items of the organizations they manage or own).
This class has two important attributes that can be set:
multitenant_shared_relations: if the model has relations (eg: ForeignKey, OneToOne) to other models which are also multitenant (that is, they have an organization field), you want the admin to only show the relations the user can manage, the way to do that is to list those model attributes here as a list of strings. See how it is used in OpenWISP Controller for a real world example.
multitenant_parent: if the admin model does not have an organization field, but instead relies on a parent model which has the field, then you can specify here the field which points to the parent. See how it is used in OpenWISP Firmware Upgrader for a real world example.
MultitenantOrgFilter: admin filter that shows only organizations the current user can manage in its available choices.
MultitenantRelatedOrgFilter: similar MultitenantOrgFilter but shows only objects which have a relation with one of the organizations the current user can manage, this shall be used when the model does not have its own organization field but relies on a parent model which has the organization field.
Extend openwisp-users
One of the core values of the OpenWISP project is Software Reusability, for this reason openwisp-users provides a set of base classes which can be imported, extended and reused to create derivative apps.
This will be extreme beneficial for you if you want to create additional fields for User model, example asking for Social Security Number of the User for registeration.
In order to implement your custom version of openwisp-users, you need to perform the steps described in this section.
When in doubt, the code in the test project and the sample app will serve you as source of truth: just replicate and adapt that code to get a basic derivative of openwisp-users working.
Premise: if you plan on using a customized version of this module, we suggest to start with it since the beginning, because migrating your data from the default module to your extended version may be time consuming.
1. Initialize your custom module
The first thing you need to do is to create a new django app which will contain your custom version of openwisp-users.
A django app is nothing more than a python package (a directory of python scripts), in the following examples we’ll call this django app myusers, but you can name it how you want:
django-admin startapp myusers
Keep in mind that the command mentioned above must be called from a directory which is available in your PYTHON_PATH so that you can then import the result into your project.
Now you need to add myusers to INSTALLED_APPS in your settings.py, ensuring also that openwisp_users has been removed:
INSTALLED_APPS = [
    # ... other apps ...

    # 'openwisp_users'  <-- comment out or delete this line
    'myusers'
]
For more information about how to work with django projects and django apps, please refer to the django documentation.
2. Install openwisp-users
Install (and add to the requirement of your project) openwisp-users:
pip install openwisp-users
3. Add EXTENDED_APPS
Add the following to your settings.py:
EXTENDED_APPS = ('openwisp_users',)4. Add openwisp_utils.staticfiles.DependencyFinder
Add openwisp_utils.staticfiles.DependencyFinder to STATICFILES_FINDERS in your settings.py:
STATICFILES_FINDERS = [
    'django.contrib.staticfiles.finders.FileSystemFinder',
    'django.contrib.staticfiles.finders.AppDirectoriesFinder',
    'openwisp_utils.staticfiles.DependencyFinder',
]
5. Add openwisp_utils.loaders.DependencyLoader
Add openwisp_utils.loaders.DependencyLoader to TEMPLATES before django.template.loaders.app_directories.Loader in your settings.py:
TEMPLATES = [
    {
        'BACKEND': 'django.template.backends.django.DjangoTemplates',
        'OPTIONS': {
            'loaders': [
                'django.template.loaders.filesystem.Loader',
                'openwisp_utils.loaders.DependencyLoader',
                'django.template.loaders.app_directories.Loader',
            ],
            'context_processors': [
                'django.template.context_processors.debug',
                'django.template.context_processors.request',
                'django.contrib.auth.context_processors.auth',
                'django.contrib.messages.context_processors.messages',
            ],
        },
    }
]
6. Inherit the AppConfig class
Please refer to the following files in the sample app of the test project:
You have to replicate and adapt that code in your project.
For more information regarding the concept of AppConfig please refer to the “Applications” section in the django documentation.
7. Create your custom models
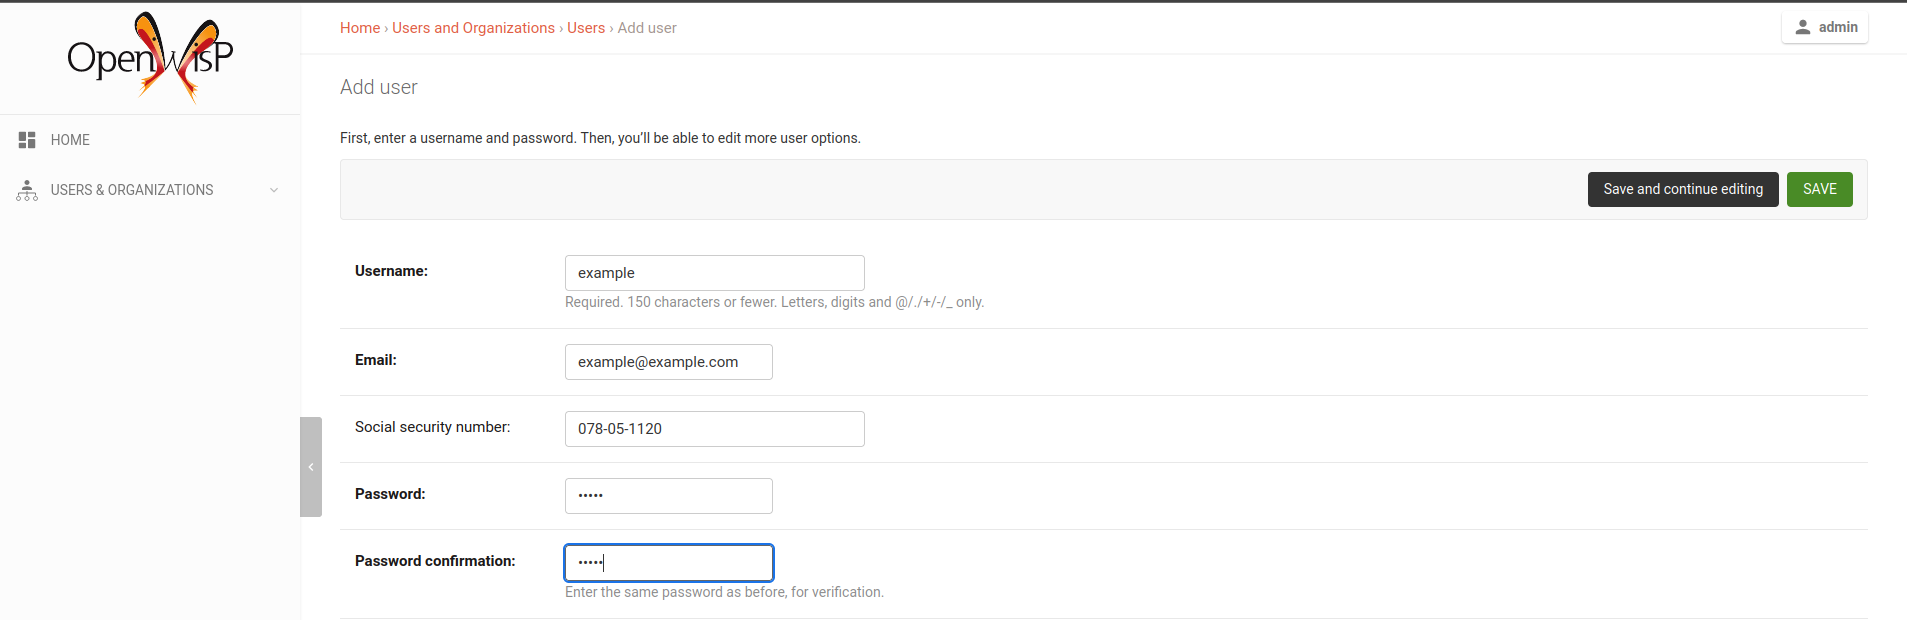
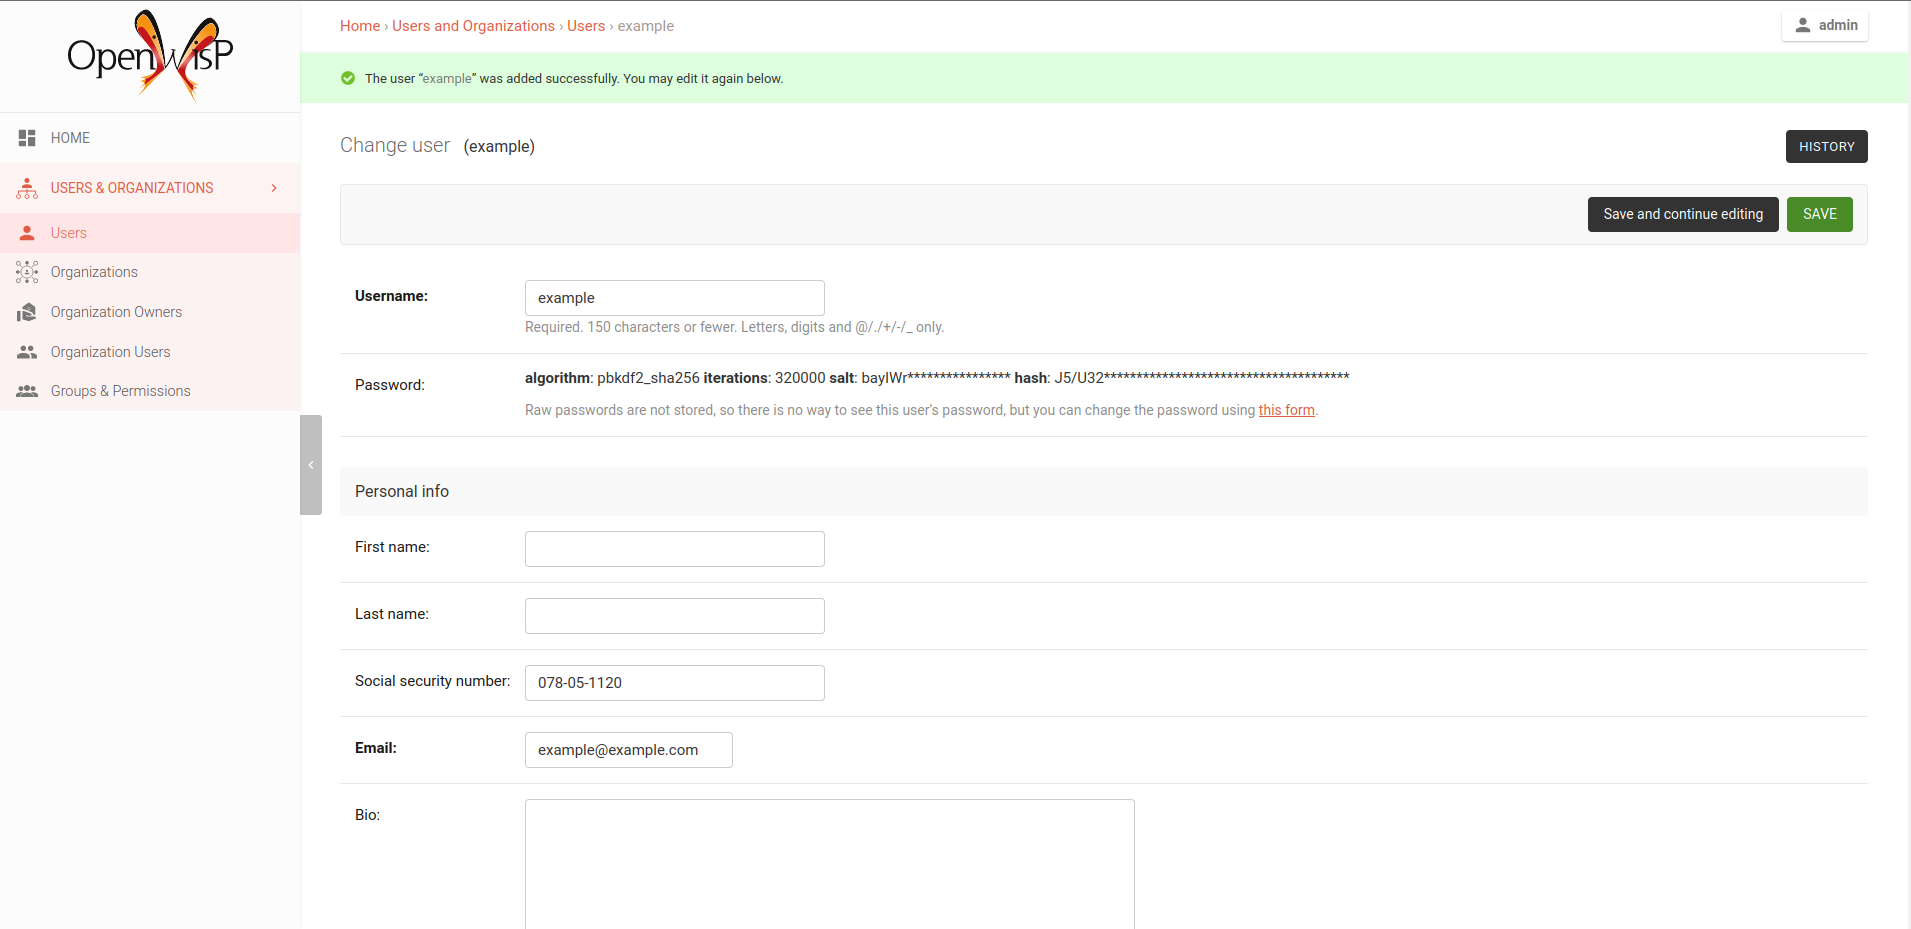
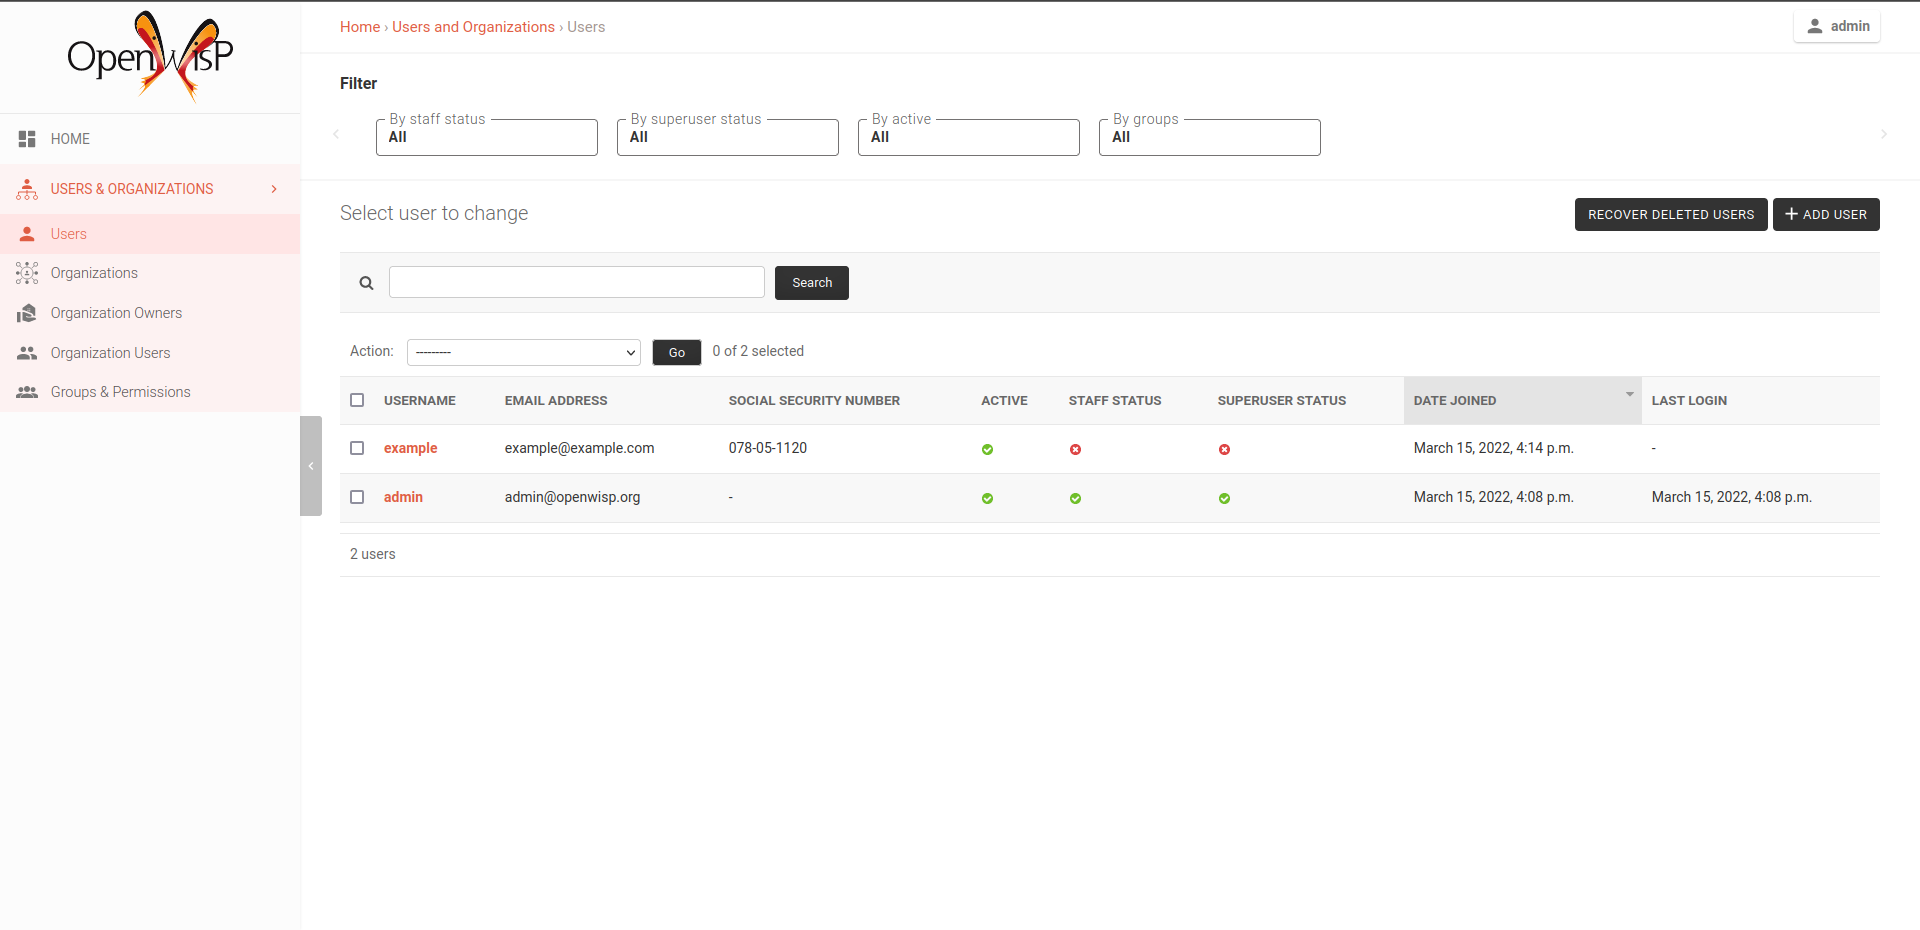
For the purpose of showing an example, we added a simple social_security_number field in User model to the models of the sample app in the test project.
You can add fields in a similar way in your models.py file.
For doubts regarding how to use, extend or develop models please refer to the “Models” section in the django documentation.
8. Add swapper configurations
Once you have created the models, add the following to your settings.py:
# Setting models for swapper module
AUTH_USER_MODEL = 'myusers.User'
OPENWISP_USERS_GROUP_MODEL = 'myusers.Group'
OPENWISP_USERS_ORGANIZATION_MODEL = 'myusers.Organization'
OPENWISP_USERS_ORGANIZATIONUSER_MODEL = 'myusers.OrganizationUser'
OPENWISP_USERS_ORGANIZATIONOWNER_MODEL = 'myusers.OrganizationOwner'
# The following model is not used in OpenWISP yet
# but users are free to implement it in their projects if needed
# for more information refer to the django-organizations docs:
# https://django-organizations.readthedocs.io/
OPENWISP_USERS_ORGANIZATIONINVITATION_MODEL = 'myusers.OrganizationInvitation'
Substitute myusers with the name you chose in step 1.
9. Create database migrations
Create database migrations:
./manage.py makemigrations
Now, manually create a file 0004_default_groups.py in the migrations directory just created by the makemigrations command and copy contents of the sample_users/migrations/0004_default_groups.py.
Then, run the migrations:
./manage.py migrate
Note: the 0004_default_groups is required because other OpenWISP modules depend on it. If it’s not created as documented here, the migrations of other OpenWISP modules will fail.
10. Create the admin
Refer to the admin.py file of the sample app.
To introduce changes to the admin, you can do it in two main ways which are described below.
For more information regarding how the django admin works, or how it can be customized, please refer to “The django admin site” section in the django documentation.
1. Monkey patching
If the changes you need to add are relatively small, you can resort to monkey patching.
For example:
from openwisp_users.admin import (
    UserAdmin,
    GroupAdmin,
    OrganizationAdmin,
    OrganizationOwnerAdmin,
    BaseOrganizationUserAdmin,
)

# OrganizationAdmin.field += ['example_field'] <-- Monkey patching changes example
For your convenience of adding fields in User forms, we provide the following functions:
usermodel_add_form
When monkey patching the UserAdmin class to add add fields in the “Add user” form, you can use this function. In the example, Social Security Number is added in the add form:
usermodel_change_form
When monkey patching the UserAdmin class to add fields in the “Change user” form to change / modify user form’s profile section, you can use this function. In the example, Social Security Number is added in the change form:
usermodel_list_and_search
When monkey patching the UserAdmin class you can use this function to make field searchable and add it to the user display list view. In the example, Social Security Number is added in the changelist view:
2. Inheriting admin classes
If you need to introduce significant changes and/or you don’t want to resort to monkey patching, you can proceed as follows:
from django.contrib import admin
from openwisp_users.admin import (
    UserAdmin as BaseUserAdmin,
    GroupAdmin as BaseGroupAdmin,
    OrganizationAdmin as BaseOrganizationAdmin,
    OrganizationOwnerAdmin as BaseOrganizationOwnerAdmin,
    OrganizationUserAdmin as BaseOrganizationUserAdmin,
)
from swapper import load_model
from django.contrib.auth import get_user_model

Group = load_model('openwisp_users', 'Group')
Organization = load_model('openwisp_users', 'Organization')
OrganizationOwner = load_model('openwisp_users', 'OrganizationOwner')
OrganizationUser = load_model('openwisp_users', 'OrganizationUser')
User = get_user_model()

admin.site.unregister(Group)
admin.site.unregister(Organization)
admin.site.unregister(OrganizationOwner)
admin.site.unregister(OrganizationUser)
admin.site.unregister(User)


@admin.register(Group)
class GroupAdmin(BaseGroupAdmin):
    pass


@admin.register(Organization)
class OrganizationAdmin(BaseOrganizationAdmin):
    pass


@admin.register(OrganizationOwner)
class OrganizationOwnerAdmin(BaseOrganizationOwnerAdmin):
    pass


@admin.register(OrganizationUser)
class OrganizationUserAdmin(BaseOrganizationUserAdmin):
    pass


@admin.register(User)
class UserAdmin(BaseUserAdmin):
    pass
11. Create root URL configuration
Please refer to the urls.py file in the sample project.
For more information about URL configuration in django, please refer to the “URL dispatcher” section in the django documentation.
12. Import the automated tests
When developing a custom application based on this module, it’s a good idea to import and run the base tests too, so that you can be sure the changes you’re introducing are not breaking some of the existing features of openwisp-users.
In case you need to add breaking changes, you can overwrite the tests defined in the base classes to test your own behavior.
See the tests of the sample app to find out how to do this.
You can then run tests with:
# the --parallel flag is optional
./manage.py test --parallel myusers
Substitute myusers with the name you chose in step 1.
Other base classes that can be inherited and extended
The following steps are not required and are intended for more advanced customization.
1. Extending the API Views
The API view classes can be extended into other django applications as well. Note that it is not required for extending openwisp-users to your app and this change is required only if you plan to make changes to the API views.
Create a view file as done in API views.py.
Remember to use these views in root URL configurations in point 11.
For more information about django views, please refer to the views section in the django documentation.
Contributing
Please refer to the OpenWISP contributing guidelines.
Support
Changelog
See CHANGES.
License
See LICENSE.
Release history Release notifications | RSS feed


Download files
Download the file for your platform. If you're not sure which to choose, learn more about installing packages.
Source Distribution
Built Distribution
Hashes for openwisp_users-1.0.2-py2.py3-none-any.whl
| Algorithm | Hash digest | |
|---|---|---|
| SHA256 | cc5e45258a310dea6639a581a44a6cb1af0751590b47a25a3f9e1340e6e3632f |
|
| MD5 | 74b93dd30f9ba330548042905bd6d41e |
|
| BLAKE2b-256 | cfee58726f16a7b8df57b409671af128328703e0eaacff489fba317276f84a1b |


